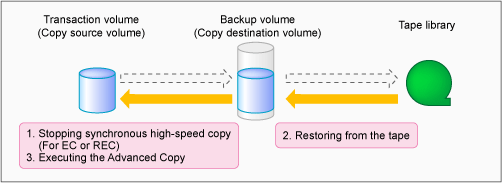
For OPC, QuickOPC, EC or REC, follow the procedure below to restore transaction volume data from tape. This method is called "Restoring using backup volume".
Refer to "3.4.4.1 Restoring Using Backup Volume" for details.
Figure 3.16 Restoring from Tape (Restore Using Backup Volume)

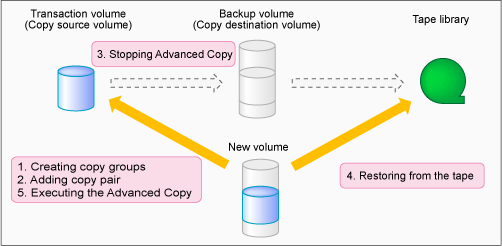
For SnapOPC+, follow the procedure below to restore transaction volume data from tape. This method is called "Restoring using a new volume".
In addition, if you do not use a backup volume that was used for backup regardless of copy type, follow the procedure below.
Refer to "3.4.4.2 Restoring Using New Volume" for details.
Figure 3.17 Restoring from Tape (Restore Using New Volume)

The procedure to restore using a backup volume is as follows.
Note
This procedure uses a backup volume for restoring from a tape. For this reason, the backup volume contents are overwritten by the tape contents.
If you want to keep the backup volume data, perform restore the data using "3.4.4.2 Restoring Using New Volume".
Stopping synchronous high-speed copy (EC or REC only)
Execute the acec cancel command with the -p and -force options to stop synchronous high-speed copy.
[Execution example]
> acec cancel -g group01 -p "ET001/0x1[addr=0x0,size=0x5000]:ET001/0x3[addr=0x10000]" -force

ET001/0x1[addr=0x0,size=0x5000]:ET001/0x3[addr=0x10000]
# DATE : 2008/06/24 16:28:00 - << EC Disconnected >>

  Succeeded : 1
  Failed    : 0
Restoring from tape
Restore the data that was backed up to tape to the backup volume partition.
Refer to the manuals of the backup software and tape device that you are using for details on how to back up to tape.
Executing Advanced Copy
Restore the contents of the backup volume partition to the transaction volume.
Refer to the copy types in "3.2 Executing Advanced Copy" for the execution procedure.
The procedure to restore data using a new volume is as follows.
Creating a copy group
To perform Advanced Copy from a new volume partition to the transaction volume, create a new copy group. Specify OPC as the copy type by executing the acgroup create command.
[Execution example]
> acgroup create -g group02 -type OPC -a ET001
Successful completion.
Adding copy pairs
Add a copy pair by specifying a new volume partition as the copy source and the transaction volume as the copy destination.
Refer to "Adding Copy Pair" in "3.4.3 Partition to LU" for the procedure to add a copy pair.
[Execution example]
> acpair add -g group02 -p "ET001/0x4[addr=0x10000,size=0x5000]:ET001/0x1[addr=0x0]"
Successful completion.
Information
By specifying LU to Partition (business volume for the copy source and new volume partition for the copy destination), adding a copy pair may be possible. If you add a copy pair with LU to Partition, you must add the -r option (the reversed Advanced Copy specification) when executing the acopc start command in step 5.
Stopping Advanced Copy
To reinstate data to the transaction volume, stop Advanced Copy from the transaction volume to the backup volume.
For OPC or QuickOPC
Execute the acopc query command to check the copy status.
If the session and the Tracking (only for QuickOPC) have not been stopped, execute the acopc cancel command with the -p option to stop physical copying and to stop Tracking (only for QuickOPC).
[Execution example]
> acopc query -g group01

Copy Group Name : group01
Copy Group Type : OPC
Disk Array Name : ET001 (00ETERNUSDXM##ET44S20A####HK000104######)

Source                          <=> Target                  SID  OPC Status      Copy Phase Copied Block
------------------------------- --- ----------------------- ---- --------------- ---------- ------------
ET001/0x1[addr=0x0,size=0x5000] ==> ET001/0x3[addr=0x10000] 0x21 "OPC Executing" "Copying"             0

> acopc cancel -g group01 -p "ET001/0x1[addr=0x0,size=0x5000]:ET001/0x3[addr=0x10000]"

ET001/0x1:ET001/0x3
# DATE : 2008/06/24 16:28:00 - << OPC Disconnected >>

  Succeeded : 1
  Failed    : 0
Note
If an operation is performing reverse copy, also check the reverse Advanced Copy status.
For SnapOPC+
Execute the acsnap query command to check the copy status.
If the session has not been stopped, execute the acsnap cancel command with the -force option to stop synchronous high-speed copying.
[Execution example]
> acsnap query -g group01

Copy Group Name : group01
Copy Group Type : SnapOPCP
Disk Array Name : ET001 (00ETERNUSDXM##ET44S20A####HK000104######)

Source                        <=> Target                            SID  Snap Status               Gen Date     Copied Block
----------------------------- --- --------------------------------- ---- ------------------------- --- -------- ------------
ET001/0x31[addr=0x0,size=0x0] ==> ET001/0x34[addr=0x0,size=0x01000] 0x23 "Copy On Write(Active)"    3  10minute      1048576
ET001/0x31[addr=0x0,size=0x0] ==> ET001/0x33[addr=0x0,size=0x01000] 0x22 "Copy On Write(Inactive)"  2  3hour         1048576
ET001/0x31[addr=0x0,size=0x0] ==> ET001/0x32[addr=0x0,size=0x01000] 0x21 "Copy On Write(Inactive)"  1  1day          1048576

> acsnap cancel -g group01 -force

ET001/0x31[addr=0x0,size=0x0]:ET001/0x32[addr=0x0,size=0x01000]
# DATE : 2008/06/24 16:28:00 - << SnapOPCP Disconnected >>

ET001/0x31[addr=0x0,size=0x0]:ET001/0x33[addr=0x0,size=0x01000]
# DATE : 2008/06/24 16:28:00 - << SnapOPCP Disconnected >>

ET001/0x31[addr=0x0,size=0x0]:ET001/0x34[addr=0x0,size=0x01000]
# DATE : 2008/06/24 16:28:00 - << SnapOPCP Disconnected >>

  Succeeded : 3
  Failed    : 0
Note
If an operation is performing reverse copy, also check the reverse Advanced Copy status.
Stop the SnapOPC+ sessions of all snap generations for the transaction volume.
If multiple copy groups are defined for the transaction volume, the SnapOPC+ sessions of all the snap generations within all the copy groups must be stopped.
The SnapOPC+ sessions of all the snap generations for the transaction volume can be stopped by executing the acsnap cancel command with the -g option (specify the copy group that has the latest snap generation for the transaction volume) and the -force option.
For EC or REC
Execute the acec cancel command with the -p and -force options to stop synchronous high-speed copy.
[Execution example]
> acec cancel -g group01 -p "ET001/0x1[addr=0x0,size=0x5000]:ET001/0x3[addr=0x10000]" -force

ET001/0x1[addr=0x0,size=0x5000]:ET001/0x3[addr=0x10000]
# DATE : 2008/06/24 16:28:00 - << EC Disconnected >>

  Succeeded : 1
  Failed    : 0
Restoring from tape
Restore the data that was backed up to tape to the new volume partition.
Refer to the manuals of the backup software and tape device that you are using for details on how to back up to tape.
Executing Advanced Copy
Restore the contents of the new volume partition to the transaction volume.
Refer to "3.2.1.2 Restore on OPC Backup Environment" for the execution procedure.
[Execution example]
> acopc start -g group02 -p "ET001/0x4[addr=0x10000,size=0x5000]:ET001/0x1[addr=0x0]"

ET001/0x4[addr=0x10000,size=0x5000]:ET001/0x1[addr=0x0]
# DATE : 2008/06/25 12:00:00 - << OPC Started >>
# From:BoxID=303045343030304d3323232323234534353053323041232323234b44343033303633393030342323/Olu=4/Adr_high=0/Adr_low=0/size_high=0/size_low=0
# To  :BoxID=303045343030304d3323232323234534353053323041232323234b44343033303633393030342323/Olu=1/Adr_high=0/Adr_low=0

  Succeeded : 1
  Failed    : 0
Note
Copy from the transaction volume to the backup volume is not guaranteed until the physical copy from the partition of new volume to the transaction volume is completed (until the OPC session disconnects). Do not begin copying from the transaction volume to the backup volume until the physical copy is completed.