Point
It is recommended that you back up the following resources before starting the upgrade.
By preparing a backup, in cases when an error occurs during the upgrade, it is possible to return the system to its state prior to the upgrade, simply by recovering (restoring) the system from the backup.
System (the primary node and the secondary node)
Shared disk for shared data of Managed Server transactions
Log on to the server using Administrator privileges.
Check that Managed Server transactions are stopped on the secondary node.
If not stopped, use the Failover Cluster Manager to stop Managed Server transactions on the secondary node.
If multiple Managed Server transactions exist, perform this procedure on each secondary node for Managed Server transactions.
Stop the Managed Server transaction on the primary node.
Use the Failover Cluster Manager to stop the Managed Server transactions.
However, the shared disk for shared data of Managed Server transactions must be online.
If multiple Managed Server transactions exist, perform this procedure on each primary node for Managed Server transaction.
In all of the nodes in which the Storage Cruiser's agent has been installed, stop the service of the Storage Cruiser's agent.
Refer to "Starting and Stopping Agent" in the Storage Cruiser Operation Guide for information on how to stop the service.
Stop the local transactions on all the nodes, perform the following procedure.
With the Windows services screen, stop the AdvancedCopy Manager COM Service.
Perform a backup of the previous version with all of the nodes.
For recovery in case the upgrade fails, perform a backup of the operating environment of the previous version of the AdvancedCopy Manager's agent.
On the primary node and the secondary node, perform a backup of the previous version.
In cases when there are multiple Managed Server transactions, in each primary node of the Managed Server transactions, switch the shared disk for the shared data of the Managed Server transactions online.
Information
The capacity required for performing the backup is the total value of the following:
Environment Directory and Work Directory of "For Windows environments" under "Required disk space for installation" in the Installation and Setup Guide
"For Windows environments" under "Required disk space for operation" in the Installation and Setup Guide
In the case of a primary node operating a Managed Server transaction, add the following to the capacity required to perform the backup:
"Capacity of Shared Disk" in the Cluster Environment Setup Guide
The procedure is shown below:
Insert the DVD "ETERNUS SF SC/ACM/Express Mediapack (V16.9 or higher) Agent Program and Manual" of this version into the DVD drive.
Furthermore, if the Installer screen is displayed by autorun, exit the installer.
Select Control Panel > Programs and Functions and confirm the architecture of the AdvancedCopy Manager's agent that has been installed.
When using the "AdvancedCopy Manager (x86) - Agent"
The 32 bit version AdvancedCopy Manager's agent has been installed.
When using the "AdvancedCopy Manager (x64) - Agent"
The 64 bit version AdvancedCopy Manager's agent has been installed.
Start the command prompt with "Run as administrator".
Execute the following batch file to perform a backup of the previous version.
For backupDir, specify the directory in which to store the backup data with an absolute path.
When using the 32 bit version Agent
dvdDrive:\Agent_windows\AdvancedCopy_Manager\agent\windows_x86\esfacmapreinst.bat backupDir
When using the 64 bit version Agent
dvdDrive:\Agent_windows\AdvancedCopy_Manager\agent\windows_x64\esfacmapreinst.bat backupDir
When the backup fails, after confirming the output error message and removing the cause of the failure, re-execute the batch file.
Point
The characters " | : * ? / . < > % & ^ ; ! are not supported for directory names.
If the directory name contains any spaces, they should be surrounded by double quote characters.
Eject the DVD media.
Note that if step 1 and step 2 have already been performed, perform from step 3.
If multiple Managed Server transactions exist, use this procedure on each primary node for Managed Server transactions.
Note
Although the initial screen of the installer is displayed during these steps, this is not used in the Upgrade Installation. Be sure to click Exit and end the screen.
Log on to the server using Administrator privileges.
Insert the DVD "ETERNUS SF SC/ACM/Express Mediapack (V16.9 or higher) Agent Program and Manual" of this version into the DVD drive.
The following window is displayed.
For the Upgrade Installation, this window is not used. Click Exit.
Start the following installation wizard corresponding to the architecture of AdvancedCopy Manager's agent checked in preparing for the upgrade:
For 32 bit version
dvdDrive:\Agent_windows\AdvancedCopy_Manager\agent\windows_x86\setup.exeFor 64 bit version
dvdDrive:\Agent_windows\AdvancedCopy_Manager\agent\windows_x64\setup.exeThe following steps are explained using screen examples when the installation wizard of the 32 bit version agent is started.
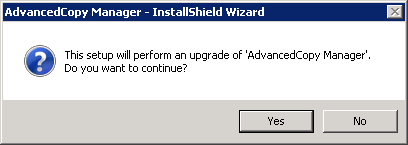
The following dialog box is displayed. Click Yes.
The following installation wizard page is displayed. Click Next.

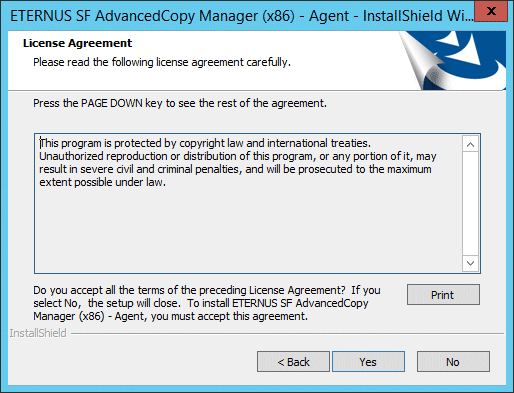
Read the terms and conditions of the License Agreement page.
If the conditions are agreeable, click Yes.
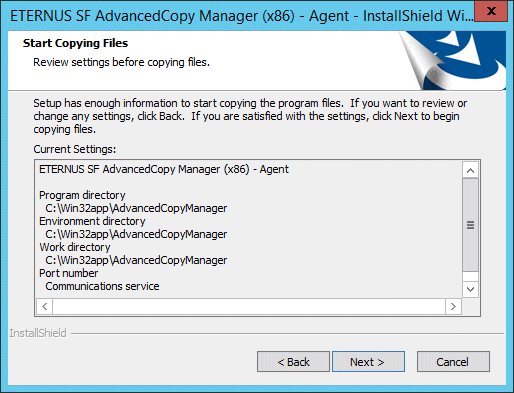
Check the settings information in the Start Copying Files page, and then click Next.
Copying of the program is started.
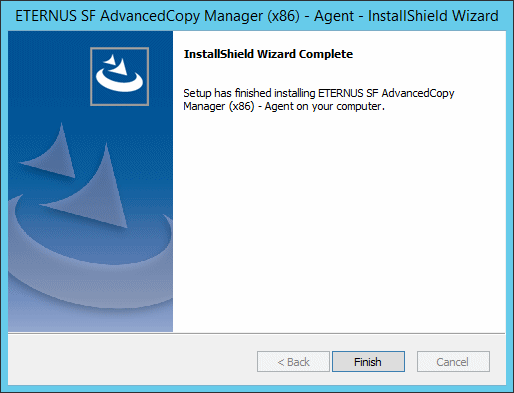
The following installation wizard page is displayed. The upgrade process is completed. Click Finish.
Eject the DVD media.
When the tasks described above have been performed, the upgrade of the AdvancedCopy Manager's agent is complete.
When the upgrade of the primary node has been completed, refer to "7.3.2.4 Tasks to Be Performed After Upgrade (Primary Node)" and set up the AdvancedCopy Manager's agent of the primary node.
When the upgrade of the secondary node has been completed, refer to "7.3.2.7 Tasks to Be Performed After Upgrade (Secondary Node) " and set up the AdvancedCopy Manager's agent of the secondary node.
Point
If the Upgrade Installation has ended in an error, refer to "8.2.5 In Case of Problem During Upgrade of AdvancedCopy Manager's Agent (for Windows)" and return the system to a normal state.
The upgrade is performed as follows:
Note that if step 1 and step 2 have already been performed, perform from step 3.
If multiple Managed Server transactions exist, perform this procedure on each primary node for Managed Server transaction.
Log on to the server using Administrator privileges.
Insert the DVD "ETERNUS SF SC/ACM/Express Mediapack (V16.9 or higher) Agent Program and Manual" of this version into the DVD drive.
Furthermore, if the Installer screen is displayed by autorun, exit the installer.
Start the command prompt with "Run as administrator".
Install the AdvancedCopy Manager's agent.
In response to the architecture of the AdvancedCopy Manager's agent confirmed at the operation before upgrade, execute the commands for silent installation below to install.
For installLogFile, specify the file in which to output installation log with an absolute path. It is optional to specify for installLogFile.
When using the 32 bit version Agent
dvdDrive:\Agent_windows\AdvancedCopy_Manager\agent\windows_x86\acmagtsilentinstall.bat [-l installLogFile]
When using the 64 bit version Agent
dvdDrive:\Agent_windows\AdvancedCopy_Manager\agent\windows_x64\acmagtsilentinstall.bat [-l installLogFile]
Point
If nothing is specified for installLogFile, an install log file named "acmagtsilentinstall.log" is created in the working directory specified by the environment variable TEMP.
If there is any file of the same name as the specified install log file, it is overwritten.
It is required to specify an existing directory with write permission for the directory in which to store the install log file. If it has no write permission, no error message is output in the command prompt or screen and the process terminates with error.
If the path name of the installation log file contains any spaces, they should be surrounded by double quote characters.
The characters " | : * ? / . < > % & ^ ; ! are not supported for path name of the installation log file.
Note
If an invalid option is specified, its corresponding error message is output in the install log file and the process exits. No error message is output in the command prompt or screen.
Do not execute multiplexly the command for silent installation. If it is multiplexly executed, the command executed after that terminates abnormally. At this time, an install log file is not created.
During an update, it is not possible to specify an installation parameter file for the command. In the case that a file has been specified, the command terminates in an error.
On completion of installation, a command prompt is displayed.
Eject the DVD media.
Check the return value from the silent installation command. If necessary, check the install log file. However, if the return value from the silent installation command is 3 or 9, an install log file is not created. For details, refer to "Return Values for Silent Installation (for AdvancedCopy Manager's Agent)" in the Installation and Setup Guide.
The installation result can be viewed in the install log file, too.
Open the install log file to see "ResultCode" in the ResponseResult section. In "ResultCode" is written the return value from the silent installation command.
Point
If the Upgrade Installation has ended in an error, refer to "8.2.5 In Case of Problem During Upgrade of AdvancedCopy Manager's Agent (for Windows)" and return the system to a normal state.
When the upgrade has been completed, the tasks below need to be performed.
If multiple Managed Server transactions exist, use this procedure in each primary node for Managed Server transaction.
Edit the following environment setting files for Managed Server transaction on the shared disk for shared data:
<Drive of shared disk for shared data of Managed Server transaction>:\etc\opt\swstorage\clsetup.ini
<Drive of shared disk for shared data of Managed Server transaction>:\etc\opt\swstorage\etc\swstg.ini
Change the version information within each file, as follows.
Descriptive Contents of Version Information | |
|---|---|
Before | After |
Version=V16.x | Version=V16.9 |
Note
Do not change anything other than the version information.
Perform the upgrade for the secondary node.
The upgrade procedure is the same as that for the primary node. Refer to "7.3.2.2 Performing Upgrade (Primary Node)".
Point
If this secondary node acts as a primary node for other Managed Server transactions, it is upgraded as a primary node, so this procedure is not needed.
Perform the upgrade with silent installation for the secondary node.
The upgrade with silent installation procedure is the same as that for the primary node. Refer to "7.3.2.3 Upgrade with Silent Installation Tasks (Primary Node)".
Point
If this secondary node acts as a primary node for other Managed Server transactions, it is upgraded as a primary node, so this procedure is not needed.
There is no further action required after the upgrade for the secondary node.
Perform the following procedure:
Note that in these tasks, in addition to operations with the Managed Server, there are operations to execute from the Management Server and Web Console.
On the primary node, start the Managed Server transactions.
Use the Failover Cluster Manager to start the Managed Server transactions.
If multiple Managed Server transactions exist, perform this procedure for each Managed Server transaction.
In all of the nodes in which the Storage Cruiser's agent has been installed, start the service of the Storage Cruiser's agent. Refer to "Starting and Stopping Agent" in the Storage Cruiser Operation Guide for information on how to start the service.
Start the local transactions on all the nodes, perform the following procedure.
With the Windows services screen, start the AdvancedCopy Manager COM Service.
To ensure data consistency, with the Management Server, execute the "stgxfwcmmodsrv" command to change the server information.
When executing the "stgxfwcmmodsrv" command, specify the Managed Server name for the -n option.
When the Management Server OS is Windows
$INS_DIR\ACM\bin\stgxfwcmmodsrv -n serverName
$INS_DIR means the "Program Directory" specified at the ETERNUS SF Manager installation.
When the Management Server OS is Solaris or Linux
/opt/FJSVswstf/bin/stgxfwcmmodsrv -n serverName
If multiple Managed Server transactions exist, perform this procedure for each Managed Server transaction.
In addition, if there is any node that is running local transactions, perform this procedure on the relevant node.
Note
For changing the server information, start a new window for command execution, and then perform the procedure on the window.
See
Refer to "Command References" in the AdvancedCopy Manager Operation Guide relevant to the OS of the Management Server for information on the command.
Perform the following operations with Web Console to reload the server information.
On the global navigation tab, click Server.
The registered server list is displayed in the Main pane.
On the Main pane, check the target server checkbox.
If the target server is a VM guest, check the checkbox of the VM host where the VM guest exists.
On the Action pane, click Reload Conf. under Server.
Point
Once normal operation has been confirmed after the upgrade of the AdvancedCopy Manager's agent, the backup data in the backup destination directory created in step 6-d of "7.3.2.1 Preparing for Upgrade" maybe deleted.