
The comprehensively evaluated status of storage devices, switches, and servers are displayed with icons.
The types of icons that are displayed are as follows.
Icon | Meaning |
|---|---|
| All devices are running normally. |
| Some devices require attention. |
| An error is occurring in some devices. |
Clicking the above icons displays the status of storage devices, switches, and servers respectively in a pull-down list.
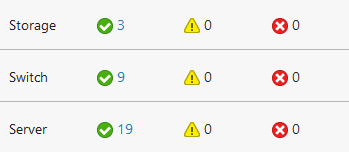
Clicking the link changes the screen to Detail View to display a list of storage devices, switches, or servers with the filter set so that only the status corresponding to an icon is displayed.
The number of processes that are running in the ETERNUS SF system is displayed.
Clicking this icon displays a list of process status in a pull-down list.
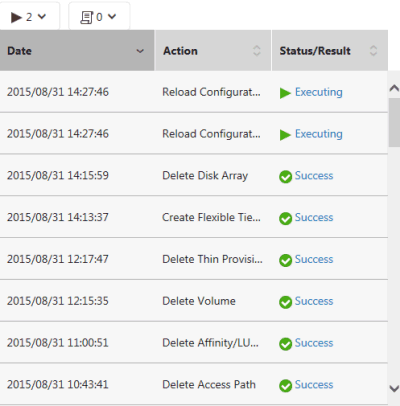
Clicking an element in the Status/Result column displays a dialog box showing the details about the process status of the clicked line. The meaning of displayed items is the same with the Job Status pane.
Among the various logs, the number of unreferenced logs with a level of "Warning" or "Error", is displayed.
Clicking this icon displays a list of unreferenced logs in a pull-down list.
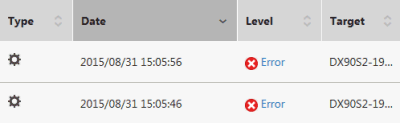
Clicking an element in the Level column displays a dialog box showing the details about the log content of the clicked line in detail.
Point
The following logs are displayed:
Operation History
Events
Threshold Monitoring Alarms
Quota Management (NAS Management)
The name of the user logged in to Web Console is displayed.
Clicking the Menu to the right of the user name displays a pull-down menu.
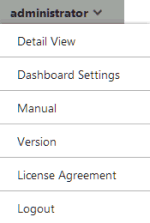
The Dashboard action when clicking each menu is as follows.
Menu Name | Dashboard Action |
|---|---|
Detail View | Moves to the Detail View screen. |
Dashboard setting | Displays a dialog box for performing settings related to Dashboard. Refer to "5.5.1 Home Screen Settings" for details. |
Manual | Displays the online manual index screen. |
Version | Displays the product version information. |
License Agreement | Displays the License Agreement. |
Logout | Logs out from Web Console. |
This is a button for adding a panel to the Panel area. This button appears on the Dashboard screen.
Clicking Add displays a menu to add a panel with icons under the Menu area.

In this status, when clicking the icon corresponding to the information that you want to add, a panel is added to the Panel area or a configuration dialog box for adding a panel is displayed.
Actions executed when each icon is clicked, names of added panels, and panel function overview are shown below.
Icon Name | Action | Name of Added Panel | Function Overview of Panel |
|---|---|---|---|
Status | Adds a panel to the Panel area. | Device Status panel | Displays the status of devices that are managed by the ETERNUS SF system. |
Log | Logs panel | Displays various logs of the ETERNUS SF system. | |
Automated Storage Tiering | Displays a configuration dialog box to add a panel. Setting the display information in the configuration dialog box adds a panel to the Panel area according to the settings. | Access Status Chart panel | Graphically displays access status to Tier pools or volumes for devices that use Automated Storage Tiering among devices managed by the ETERNUS SF system. |
Capacity | Capacity panel | Displays information for capacity usage of devices that are managed by the ETERNUS SF system. The change of capacity usage can be viewed in a graph, too. |
Refer to "Chapter 5 Operations for Dashboard" for details about panels to be added.
This is a button for changing the panel display location in the Panel area. This button appears on the Dashboard screen.
Clicking Move changes all the panels in the Panel area to the Move mode.
When the panels change to the Move mode, an icon indicating the Move mode is displayed on the upper left portion of each panel.
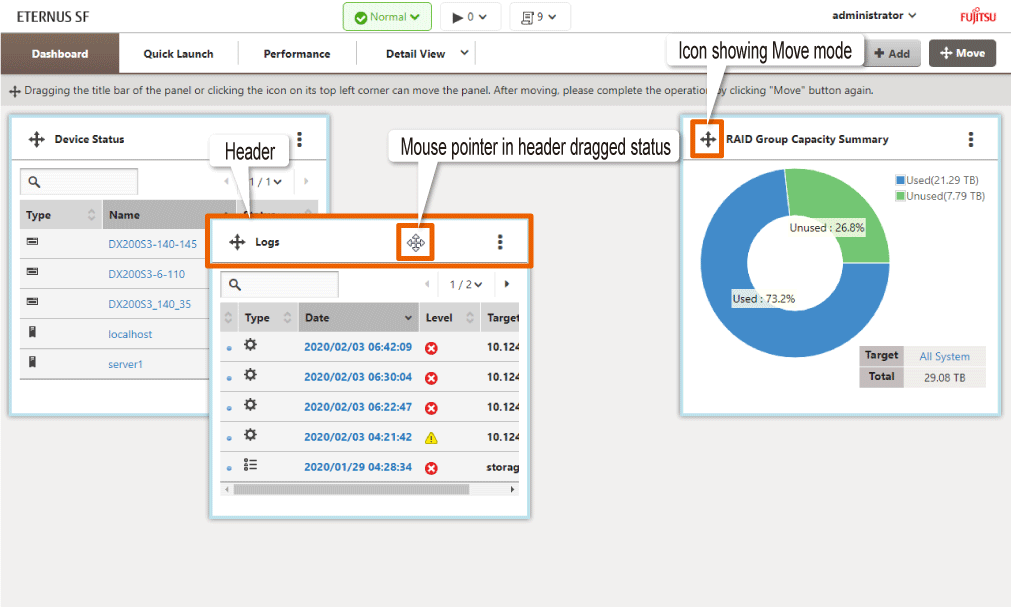
In this status, the panel display location can be changed. The two ways of changing the panel display location are as follows:
Replace the display location by dragging and dropping the header portion of the panel that you want to change with a different panel.
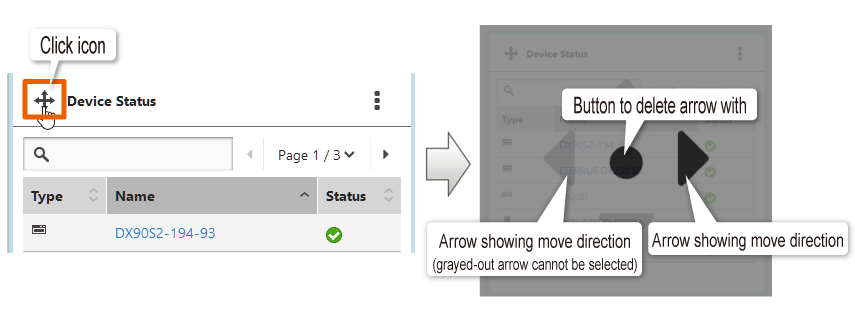
Click the icon on the upper left portion of the panel you want the display location changed to display an arrow to move display location. Next, click the arrow in the direction of the other to change locations.
To delete the arrow, click the button in the center.
If you click Move when the panels are in the Move mode, all the panels are returned to the Display mode.