How to failover a node in the event of a double fault
Perform the following operation:
-> AutoSwitchOver = HostFailure | ResourceFailure | Shutdown
If "no" has been set to HaltFlag, a failover is not performed even in the event of a double fault. Setting "yes" to HaltFlag allows the Shutdown Facility to stop the failed node forcibly (PANIC, power discontinuity, and restart) in the event of a double fault. Then, a failover is performed.
Note
Even though the AutoSwitchOver attribute has been set, a failover is not performed unless HaltFlag has been set in the event of a double fault.
How to failover a userApplication in the event of a node failure, resource failure, and RMS stop
Perform the following operation:
-> AutoSwitchOver = HostFailure | ResourceFailure | Shutdown
Note
In the event of a double fault, a failover is not performed even though this attribute value has been set.
Set the HaltFlag attribute for performing a failover even in the event of a double fault.
When the status of the userApplication to be switched is Fault, it cannot be switched even though AutoSwitchOver has been set.
When performing a failover, clear the Faulted state.
How to start up userApplication automatically when RMS is started
Perform the following operation:
-> AutoStartUp = yes
If "yes" has been set to AutoStartUp attribute, the status of a cluster application is automatically transited to Online at RMS startup.
How to switch userApplication to Standby automatically when RMS is started, userApplication is switched, or when clearing a fault state of userApplication
Perform the following operation:
-> StandbyTransitions = Startup | SwitchRequest | ClearFaultRequest
Note
If "yes" has been set to AutoStartUp attribute, the status of the standby userApplication is transited to Standby when RMS is started regardless of the setting value of StandbyTransitions.
The relationship between AutoStartUp and StandbyTransitions is as follows.
RMS Startup node | AutoStartUp = yes | AutoStartUp = no | |||
|---|---|---|---|---|---|
StandbyTransitions | StandbyTransitions | ||||
No | StartUP | No | StartUP | ||
Multiple nodes | Operational side uap | Online | Online | Offline | Standby |
Standby side uap | Standby | Standby | Offline | Standby | |
One node only | Standby | Standby | Offline | Standby | |
If the resource which StandbyCapable attribute is set as "yes"(1) does not exist in the userApplication, the userApplication is not in the Standby state regardless of the set value of StandbyTransitions attribute.
How to set scalable cluster applications for preventing timeout of Controller resource during a state transition
When it takes time to start up and stop a cluster application that constitutes a scalable configuration, a timeout error of the Controller resource (resource to indicate the scalability) may occur during a state transition. In this case, the state transition is stopped forcibly.
In this case, the setting of Controller resource needs to be changed according to the startup and stop times for each cluster application that constitutes a scalable configuration.
Calculate the Timeout value of a scalable cluster application, and then change its setting with the following procedure:
Calculating the maximum state transition time for a cluster application
The status of the Controller resource is transited to Online when the statues of userApplications under the Controller resource are all Online. Therefore, calculate the total values of ScriptTimeouts for each resource that configures a cluster application.
For example, if every one of the following resource; Cmdline resource, Fsystem resource, GDS resource, or Gls resource exists under the cluster application, you can calculate as follows. (The timeout value for each resource is a default value.)
Cmdline resource 300 (sec) + Fsystem resource 180 (sec) + GDS resource 1800 (sec) + Gls resource 60 (sec) = 2340 (sec)
This value is larger than the default value for the scalable cluster application 180 (sec), set the setting value to 2340 (sec).
Information
Default script timeout values for each resource
Cmdline  : 300
Fsystem  : 180
GDS      : 1800
Gls      : 60
Considering the number of SysNode
Calculate the considered number of SysNode that configures a cluster application.
The value calculated in Step 1 is the value where the number of SysNode is considerate.
Minus 1 from the number of SysNode and double the value. Then, multiply it by the one calculated in Step 1.
The maximum state transition time of a cluster application between multiple nodes
= "1) value" x 2 x ("the number of SysNode" -1)Example
For example, in the case Online or Offline processing of a userApplication is assumed to be finished just before it times out when the userApplication is with a three-node configuration and the status is Online on Node1, after starting the state transition on the first Node, it takes 4 times (2 x ("the number of Sysnode" - 1) for the userApplication to be Online on the final node as follows:
Offline processing on Node1
Online processing on Node2
Offline processing on Node2
Online processing on Node3
Calculating the total values of Step 2 for each cluster application
Changing the setting with the hvw command
Follow the procedure below:
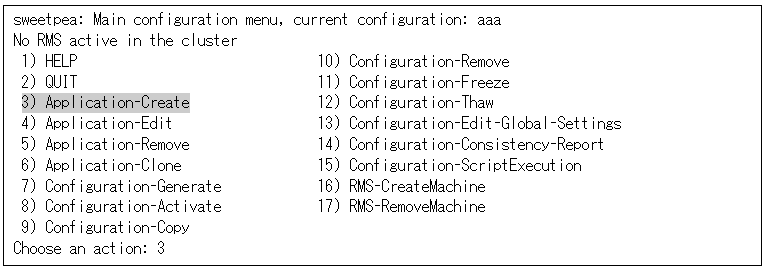
Start up RMS Wizard with the hvw command.
Select "Application-Create" from "Main configuration menu."

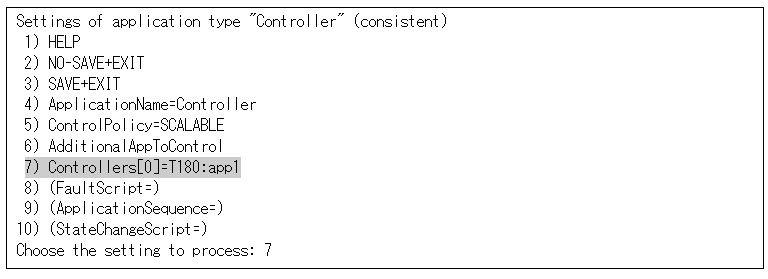
Select "Controller" from "Application selection menu."

Select "Controllers" from "Settings of application type."

Select "SELECTED."

Select "TIMEOUT(T)" from "Set *global* flags for all scalable (sub) applications."

Select "FREECHOICE" and enter the setting value (when entering 2340).

Select "SAVE+RETURN" from "Set *global* flags for all scalable (sub) applications."

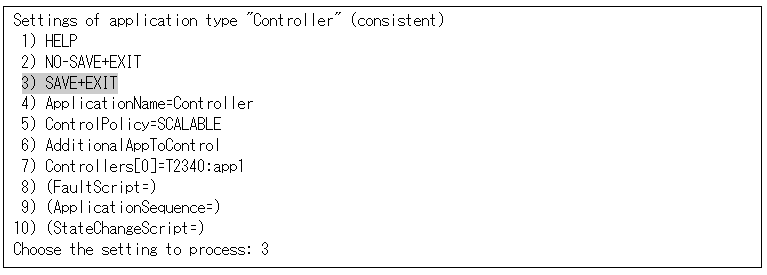
Select "SAVE+EXIT" from "Settings of application type."

See
For detailed operation on how to change RMS Wizard and attributes, see "10.3 Changing a Cluster Application" or "PRIMECLUSTER Reliant Monitor Services (RMS) with Wizard Tools Configuration and Administration Guide."
How to stop a standby operational system preferentially in the event of a heartbeat error
When a heartbeat error is detected, set the survival priority for the node to be stopped forcibly so that it prevents all operational and standby systems from being failed by forcibly stopping both operational and standby systems mutually. Below describes how to stop the operational system preferentially and collect the information for investigation.
Note
The weighting of each node to set in the Shutdown Facility is defined to a node.
If an operational and standby system is switched due to a failover or switchover, it cannot be enabled even though the setting is changed. As before, stop an operational system forcibly after a given time has elapsed in a standby system.
When a cluster is switched, be sure to perform a failback.
If a system panic, CPU load, or I/O load continues, it seems like a heartbeat has an error. In this case, the cluster node with an error is forcibly stopped regardless of the survival priority.
A standby system with a low survival priority waits until an operational system is forcibly stopped completely. During this waiting time, if the heartbeat is recovered, some information for investigating the heartbeat error may not be collected.
This case may occur when the CPU load or I/O load is the high in an operational system.
Below indicates an example when the operational system is node1, and the standby system is node2.
Note
Perform the Steps 1 to 4 in the both operational and standby systems.
Modify the SF configuration (/etc/opt/SMAW/SMAWsf/rcsd.cfg) for the standby system (node2) with the vi editor, and so on to give a higher weight value to the standby system. Change the weight attribute value of node2 from "1" to "2."
node2# vi /etc/opt/SMAW/SMAWsf/rcsd.cfg
[Before edit]
node1,weight=1,admIP=x.x.x.x:agent=SA_xx,timeout=20:agent=SA_yy:timeout=20
node2,weight=1,admIP=x.x.x.x:agent=SA_xx,timeout=20:agent=SA_yy:timeout=20
[After edit]
node1,weight=1,admIP=x.x.x.x:agent=SA_xx,timeout=20:agent=SA_yy:timeout=20
node2,weight=2,admIP=x.x.x.x:agent=SA_xx,timeout=20:agent=SA_yy:timeout=20
Note
Describe the setting of one node with one line in the rcsd.cfg file.
admIP may not be described depending on the version of PRIMECLUSTER.
Restart the SF with the sdtool -r command.
It takes about five seconds to execute the sdtool -r command. After that, the changed SF configuration is reflected to the SF.
node2# sdtool -r
Use the sdtool -C command. to check that the changed SF configuration has been reflected
Check that the weight attribute value of node2 has become "2."
node2# sdtool -C

Cluster Host   Type    Weight  Admin IP        Agent List (Agent:timeout)
------------   -----   ------  --------        --------------------------
node1          CORE    1       x.x.x.x         SA_xx:20,SA_yy:20
node2          CORE    2       x.x.x.x         SA_xx:20,SA_yy:20
Note
"Type" may not be displayed depending on the version of PRIMECLUSTER.
Use the sdtool -s command to check that all the SAs defined to the SF operate properly. Moreover, check that "Test State" and "Init State" have been changed to "TestWorked" and "InitWorked" respectively.
node2# sdtool -s
Cluster Host    Agent         SA State      Shut State  Test State  Init State
------------    -----         --------      ----------  ----------  ----------
node1           SA_xx         Idle          Unknown     TestWorked  InitWorked
node1           SA_yy         Idle          Unknown     TestWorked  InitWorked
node2           SA_xx         Idle          Unknown     TestWorked  InitWorked
node2           SA_yy         Idle          Unknown     TestWorked  InitWorked
Note
Perform the following Steps 5 to 8 either in the operational or standby system.
Check the ShutdownPriority attribute value of a cluster application (userApplication) with hvutil -W command.
When the ShutdownPriority attribute value is other than "0," perform Steps 6 to 8.
When it is "0," no more setting is required.
node1# hvutil -W
4
Stop PRIMECLUSTER (RMS).
Note
Note that if you stop PRIMECLUSTER (RMS), the operation is also stopped.
node1# hvshut -aChange the ShutdownPriority attribute value of a cluster application (userApplication) to "0." First, start the RMS Wizard.
node1# /opt/SMAW/SMAWRrms/bin/hvw -n testconfNote
Change testconf based on your environment.
For details, see "11.1 Changing the Operation Attributes of a userApplication."
Select "Application-Edit" from "Main configuration menu."
Select the appropriate cluster application (userApplication) to change its configuration in "Application selection menu."
Select "Machines+Basics" in "turnkey wizard."
Select "ShutdownPriority."
Select "FREECHOICE" to enter 0.
Select "SAVE+EXIT" in "Machines+Basics."
Select "SAVE+EXIT" in "turnkey wizard."
Select "RETURN" on "Application selection menu."
Select "Configuration-Generate."
Select "Configuration-Activate."
Start PRIMECLUSTER (RMS).
node1# hvcm -aNote
When a cluster is switched, be sure to perform a failback.
How to stop the operational node forcibly in the event of a subsystem hang
The following event is called a subsystem hang: the cluster does not detect that the operation is stopped (the operation seems normal from the cluster monitoring) because only some I/Os within the operational node have errors and other I/Os operate normally.
In this case, if the node is switched to a standby node, the operation may be restarted. In the event of a subsystem hang, ping may respond properly and you may be able to log in to a node.
When a subsystem hang is detected, stop the operational node with the following method and switch the operation.
Stop the operational node from the standby node with the sdtool command.
# sdtool -k node-name
node-name : CF node name of the operational nodePanic the operational node with the NMI switch or keyboard operation in the main device.
Collect dumps of the operational node with Web-UI to stop it.
Note
It is possible to determine a subsystem hang from application failures to control a forcible stop mentioned above. In the case, it needs to be determined from multiple clients. That is, even though an error is found from one client, the error may be in the client or on the network. You need to consider such a case when controlling a forcible stop.
How to use SNMP manager to monitor cluster system
If any error occurs in the resources registered in the userApplication of a cluster, SNMP Trap will be sent to the server which SNMP manager runs on, thus the cluster system will be able to be monitored.
See
For details of this function, see "F.11 SNMP Notification of Resource Failure" in "PRIMECLUSTER Reliant Monitor Services (RMS) with Wizard Tools Configuration and Administration Guide."
Set the FaultScript attribute of userApplication to "To be specified by the hvsnmptrapsend command" as follows.
Check if the net-snmp-utils package provided by the OS has been installed on all the nodes of the cluster which uses this function. If it has not been installed, you need to install it.
Example
# rpm -q net-snmp-utils
net-snmp-utils-5.5-41.el6.i686
Confirm that the SNMP manager supports version 2c of SNMP in the SNMP Trap destination. Moreover, check the community names that the SNMP manager can receive beforehand.
Start up RMS Wizard with the hvw command.
Select "(FaultScript=)" from the "Machines+Basics" menu of the userApplication which monitors resource errors.
Machines+Basics (app1:consistent)
 1) HELP
 2) -
 3) SAVE+EXIT
 4) REMOVE+EXIT
 5) AdditionalMachine
 6) AdditionalConsole
 7) Machines[0]=fuji2RMS
 8) Machines[1]=fuji3RMS
 9) (PreCheckScript=)
10) (PreOnlineScript=)
11) (PostOnlineScript=)
12) (PreOfflineScript=)
13) (OfflineDoneScript=)
14) (FaultScript=)
15) (AutoStartUp=no)
16) (AutoSwitchOver=HostFailure|ResourceFailure|ShutDown)
17) (PreserveState=no)
18) (PersistentFault=0)
19) (ShutdownPriority=)
20) (OnlinePriority=)
21) (StandbyTransitions=ClearFaultRequest|StartUp|SwitchRequest)
22) (LicenseToKill=no)
23) (AutoBreak=yes)
24) (AutoBreakMaintMode=no)
25) (HaltFlag=yes)
26) (PartialCluster=0)
27) (ScriptTimeout=)
Choose the setting to process: 14
See
For information on how to set up userApplication with the RMS Wizard, see "6.7.2.1 Creating Standby Cluster Applications" and "10.3 Changing a Cluster Application."
Select "FREECHOICE" and execute the following command.
/opt/SMAW/bin/hvsnmptrapsend <community> <host>
<community> Specify the SNMP community.
<host>      Specify the destination of SNMP trap.
 1) HELP
 2) RETURN
 3) NONE
 4) FREECHOICE
 Enter the command line to start upon fault processing: 4
         >> /opt/SMAW/bin/hvsnmptrapsend community snmprvhost
Note
When the Fault script has been registered already, create a new script for executing both the Fault script command and the hvsnmptrapsend command, and register this script in the Fault script.
Confirm that "FaultScript" of the "Machines+Basics" menu has been set.
Machines+Basics (app1:consistent)
 1) HELP
 2) -
 3) SAVE+EXIT
 4) REMOVE+EXIT
 5) AdditionalMachine
 6) AdditionalConsole
 7) Machines[0]=fuji2RMS
 8) Machines[1]=fuji3RMS
 9) (PreCheckScript=)
10) (PreOnlineScript=)
11) (PostOnlineScript=)
12) (PreOfflineScript=)
13) (OfflineDoneScript=)
14) (FaultScript='/opt/SMAW/bin/hvsnmptrapsend~community~snmprvhost')
15) (AutoStartUp=no)
16) (AutoSwitchOver=HostFailure|ResourceFailure|ShutDown)
17) (PreserveState=no)
18) (PersistentFault=0)
19) (ShutdownPriority=)
20) (OnlinePriority=)
21) (StandbyTransitions=ClearFaultRequest|StartUp|SwitchRequest)
22) (LicenseToKill=no)
23) (AutoBreak=yes)
24) (AutoBreakMaintMode=no)
25) (HaltFlag=yes)
26) (PartialCluster=0)
27) (ScriptTimeout=)
Choose the setting to process:
See "6.7.4 Generate and Activate" and execute the "Configuration-Generate" and "Configuration-Activate" processes.