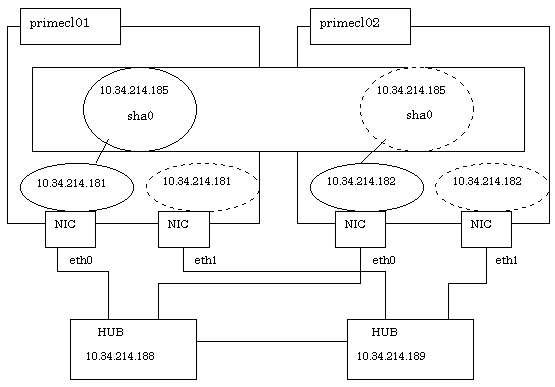
For information on the initial GLS setup, see "PRIMECLUSTER Global Link Services Configuration and Administration Guide: Redundant Line Control Function."
This section describes how to set up "Example of the Cluster system" of "Example of configuring NIC switching mode (IPv4)" that GLS (redundant line control function) provides. This procedure is described in the example below.
Note
Although it is possible to have "takeover network" for PRIMECLUSTER and "IP address takeover" for GLS on the same cluster system, you must not configure them on the same interface. If you do so, the communication through "takeover IP address" will be disabled.
For example, when you select 'eth1' for the interface when you set "takeover network" for PRIMECLUSTER, do not use 'eth1' for GLS environment settings (do not specify 'eth1' by using the '-t' option for "hanetconfig create" command).
When you need to duplex the interface for a takeover network, use "IP address takeover" for GLS. You cannot set "takeover network" for the bonding interface.
The setup values correspond to the values in "Setup (GLS_Monitoring Parameter)", "Setup (GLS_Virtual Interface)", "Setup (GLS_GS Linkage Mode Monitoring Destination Information)", and "Setup (GLS_Common Parameter)" of PRIMECLUSTER Designsheets.

Operation Procedure:
Setting up the system
Define the IP address and Host name in /etc/hosts file.
10.34.214.185   takeoverIP   # Virtual IP
10.34.214.181   primecl01    # primecl01 Physical IP
10.34.214.182   primecl02    # primecl02 Physical IP
10.34.214.188   swhub1       # primary HUB IP
10.34.214.189   swhub2       # secondary HUB IP
Specify the IP address defined in Step 1-1 above to the /etc/sysconfig/network-scripts/ifcfg-ethX (X is either 0 or 1) file.
Contents of /etc/sysconfig/network-scripts/ifcfg-eth0
DEVICE=eth0
BOOTPROTO=static
HOTPLUG=no
IPADDR=10.34.214.181
NETMASK=255.255.255.0
ONBOOT=yes
TYPE=Ethernet
Contents of /etc/sysconfig/network-scripts/ifcfg-eth1
DEVICE=eth1
BOOTPROTO=static
HOTPLUG=no
ONBOOT=yes
TYPE=Ethernet
Note
Add "HOTPLUG=no" to the settings for the physical interfaces bundled by GLS (the /etc/sysconfig/network-scripts/ifcfg-ethX file). This setting is not necessary when bundling the tagged VLAN interface.
Information
Setting of "HOTPLUG=no" does not disable the PCI hot plug function.
You can perform hot maintenance for NIC (PCI card) to the physical interfaces with "HOTPLUG=no."
Restarting
Run the following command and restart OS. After restarting OS, verify eth0 is enabled using the "ip(8)" or the "ifconfig(8)" command.
# /sbin/shutdown -r now
Setting a subnet mask
For the underlined parameter, specify the network address and the subnet mask of the virtual interface.
# /opt/FJSVhanet/usr/sbin/hanetmask create -i 10.34.214.0 -m 255.255.255.0
Check that the facility has been set up correctly.
# /opt/FJSVhanet/usr/sbin/hanetmask print
Note
For details on the subnet mask value, see "hanetmask Command" in "PRIMECLUSTER Global Link Services Configuration and Administration Guide: Redundant Line Control Function."
Creating of virtual interface
For the underlined parameter, specify the physical IP address of the node.
# /opt/FJSVhanet/usr/sbin/hanetconfig create -n sha0 -m d -i 10.34.214.185 -e 10.34.214.181 -t eth0,eth1Check that the virtual interface has been set up correctly.
# /opt/FJSVhanet/usr/sbin/hanetconfig print
Setting up the HUB monitoring function
For the underlined parameter, specify the IP addresses of the hubs to be monitored.
# /opt/FJSVhanet/usr/sbin/hanetpoll create -n sha0 -p 10.34.214.188,10.34.214.189 -b off
Check that the facility has been set up correctly.
# /opt/FJSVhanet/usr/sbin/hanetpoll print
Setting up the Standby patrol monitoring function
# /opt/FJSVhanet/usr/sbin/hanetconfig create -n sha1 -m p -t sha0
Check that the facility has been set up correctly.
# /opt/FJSVhanet/usr/sbin/hanetconfig print
Creating of the takeover IP address (takeover virtual Interface)
# /opt/FJSVhanet/usr/sbin/hanethvrsc create -n sha0
Check that the registration has been done correctly.
# /opt/FJSVhanet/usr/sbin/hanethvrsc print
Setting up the system
Define the IP address and Host name in /etc/hosts file. Defined content is same as HOST-primecl01.
Specify the IP address defined in Step 1-1 above to the /etc/sysconfig/network-scripts/ifcfg-ethX (X is either 0 or 1) file.
Contents of /etc/sysconfig/network-scripts/ifcfg-eth0
DEVICE=eth0
BOOTPROTO=static
HOTPLUG=no
IPADDR=10.34.214.182
NETMASK=255.255.255.0
ONBOOT=yes
TYPE=Ethernet
Contents of /etc/sysconfig/network-scripts/ifcfg-eth1
DEVICE=eth1
BOOTPROTO=static
HOTPLUG=no
ONBOOT=yes
TYPE=Ethernet
Restarting
Run the following command and restart OS. After restarting OS, verify eth0 is enabled using the "ip(8)" or the "ifconfig(8)" command.
# /sbin/shutdown -r now
Setting a subnet mask
For the underlined parameter, specify the network address and the subnet mask of the virtual interface.
# /opt/FJSVhanet/usr/sbin/hanetmask create -i 10.34.214.0 -m 255.255.255.0
Check that the facility has been set up correctly.
# /opt/FJSVhanet/usr/sbin/hanetmask printNote
For details on the subnet mask value, see "hanetmask Command" in "PRIMECLUSTER Global Link Services Configuration and Administration Guide: Redundant Line Control Function."
Creating of virtual interface
For the underlined parameter, specify the physical IP address of the node.
# /opt/FJSVhanet/usr/sbin/hanetconfig create -n sha0 -m d -i 10.34.214.185 -e 10.34.214.182 -t eth0,eth1
Check that the virtual interface has been set up correctly.
# /opt/FJSVhanet/usr/sbin/hanetconfig printSetting up the HUB monitoring function
In the underlined parameter, specify the IP addresses of the hubs to be monitored.
# /opt/FJSVhanet/usr/sbin/hanetpoll create -n sha0 -p 10.34.214.188,10.34.214.189 -b off
Check that the facility has been set up correctly.
# /opt/FJSVhanet/usr/sbin/hanetpoll printSetting up the Standby patrol monitoring function
# /opt/FJSVhanet/usr/sbin/hanetconfig create -n sha1 -m p -t sha0Check that the facility has been set up correctly.
# /opt/FJSVhanet/usr/sbin/hanetconfig printCreating of the takeover IP address (takeover virtual Interface)
# /opt/FJSVhanet/usr/sbin/hanethvrsc create -n sha0
Check that the resources have been set up correctly.
# /opt/FJSVhanet/usr/sbin/hanethvrsc printPost-setup processing
After the OPERATING and STANDBY node setup is done, create the Gls resources and register them to the cluster application.
For details, see "6.7.3.5 Setting Up Gls Resources" and "6.7 Setting Up Cluster Applications."
Then, start RMS and check the RMS tree to confirm whether the Gls resources are displayed correctly. For details, see "7.1.3.1 RMS Tree."
The Gls resource name is displayed as GlsX (X is integer).
See
For information on GLS (redundant line control function) and other operation modes, see "PRIMECLUSTER Global Link Services Configuration and Administration Guide: Redundant Line Control Function."