Install the Solaris software and the software required for PRIMECLUSTER in the control and guest domains of all nodes. Then perform the OS and hardware settings required for installation and operation.
For further details on configuring Oracle VM Server for SPARC or creating Oracle Solaris Kernel Zones, see "Creating and Using Oracle Solaris Kernel Zones."
The building procedure is different depending on the following cluster systems:
Cluster system between Kernel Zones within a same physical partition (Control domain)
Cluster system between Kernel Zones within a same physical partition (Guest domain)
Cluster system between Kernel Zones among different physical partitions (Control domain)
Cluster system between Kernel Zones among different physical partitions (Guest domain)
This section explains how to build a cluster system between Kernel Zones within a same physical partition (Control domain/Guest domain).
Figure 15.1 Sample configuration of a cluster system between Kernel Zones within a same physical partition (Control domain)
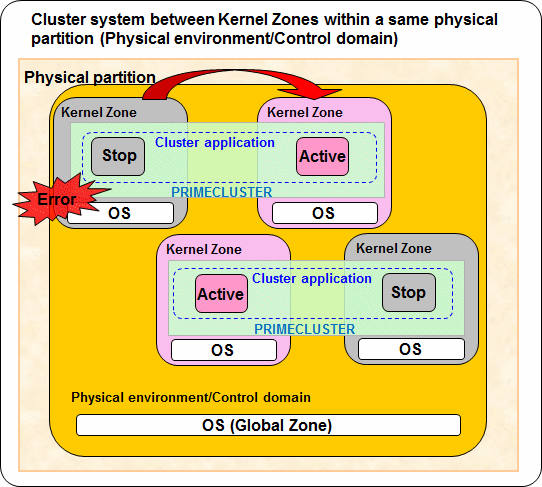
Figure 15.2 Sample configuration of a cluster system between Kernel Zones within a same physical partition (Guest domain)
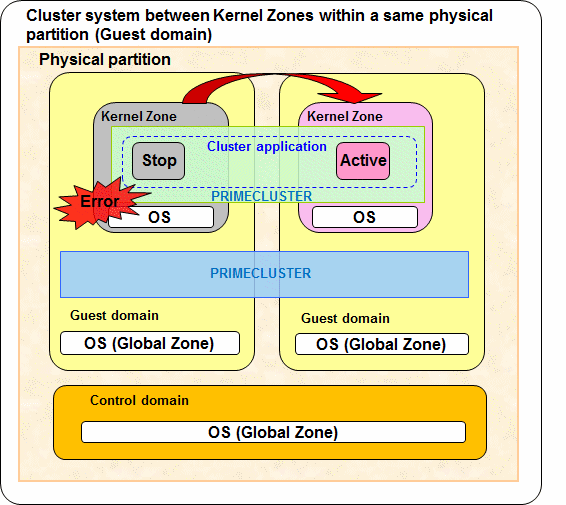
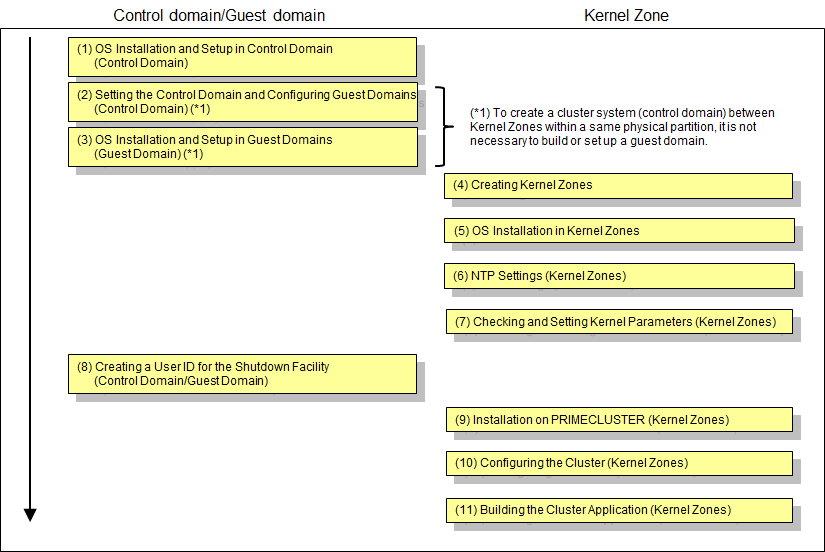
Figure 15.3 Building Procedure
OS Installation and Setup in Control Domain (Control Domain)
Complete all preparations for configuring your Oracle VM Server for SPARC environment by installing the operating system and the Oracle VM Server for SPARC package in the control domain. Referring to "Oracle VM Server for SPARC Guide" or "Fujitsu SPARC M12 and Fujitsu M10/SPARC M10 Domain Configuration Guide" for the details, complete all preparations through to the files for the virtual disk server devices.
If a guest domain is not built, the preparation for configuring an Oracle VM Server environment is unnecessary.
Disk-Related Settings
When using a shared disk unit, you need to install and set up the related software product.
Carry out these settings in the control domain before installing PRIMECLUSTER.
For details, see "3.2.2 Setting Up Disk Units."
When building a cluster system between Kernel Zones within a same physical partition (Control domain), you must enable MPxIO to use a shared disk unit in Kernel Zones. Execute the following command on the control domain.
Note that once this command is executed, the system is automatically restarted.
For the fibre channel connection
# stmsboot -D fp -eFor the ISCSI connection
# stmsboot -D iscsi -eSetting the Control Domain and Configuring Guest Domains (Control domain)
Referring to "Oracle VM Server for SPARC Guide" or "Fujitsu SPARC M12 and Fujitsu M10/SPARC M10 Domain Configuration Guide," complete all configurations for the control and guest domains.
Note
For "Cluster system between Kernel Zones within a same physical partition (Control domain)," it is not necessary to configure the guest domain.
Sample Configuration of Control and Guest Domains
As the virtual disk used as the system disk, specify a file in the format /LDoms/Vol1/vdisk0.img.
For the disk used as the switching disk in the cluster, specify a block device like /dev/dsk/cXtXdXs2. When doing so, specify a disk as the full disk without specifying the slice option.
Example: Configuration Script for Control Domain
# Define the virtual disk server.
ldm add-vdiskserver primary-vds0 primary
# Define the virtual disk server device.
ldm add-vdiskserverdevice /LDoms/Vol1/vdisk0.img vol1@primary-vds0
ldm add-vdiskserverdevice /dev/dsk/c0t6000B5D0006A0000006A0FB800130000d0s2 vol2@primary-vds0
Example: Configuration Script for Guest Domain
VDISK0=vol1@primary-vds0
VSHDISK0=vol2@primary-vds0
...
ldm add-vdisk vdisk0 $VDISK0 $DOMAIN
ldm add-vdisk timeout=360 vshdisk0 $VSHDISK0 $DOMAIN
Setting change of Virtual Network Device (vnet)
When using a Kernel Zone on the guest domain, you must assign the MAC address for the Kernel Zone to the virtual network device (vnet) that is used in the Kernel Zone. For the virtual network device (vnet) that is used as a public LAN, administrative LAN, or cluster interconnect in the Kernel Zone from the control domain, execute the following command.
Setting the MAC address automatically
# ldm set-vnet alt-mac-addrs=auto <virtual network device name> <domain name>
Setting the MAC address manually
# ldm set-vnet alt-mac-addrs=<MAC address> <virtual network device name> <domain name>
When creating multiple Kernel Zones on the guest domain, separate alt-mac-addrs by ", (comma)" to specify "auto" for the number of Kernel Zones or MAC addresses.
Example: using vnet0, vnet1, and vnet2 in three Kernel Zones on the guest1 domain (MAC address is automatically set)
# ldm set-vnet alt-mac-addrs=auto,auto,auto vnet0 guest1
# ldm set-vnet alt-mac-addrs=auto,auto,auto vnet1 guest1
# ldm set-vnet alt-mac-addrs=auto,auto,auto vnet2 guest1
OS Installation and Setup in Guest Domains (Guest Domain)
Install the operating system in each guest domain. Referring to "Oracle VM Server for SPARC Guide" or "Fujitsu SPARC M12 and Fujitsu M10/SPARC M10 Domain Configuration Guide," complete installation of operating systems in all guest domains.
To use a shared disk unit in Kernel Zones, you must enable MPxIO. Execute the following command on the control domain.
Note that once this command is executed, the system is automatically restarted.
For the fibre channel connection
# stmsboot -D fp -eFor the ISCSI connection
# stmsboot -D iscsi -eNote
For "Cluster system between Kernel Zones within a same physical partition (Control domain)," this procedure is not necessary.
Creating Kernel Zones
You must perform this section's procedure the same number of times as the number of Kernel Zones you need. For how to create Kernel Zones, see "Creating and Using Oracle Solaris Kernel Zones."
Using the zonecfg command, create Kernel Zones. Refer to the following example.
# zonecfg -z kzone01 *1
*1: "kzone01" is the Kernel Zone name (hereafter, the name is the same)
kzone01: No such zone configured
Use 'create' to begin configuring a new zone.
zonecfg:kzone01> create -t SYSsolaris-kz
zonecfg kzone01> set autoboot=false
zonecfg:kzone01> info virtual-cpu
zonecfg:kzone01> add virtual-cpu
zonecfg:kzone01:virtual-cpu> set ncpus=2
zonecfg:kzone01:virtual-cpu> end
zonecfg:kzone01> info virtual-cpu
virtual-cpu:
        ncpus: 2
zonecfg:kzone01> select capped-memory
zonecfg:kzone01:capped-memory> set physical=4G
zonecfg:kzone01:capped-memory> end
[Deleting a default network]
zonecfg:kzone01> remove anet id=0
[Assigning a network]
zonecfg:kzone01> add net
zonecfg:kzone01:net> set physical=net1   *2
zonecfg:kzone01:net> end
*2: If the physical interface is multiplexed within the Kernel Zone, it is necessary to specify two or more physical interfaces.
[Using a disk device in the Kernel Zone of Solaris 11.3 or earlier]
zonecfg:kzone01> add device
zonecfg:kzone01:device> set match=/dev/rdsk/c9t0d0    *3
zonecfg:kzone01:device> end
*3: Enter the disk device to be added to the Kernel Zone by using a full path.
[Using a disk device in the Kernel Zone of Solaris 11.4 or later]
zonecfg:kzone01> add device
zonecfg:kzone01:device> set storage=dev:dsk/c9t0d0    *4
zonecfg:kzone01:device> end
*4: Specify the disk device to be added to the Kernel Zone.
zonecfg:kzone01> verify
zonecfg:kzone01> commit
zonecfg:kzone01> exit
See
For details, see the manual of the zonecfg command and also Oracle Solaris documents.
OS Installation in Kernel Zones
Install the OS in Kernel Zones.
Install Solaris in Kernel Zones using the zoneadm install command. Below is an example of installing the Kernel Zone.
# zoneadm -z kzone01 install
Preparing to install zone <kzone01>.
Creating list of files to copy from the global zone.
Copying <155078> files to the zone.
Initializing zone product registry.
Determining zone package initialization order.
Preparing to initialize <1282> packages on the zone.
Initialized <1282> packages on zone.
Zone <kzone01> is initialized.
Installation of <51> packages was skipped.
The file </zone-a-system/root/var/sadm/system/logs/install_log> contains a log of the zone installation.
NTP Settings (Kernel Zones)
This setup synchronizes the time in all of the nodes of the cluster system. Make sure to make this setting when configuring a cluster.
Carry out these settings in Kernel Zones before installing PRIMECLUSTER.
Checking and Setting Kernel Parameters (Kernel Zones)
When operating the software products related to PRIMECLUSTER, you need to adjust the OS kernel parameters according to the hardware configuration and applications.
Carry out these settings in Kernel Zones before rebooting the system after "Installation on PRIMECLUSTER (Kernel Zones)".
For details, see "3.2.3 Checking and Setting the Kernel Parameters."
Creating a User ID for the Shutdown Facility (Control Domain/Guest Domain)
In Kernel Zones environment, you must set a user ID for the shutdown facility because PRIMECLUSTER has to control the Kernel Zone OS.
Perform the following procedure on the host (Control domain/Guest domain) where Kernel Zones operates.
Point
The user ID to be created in this procedure is the user to login the global zone host (Control domain/Guest domain) for forcibly stopping a node by the shutdown facility.
Use this user ID and password when setting the shutdown facility.
Creating a General User ID (optional)
Create a general user ID (optional) for the shutdown facility in the global zone host.
# useradd -m -d <Home directory> <User ID>
Setting Up the sudo Command
You must set up the sudo command so that the general user ID (optional) for the shutdown facility can execute the command as the root user.
Use the visudo command to add the following setting so that the general user created in Step 1 can execute the command without entering the password.
Since the shutdown facility uses the sudo command, a log of the sudo command is output to a syslog in 10 seconds.
For outputting a log of the sudo command to an arbitrary file not via the syslog, add the setting together with allowing the command to be executed.
# visudoExample of how to allow the command to be executed
<User ID> ALL=(root) NOPASSWD: ALLExample of how to disable log output to a syslog
Defaults !syslog
Example of how to output a sudo log to an arbitrary file
Defaults logfile=<Log file full path name>On all Kernel Zone, you must complete the user inquiry of the first SSH connection (RSA key generation) for all hosts where Kernel Zones operate. Follow the procedures detailed in "5.1.2.5.3 Logging in to Global Zone Host" to log in as the user for the shutdown facility.
Installation on PRIMECLUSTER (Kernel Zones)
For details on installing PRIMECLUSTER, see "3.1 PRIMECLUSTER Installation."
Configuring the Cluster (Kernel Zones)
Referring to "Chapter 4 Preparation Prior to Building a Cluster" and "Chapter 5 Building a Cluster," make the initial cluster setting in Kernel Zones.
Note
Do not change the timeout value on Kernel Zones from 10 seconds to a different value in CF settings.
Building the Cluster Application (Kernel Zones)
Build the cluster application in Kernel Zones.
Referring to "15.1.2 Building the cluster application (Control domain, Guest domain, and Kernel Zones)," build the cluster application in Kernel Zones.
This section explains how to build a cluster system between Kernel Zones among different physical partitions (Control domain)
Figure 15.4 Sample configuration of a cluster system between Kernel Zones among different physical partitions (Control domain)
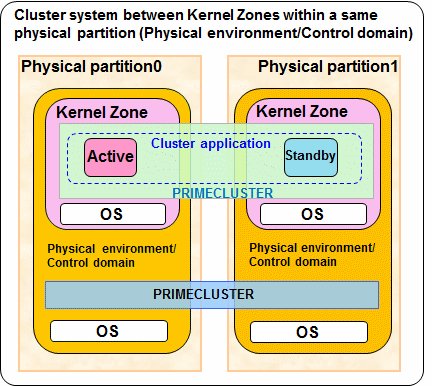
Figure 15.5 Building Procedure
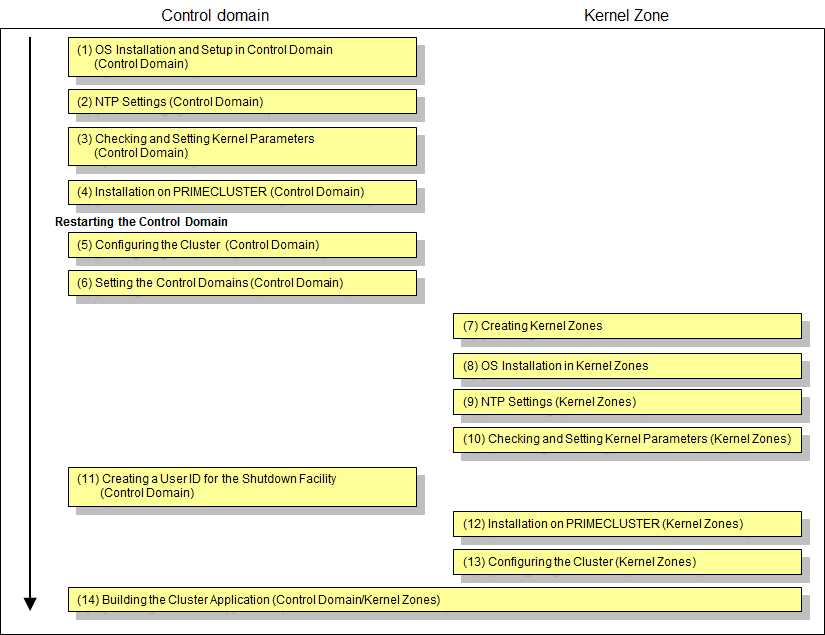
OS Installation and Setup in Control Domain (Control Domain)
Complete all preparations for configuring your Oracle VM Server for SPARC environment by installing the operating system and the Oracle VM Server for SPARC package in the control domain. Referring to "Oracle VM Server for SPARC Guide" or "Fujitsu SPARC M12 and Fujitsu M10/SPARC M10 Domain Configuration Guide" for the details, complete all preparations through to the files for the virtual disk server devices.
If a guest domain is not built, the preparation for configuring an Oracle VM Server environment is unnecessary.
Disk-Related Settings
When using a shared disk unit, you need to install and set up the related software product.
Carry out these settings in the control domain before installing PRIMECLUSTER.
For details, see "3.2.2 Setting Up Disk Units."
To use a shared disk unit in Kernel Zones, you must enable MPxIO. Execute the following command on the control domain.
Note that once this command is executed, the system is automatically restarted.
For the fibre channel connection
# stmsboot -D fp -eFor the ISCSI connection
# stmsboot -D iscsi -eNTP Settings (Control Domain)
This setup synchronizes the time in all of the nodes of the cluster system. Make sure to make this setting when configuring a cluster.
Carry out these settings in the control domain before installing PRIMECLUSTER.
Checking and Setting Kernel Parameters (Control Domain)
When operating the software products related to PRIMECLUSTER, you need to adjust kernel parameters according to the hardware configuration and applications.
Carry out these settings in the control domain before rebooting the system after "Step 4. Installation on PRIMECLUSTER (Control Domain)".
For details, see "3.2.3 Checking and Setting the Kernel Parameters."
Installation on PRIMECLUSTER (Control Domain)
For details on installing PRIMECLUSTER, see "3.1 PRIMECLUSTER Installation."
Configuring the Cluster (Control Domain)
Referring to "Chapter 4 Preparation Prior to Building a Cluster" and "Chapter 5 Building a Cluster," make the initial cluster settings in the control domain. To build clusters, perform procedures from "5.1.1 Setting Up CF and CIP" through "5.1.2 Configuring the Shutdown Facility" and also perform "5.2 Setting Up Power Supply Linkage" as needed.
Note
Set the timeout value of the cluster system on the control domain in CF settings as follows. See "11.3.1 Changing Time to Detect CF Heartbeat Timeout" for the settings.
Timeout value: 20 seconds
When a failure of the control domain (including the cluster application error) is detected and the control domain cannot be forcibly stopped, all the guest domains or all the I/O domains within the failed physical partition are stopped regardless of whether a cluster system exists. This is because of stopping the physical partition forcibly.
When a virtual I/O is set on the control domain, the guest domain within the failed physical partition may be stopped regardless of whether a cluster system exists.
Setting the Control Domains (Control Domain)
Referring to "Oracle VM Server for SPARC Guide" or "Fujitsu SPARC M12 and Fujitsu M10/SPARC M10 Domain Configuration Guide," complete all configurations for the control and guest domains.
Creating Kernel Zones
Create Kernel Zones. You must perform this section's procedure the same number of times as the number of Kernel Zones you need. For how to create Kernel Zones, see "Creating and Using Oracle Solaris Kernel Zones."
Using the zonecfg command, create Kernel Zones. Refer to the following example.
# zonecfg -z kzone01 *1
*1: "kzone01" is the Kernel Zone name (hereafter, the name is the same)
kzone01: No such zone configured
Use 'create' to begin configuring a new zone.
zonecfg:kzone01> create -t SYSsolaris-kz
zonecfg kzone01> set autoboot=false
zonecfg:kzone01> info virtual-cpu
zonecfg:kzone01> add virtual-cpu
zonecfg:kzone01:virtual-cpu> set ncpus=2
zonecfg:kzone01:virtual-cpu> end
zonecfg:kzone01> info virtual-cpu
virtual-cpu:
        ncpus: 2
zonecfg:kzone01> select capped-memory
zonecfg:kzone01:capped-memory> set physical=4G
zonecfg:kzone01:capped-memory> end
[Deleting a default network]
zonecfg:kzone01> remove anet id=0
[Assigning a network]
zonecfg:kzone01> add net
zonecfg:kzone01:net> set physical=net1   *2
zonecfg:kzone01:net> end
*2: If the physical interface is multiplexed within the Kernel Zone, it is necessary to specify two or more physical interfaces.
[Using a disk device in the Kernel Zone of Solaris 11.3 or earlier]
zonecfg:kzone01> add device
zonecfg:kzone01:device> set match=/dev/rdsk/c9t0d0    *3
zonecfg:kzone01:device> end
*3: Enter the disk device to be added to the Kernel Zone by using a full path.
[Using a disk device in the Kernel Zone of Solaris 11.4 or later]
zonecfg:kzone01> add device
zonecfg:kzone01:device> set storage=dev:dsk/c9t0d0    *4
zonecfg:kzone01:device> end
*4: Specify the disk device to be added to the Kernel Zone.
zonecfg:kzone01> verify
zonecfg:kzone01> commit
zonecfg:kzone01> exit
See
For details, see the manual of the zonecfg command and also Oracle Solaris documents.
OS Installation in Kernel Zones
Install the OS in Kernel Zones.
Install Solaris in Kernel Zones using the zoneadm install command. Below is an example of installing the Kernel Zone.
# zoneadm -z kzone01 install
Preparing to install zone <kzone01>.
Creating list of files to copy from the global zone.
Copying <155078> files to the zone.
Initializing zone product registry.
Determining zone package initialization order.
Preparing to initialize <1282> packages on the zone.
Initialized <1282> packages on zone.
Zone <kzone01> is initialized.
Installation of <51> packages was skipped.
The file </zone-a-system/root/var/sadm/system/logs/install_log> contains a log of the zone installation.
NTP Settings (Kernel Zones)
This setup synchronizes the time in all of the nodes of the cluster system. Make sure to make this setting when configuring a cluster.
Carry out these settings in Kernel Zones before installing PRIMECLUSTER.
Checking and Setting Kernel Parameters (Kernel Zones)
When operating the software products related to PRIMECLUSTER, you need to adjust the OS kernel parameters according to the hardware configuration and applications.
Carry out these settings in Kernel Zones before rebooting the system after "Installation on PRIMECLUSTER (Kernel Zones)".
For details, see "3.2.3 Checking and Setting the Kernel Parameters."
Creating a User ID for the Shutdown Facility (Control Domain)
In Kernel Zones environment, you must set a user ID for the shutdown facility because PRIMECLUSTER has to control the Kernel Zone OS.
Perform the following procedure on the host (Control domain) where Kernel Zones operates.
Point
The user ID to be created in this procedure is the user to login the global zone host (Control domain) for forcibly stopping a node by the shutdown facility.
Use this user ID and password when setting the shutdown facility.
Creating a General User ID (optional)
Create a general user ID (optional) for the shutdown facility in the global zone host.
# useradd -m -d <Home directory> <User ID>
Setting Up the sudo Command
You must set up the sudo command so that the general user ID (optional) for the shutdown facility can execute the command as the root user.
Use the visudo command to add the following setting so that the general user created in Step 1 can execute the command without entering the password.
Since the shutdown facility uses the sudo command, a log of the sudo command is output to a syslog in 10 seconds.
For outputting a log of the sudo command to an arbitrary file not via the syslog, add the setting together with allowing the command to be executed.
# visudoExample of how to allow the command to be executed
<User ID> ALL=(root) NOPASSWD: ALLExample of how to disable log output to a syslog
Defaults !syslog
Example of how to output a sudo log to an arbitrary file
Defaults logfile=<Log file full path name>On all Kernel Zones, you must complete the user inquiry of the first SSH connection (RSA key generation) for all hosts where Kernel Zones operates.. Follow the procedures detailed in "5.1.2.5.3 Logging in to Global Zone Host" to log in as the user for the shutdown facility.
Installation on PRIMECLUSTER (Kernel Zones)
For details on installing PRIMECLUSTER, see "3.1 PRIMECLUSTER Installation."
Configuring the Cluster (Kernel Zones)
Referring to "Chapter 4 Preparation Prior to Building a Cluster" and "Chapter 5 Building a Cluster," make the initial cluster setting in Kernel Zones.
Note
Do not change the timeout value on Kernel Zones from 10 seconds to a different value in CF settings.
Building the Cluster Application (Control domain/Kernel Zones)
Build the cluster application in the control domain and Kernel Zones.
Referring to "15.1.2 Building the cluster application (Control domain, Guest domain, and Kernel Zones)," build the cluster application in the control domain and Kernel Zones.
This section explains how to build a cluster system between Kernel Zones among different physical partitions (Guest domain).
Figure 15.6 Sample configuration of a cluster system between Kernel Zones among different physical partitions (Guest domain)

Figure 15.7 Building Procedure
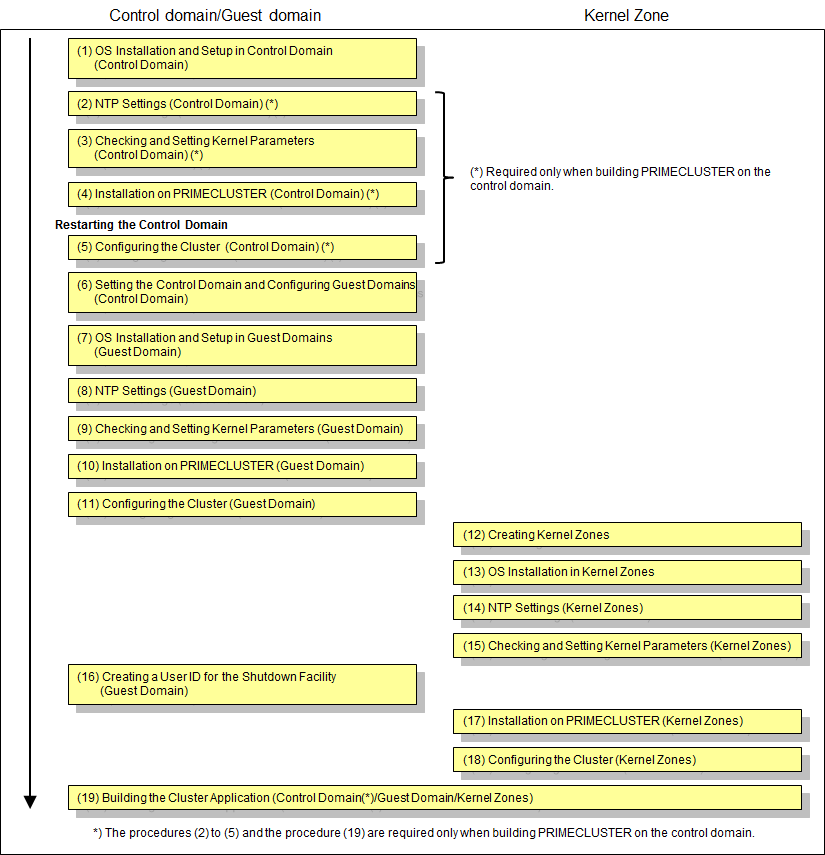
OS Installation and Setup in Control Domain (Control Domain)
Complete all preparations for configuring your Oracle VM Server for SPARC environment by installing the operating system and the Oracle VM Server for SPARC package in the control domain. Referring to "Oracle VM Server for SPARC Guide" or "Fujitsu SPARC M12 and Fujitsu M10/SPARC M10 Domain Configuration Guide" for the details, complete all preparations through to the files for the virtual disk server devices.
If a guest domain is not built, the preparation for configuring an Oracle VM Server environment is unnecessary.
Disk-Related Settings
When using a shared disk unit, you need to install and set up the related software product.
Carry out these settings in the control domain before installing PRIMECLUSTER.
For details, see "3.2.2 Setting Up Disk Units."
NTP Settings (Control Domain)
This setup synchronizes the time in all of the nodes of the cluster system. Make sure to make this setting when configuring a cluster.
Carry out these settings in the control domain before installing PRIMECLUSTER.
Checking and Setting Kernel Parameters (Control Domain)
When operating the software products related to PRIMECLUSTER, you need to adjust kernel parameters according to the hardware configuration and applications.
Carry out these settings in the control domain before rebooting the system after "Step 4. Installation on PRIMECLUSTER (Control Domain)".
For details, see "3.2.3 Checking and Setting the Kernel Parameters."
Installation on PRIMECLUSTER (Control Domain)
For details on installing PRIMECLUSTER, see "3.1 PRIMECLUSTER Installation."
Configuring the Cluster (Control Domain)
Referring to "Chapter 4 Preparation Prior to Building a Cluster" and "Chapter 5 Building a Cluster," make the initial cluster settings in the control domain. To build clusters, perform procedures from "5.1.1 Setting Up CF and CIP" through "5.1.2 Configuring the Shutdown Facility" and also perform "5.2 Setting Up Power Supply Linkage" as needed.
Note
Set the timeout value of the cluster system on the control domain in CF settings as follows. See "11.3.1 Changing Time to Detect CF Heartbeat Timeout" for the settings.
Timeout value: 20 seconds
When a failure of the control domain (including the cluster application error) is detected and the control domain cannot be forcibly stopped, all the guest domains or all the I/O domains within the failed physical partition are stopped regardless of whether a cluster system exists. This is because of stopping the physical partition forcibly.
When a virtual I/O is set on the control domain, the guest domain within the failed physical partition may be stopped regardless of whether a cluster system exists.
Setting the Control Domain and Configuring Guest Domains
Referring to "Oracle VM Server for SPARC Guide" or "Fujitsu SPARC M12 and Fujitsu M10/SPARC M10 Domain Configuration Guide," complete all configurations for the control and guest domains.
Sample Configuration of Control and Guest Domains
As the virtual disk used as the system disk, specify a file in the format /LDoms/Vol1/vdisk0.img.
For the disk used as the switching disk in the cluster, specify a block device like /dev/dsk/cXtXdXs2. When doing so, specify a disk as the full disk without specifying the slice option.
Example: Configuration Script for Control Domain
# Define the virtual disk server.
ldm add-vdiskserver primary-vds0 primary
# Define the virtual disk server device.
ldm add-vdiskserverdevice /LDoms/Vol1/vdisk0.img vol1@primary-vds0
ldm add-vdiskserverdevice /dev/dsk/c0t6000B5D0006A0000006A0FB800130000d0s2 vol2@primary-vds0
Example: Configuration Script for Guest Domain
VDISK0=vol1@primary-vds0
VSHDISK0=vol2@primary-vds0
...
ldm add-vdisk vdisk0 $VDISK0 $DOMAIN
ldm add-vdisk timeout=360 vshdisk0 $VSHDISK0 $DOMAIN
Setting change of Virtual Network Device (vnet)
When using a Kernel Zone on the guest domain, you must assign the MAC address for the Kernel Zone to the virtual network device (vnet) that is used in the Kernel Zone. For the virtual network device (vnet) that is used as a public LAN, administrative LAN, or cluster interconnect in the Kernel Zone from the control domain, execute the following command.
Setting the MAC address automatically
# ldm set-vnet alt-mac-addrs=auto <virtual network device name> <domain name>
Setting the MAC address manually
# ldm set-vnet alt-mac-addrs=<MAC address> <virtual network device name> <domain name>
When creating multiple Kernel Zones on the guest domain, separate alt-mac-addrs by ", (comma)" to specify "auto" or MAC addresses for the number of Kernel Zones.
Example: using vnet0, vnet1, and vnet2 in three Kernel Zones on the guest1 domain (MAC address is automatically set)
# ldm set-vnet alt-mac-addrs=auto,auto,auto vnet0 guest1
# ldm set-vnet alt-mac-addrs=auto,auto,auto vnet1 guest1
# ldm set-vnet alt-mac-addrs=auto,auto,auto vnet2 guest1
OS Installation and Setup in Guest Domains (Guest Domain)
Install the operating system in each guest domain. Referring to "Oracle VM Server for SPARC Guide" or "Fujitsu SPARC M12 and Fujitsu M10/SPARC M10 Domain Configuration Guide," complete installation of operating systems in all guest domains.
To use a shared disk unit in Kernel Zones, you must enable MPxIO. Execute the following command on the control domain.
Note that once this command is executed, the system is automatically restarted.
For the fibre channel connection
# stmsboot -D fp -eFor the ISCSI connection
# stmsboot -D iscsi -eNTP Settings (Guest Domain)
This setup serves to synchronize the clocks of every node in the cluster system. Make sure to make this setting when configuring a cluster.
Carry out these settings in the guest domain before installing PRIMECLUSTER.
Checking and Setting Kernel Parameters (Guest Domain)
For running PRIMECLUSTER-related software, the OS kernel parameters need to be adjusted to the environment.
Carry out these settings in the guest domain before rebooting the system after "Step 10. Installation on PRIMECLUSTER (Guest Domain)".
For details, refer to "3.2.3 Checking and Setting the Kernel Parameters".
Installation on PRIMECLUSTER (Guest Domain)
For details on installing PRIMECLUSTER, refer to "3.1 PRIMECLUSTER Installation."
Configuring the Cluster (Guest Domain)
Referring to "Chapter 4 Preparation Prior to Building a Cluster" and "Chapter 5 Building a Cluster", make the initial cluster settings in the guest domain. To build clusters, perform procedures from "5.1.1 Setting Up CF and CIP" through "5.1.2 Configuring the Shutdown Facility" and also perform "5.2 Setting Up Power Supply Linkage" as needed.
Note
When stopping a guest domain forcibly after detecting an error (including the cluster application error) on the guest domain, stop all Kernel Zones within the failed guest domain regardless of whether a cluster system exists.
Creating Kernel Zones
Create Kernel Zones. You must perform this section's procedure the same number of times as the number of Kernel Zones you need. For how to create Kernel Zones, see "Creating and Using Oracle Solaris Kernel Zones."
Using the zonecfg command, create Kernel Zones. Refer to the following example.
# zonecfg -z kzone01 *1
*1: "kzone01" is the Kernel Zone name (hereafter, the name is the same)
kzone01: No such zone configured
Use 'create' to begin configuring a new zone.
zonecfg:kzone01> create -t SYSsolaris-kz
zonecfg kzone01> set autoboot=false
zonecfg:kzone01> info virtual-cpu
zonecfg:kzone01> add virtual-cpu
zonecfg:kzone01:virtual-cpu> set ncpus=2
zonecfg:kzone01:virtual-cpu> end
zonecfg:kzone01> info virtual-cpu
virtual-cpu:
        ncpus: 2
zonecfg:kzone01> select capped-memory
zonecfg:kzone01:capped-memory> set physical=4G
zonecfg:kzone01:capped-memory> end
[Deleting a default network]
zonecfg:kzone01> remove anet id=0
[Assigning a network]
zonecfg:kzone01> add net
zonecfg:kzone01:net> set physical=net1   *2
zonecfg:kzone01:net> end
*2: If the physical interface is multiplexed within the Kernel Zone, it is necessary to specify two or more physical interfaces.
[Using a disk device in the Kernel Zone of Solaris 11.3 or earlier]
zonecfg:kzone01> add device
zonecfg:kzone01:device> set match=/dev/rdsk/c9t0d0    *3
zonecfg:kzone01:device> end
*3: Enter the disk device to be added to the Kernel Zone by using a full path.
[Using a disk device in the Kernel Zone of Solaris 11.4 or later]
zonecfg:kzone01> add device
zonecfg:kzone01:device> set storage=dev:dsk/c9t0d0    *4
zonecfg:kzone01:device> end
*4: Specify the disk device to be added to the Kernel Zone.
zonecfg:kzone01> verify
zonecfg:kzone01> commit
zonecfg:kzone01> exit
See
For details, see the manual of the zonecfg command and also Oracle Solaris documents.
OS Installation in Kernel Zones
Install the OS in Kernel Zones.
Install Solaris in Kernel Zones using the zoneadm install command. Below is an example of installing the Kernel Zone.
# zoneadm -z kzone01 install
Preparing to install zone <kzone01>.
Creating list of files to copy from the global zone.
Copying <155078> files to the zone.
Initializing zone product registry.
Determining zone package initialization order.
Preparing to initialize <1282> packages on the zone.
Initialized <1282> packages on zone.
Zone <kzone01> is initialized.
Installation of <51> packages was skipped.
The file </zone-a-system/root/var/sadm/system/logs/install_log> contains a log of the zone installation.
NTP Settings (Kernel Zones)
This setup synchronizes the time in all of the nodes of the cluster system. Make sure to make this setting when configuring a cluster.
Carry out these settings in Kernel Zones before installing PRIMECLUSTER.
Checking and Setting Kernel Parameters (Kernel Zones)
When operating the software products related to PRIMECLUSTER, you need to adjust the OS kernel parameters according to the hardware configuration and applications.
Carry out these settings in Kernel Zones before rebooting the system after "Installation on PRIMECLUSTER (Kernel Zones)".
For details, see "3.2.3 Checking and Setting the Kernel Parameters."
Creating a User ID for the Shutdown Facility (Guest Domain)
In Kernel Zones environment, you must set a user ID for the shutdown facility because PRIMECLUSTER has to control the Kernel Zone OS.
Perform the following procedure on the host (Guest domain) where Kernel Zones operates.
Point
The user ID to be created in this procedure is the user to login the global zone host (Guest domain) for forcibly stopping a node by the shutdown facility.
Use this user ID and password when setting the shutdown facility.
Creating a General User ID (optional)
Create a general user ID (optional) for the shutdown facility in the global zone host.
# useradd -m -d <Home directory> <User ID>
Setting Up the sudo Command
You must set up the sudo command so that the general user ID (optional) for the shutdown facility can execute the command as the root user.
Use the visudo command to add the following setting so that the general user created in Step 1 can execute the command without entering the password.
Since the shutdown facility uses the sudo command, a log of the sudo command is output to a syslog in 10 seconds.
For outputting a log of the sudo command to an arbitrary file not via the syslog, add the setting together with allowing the command to be executed.
# visudoExample of how to allow the command to be executed
<User ID> ALL=(root) NOPASSWD: ALLExample of how to disable log output to a syslog
Defaults !syslog
Example of how to output a sudo log to an arbitrary file
Defaults logfile=<Log file full path name>On all Kernel Zones, you must complete the user inquiry of the first SSH connection
(RSA key generation) for all hosts where Kernel Zones operates. Follow the procedures detailed in "5.1.2.5.3 Logging in to Global Zone Host" to log in as the user for the shutdown facility.
Installation on PRIMECLUSTER (Kernel Zones)
For details on installing PRIMECLUSTER "3.1 PRIMECLUSTER Installation."
Configuring the Cluster (Kernel Zones)
Referring to "Chapter 4 Preparation Prior to Building a Cluster" and "Chapter 5 Building a Cluster," make the initial cluster setting in Kernel Zones.
Note
Do not change the timeout value on Kernel Zones from 10 seconds to a different value in CF settings.
Building the Cluster Application (Control Domain/Guest Domain/Kernel Zones)
Build the cluster application in the control domain, guest domain, and Kernel Zones.
Referring to "15.1.2 Building the cluster application (Control domain, Guest domain, and Kernel Zones)," build the cluster application in the control domain, guest domain, and Kernel Zones.