Install the Solaris software and the software required for PRIMECLUSTER in the control and guest domains of all nodes. Then make the OS and hardware settings required for actual implementation and operation.
For further details on configuring Oracle VM Server for SPARC, refer to "Oracle VM Server for SPARC Guide" or "Fujitsu SPARC M12 and Fujitsu M10/SPARC M10 Domain Configuration Guide."
The building procedure is different according to the following cluster systems you are using:
Cluster system between guest domains within a same physical partition. (Supported only for SPARC M10 and M12)
Cluster system between guest domains among different physical partitions. (Supported only for SPARC M10 and M12)
Cluster system between control domains.
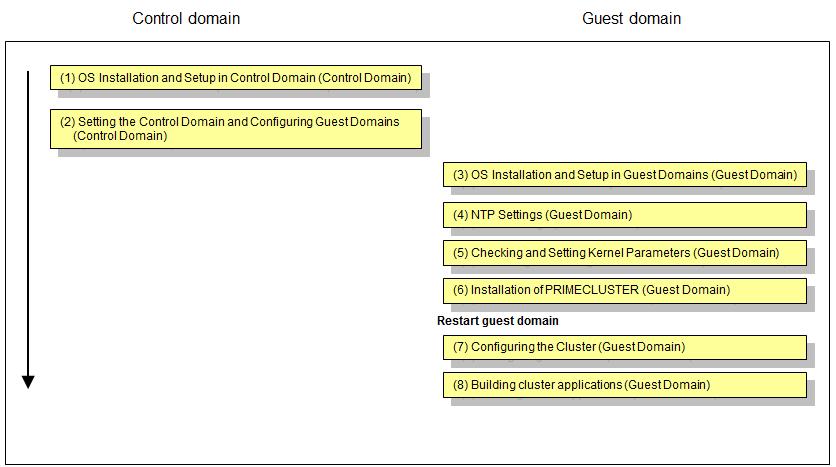
OS Installation and Setup in Control Domain (Control Domain)
Complete all preparations for configuring your Oracle VM Server for SPARC environment by installing the operating system and the Oracle VM Server for SPARC package in the control domain. Referring to "Oracle VM Server for SPARC Guide" or "Fujitsu SPARC M12 and Fujitsu M10/SPARC M10 Domain Configuration Guide" for the details, complete all preparations through to the files for the virtual disk server devices.
Disk-Related Settings
For using the shared disk device, installation and setup of related software products are required.
Carry out these settings in the control domain before installing PRIMECLUSTER.
For details, refer to "3.2.2 Setting Up Disk Units".
Do not register the shared disk device on the control domain.
Setting the Control Domain and Configuring Guest Domains
Referring to "Oracle VM Server for SPARC Guide" or "Fujitsu SPARC M12 and Fujitsu M10/SPARC M10 Domain Configuration Guide," complete all configurations for the control and guest domains.
Sample Configuration of Control and Guest Domains
As the virtual disk used as the system disk, specify the file name or the block device.
For a disk used as the switching disk in the cluster, make sure to specify the block device and export the same number of disks as guest domains which share the disk for each disk.
When doing so, pay attention to the following points
Specify a disk as the full disk without specifying the slice option
When exporting one disk more than once, specify the -f option at the second time or later.
Configuration Script for Control Domain
# Define the virtual disk server.
ldm add-vdiskserver primary-vds0 primary
# Define the virtual disk server device of the system disk.
ldm add-vdiskserverdevice <file name of disk 1> <volume name 1>@<virtual disk service name>
ldm add-vdiskserverdevice < file name of disk 2> <volume name 2>@<virtual disk service name>
# Define the virtual disk server device of the shared disk.
ldm add-vdiskserverdevice <block name> <volume name 3>@<virtual disk service name>
ldm add-vdiskserverdevice -f <block name> <volume name 4>@<virtual disk service name>
Configuration Script for Guest Domain
VDISK0=<volume name 1>@<virtual disk service name>
VDISK1=<volume name 2>@<virtual disk service name>
VSHDISK0=<volume name 3>@<virtual disk service name>
VSHDISK1=<volume name 4>@<virtual disk service name>
DOMAIN1=<domain name 1>
DOMAIN2=<domain name 2>
[...]
ldm add-vdisk <virtual disk name 1> $VDISK0 $DOMAIN1
ldm add-vdisk <virtual disk name 2> $VDISK1 $DOMAIN2
ldm add-vdisk timeout=360 <virtual disk name 3> $VSHDISK0 $DOMAIN1
ldm add-vdisk timeout=360 <virtual disk name 4> $VSHDISK1 $DOMAIN2
Example:
Scripts for the following configurations
file name of disk 1:/LDoms/Vol1/vdisk0.img
file name of disk 2:/LDoms/Vol2/vdisk0.img
block name:/dev/dsk/c0t6000B5D0006A0000006A0FB800130000d0s2
volume name 1: vol1_ldom1
volume name 2: vol1_ldom2
volume name 3: vol2_ldom1
volume name 4: vol2_ldom2
virtual disk service name: primary-vds0
domain name 1: ldom1
domain name 2: ldom2
virtual disk name 1: vdisk0
virtual disk name 2: vdisk1
virtual disk name 3: vshdisk0
virtual disk name 4: vshdisk1
Configuration Script for Control Domain
# Define the virtual disk server.
ldm add-vdiskserver primary-vds0 primary
# Define the virtual disk server device of the system disk.
ldm add-vdiskserverdevice /LDoms/Vol1/vdisk0.img vol1_ldom1@primary-vds0
ldm add-vdiskserverdevice /LDoms/Vol2/vdisk0.img vol1_ldom2@primary-vds0
# Define the virtual disk server device of the shared disk.
ldm add-vdiskserverdevice /dev/dsk/c0t6000B5D0006A0000006A0FB800130000d0s2 vol2_ldom1@primary-vds0
ldm add-vdiskserverdevice -f /dev/dsk/c0t6000B5D0006A0000006A0FB800130000d0s2 vol2_ldom2@primary-vds0
Configuration Script for Guest Domain
VDISK0=vol1_ldom1@primary-vds0
VDISK1=vol1_ldom2@primary-vds0
VSHDISK0=vol2_ldom1@primary-vds0
VSHDISK1=vol2_ldom2@primary-vds0
DOMAIN1=ldom1
DOMAIN2=ldom2
[...]
ldm add-vdisk vdisk0 $VDISK0 $DOMAIN1
ldm add-vdisk vdisk1 $VDISK1 $DOMAIN2
ldm add-vdisk timeout=360 vshdisk0 $VSHDISK0 $DOMAIN1
ldm add-vdisk timeout=360 vshdisk1 $VSHDISK1 $DOMAIN2
OS Installation and Setup in Guest Domains (Guest Domain)
Install the operating system in each guest domain. Referring to "Oracle VM Server for SPARC Guide" or "Fujitsu SPARC M12 and Fujitsu M10/SPARC M10 Domain Configuration Guide," complete installation of operating systems in all guest domains.
NTP Settings (Guest Domain)
This setup serves to synchronize the clocks of every node in the cluster system. Make sure to make this setting when configuring a cluster.
Carry out these settings in the guest domain before installing PRIMECLUSTER.
Checking and Setting Kernel Parameters (Guest Domain)
For running PRIMECLUSTER-related software, the OS kernel parameters need to be adjusted to the environment.
Carry out these settings in the guest domain before rebooting the system after "Step 6 Installation of PRIMECLUSTER (Guest Domain)".
For details, refer to "3.2.3 Checking and Setting the Kernel Parameters."
Installation of PRIMECLUSTER (Guest Domain)
For details on installing PRIMECLUSTER, refer to "3.1 PRIMECLUSTER Installation."
Restart Guest Domain after installing PRIMECLUSTER.
Configuring the Cluster (Guest Domain)
Referring to "Chapter 4 Preparation Prior to Building a Cluster" and "Chapter 5 Building a Cluster", make the initial cluster settings in the guest domain.
Note
For using the Migration function of Oracle VM Server for SPARC, see "Chapter 17 When Using the Migration Function in Oracle VM Server for SPARC Environment."
Building cluster applications (Guest Domain)
Build cluster applications. For details on how to build cluster applications on guest domains, see "Building Cluster Applications."
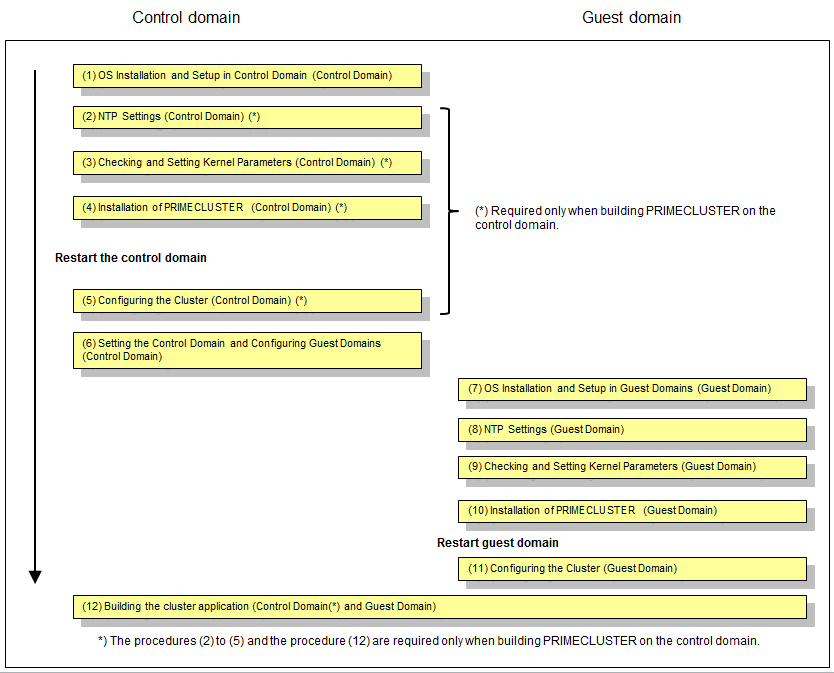
OS Installation and Setup in Control Domain (Control Domain)
Complete all preparations for configuring your Oracle VM Server for SPARC Environment by installing the operating system and the Oracle VM Server for SPARC package in the control domain. Referring to "Oracle VM Server for SPARC Guide" or "Fujitsu SPARC M12 and Fujitsu M10/SPARC M10 Domain Configuration Guide" for the details, complete all preparations through to the files for the virtual disk server devices.
Disk-Related Settings
For using the shared disk device, installation and setup of related software products are required.
Carry out these settings in the control domain before installing PRIMECLUSTER.
For details, refer to "3.2.2 Setting Up Disk Units".
At this time, do not set GDS yet. Set GDS in "Step 12. Building the cluster application (Control Domain and Guest Domain)."
NTP Settings (Control Domain)
This setup serves to synchronize the clocks of every node in the cluster system. Make sure to make this setting when configuring a cluster.
Carry out these settings in the control domain before installing PRIMECLUSTER.
Checking and Setting Kernel Parameters (Control Domain)
For running PRIMECLUSTER-related software, the OS kernel parameters need to be adjusted to the environment.
Carry out these settings in the control domain before rebooting the system after "Step 4 Installation of PRIMECLUSTER (Control Domain)".
For details, refer to "3.2.3 Checking and Setting the Kernel Parameters".
Installation on PRIMECLUSTER (Control Domain)
For details on installing PRIMECLUSTER, refer to "3.1 PRIMECLUSTER Installation".
Configuring the Cluster (Control Domain)
Referring to "Chapter 4 Preparation Prior to Building a Cluster" and "Chapter 5 Building a Cluster", make the initial cluster settings in the control domain. To build clusters, perform procedures from "5.1.1 Setting Up CF and CIP" through "5.1.2 Configuring the Shutdown Facility" and also perform "5.2 Setting Up Power Supply Linkage" as needed.
Note
Set the timeout value of the cluster system on the control domain in CF settings as follows. See "11.3.1 Changing Time to Detect CF Heartbeat Timeout" for the settings.
Timeout value: 20 seconds
When a failure of the control domain (including the cluster application error) is detected and the control domain cannot be forcibly stopped, all the guest domains or all the I/O domains within the failed physical partition are stopped regardless of whether a cluster system exists. This is because of stopping the physical partition forcibly.
When the virtual I/O is set on the control domain, the guest domain within the failed physical partition may be stopped regardless of whether a cluster system exists.
Setting the Control Domain and Configuring Guest Domains
Referring to "Oracle VM Server for SPARC Guide" or "Fujitsu SPARC M12 and Fujitsu M10/SPARC M10 Domain Configuration Guide," complete all configurations for the control and guest domains.
Note
When performing the migration of the cluster on the control domains, the network must be set so that the control domains can access the guest domains via SSH.
For more information, see "Chapter 17 When Using the Migration Function in Oracle VM Server for SPARC Environment."
Sample Configuration of Control and Guest Domains
As the virtual disk used as the system disk, specify the file name or the block device.
For the disk used as the switching disk in the cluster, specify the block device, for example, /dev/dsk/cXtXdXs2. When doing so, specify the disk as the full disk without specifying the slice option.
Configuration Script for Control Domain
# Define the virtual disk server.
ldm add-vdiskserver primary-vds0 primary
# Define the virtual disk server device.
ldm add-vdiskserverdevice <disk name> <volume name>@<virtual disk service name>
ldm add-vdiskserverdevice <block name> <volume name>@<virtual disk service name>
Configuration Script for Guest Domain
VDISK0=<volume name 1>@<virtual disk service name>
VSHDISK0=<volume name 2>@<virtual disk service name>
[...]
ldm add-vdisk <virtual disk service name 1> $VDISK0 $DOMAIN1
ldm add-vdisk timeout=360 <virtual disk service name 2> $VSHDISK0 $DOMAIN1
Example:
Script example of the following configuration
Disk name 1: /LDoms/Vol1/vdisk0.img
Block name: /dev/dsk/c0t6000B5D0006A0000006A0FB800130000d0s2
Volume name 1: vol1
Volume name 2: vol2
Virtual disk service nam: primary-vds0
Virtual disk name 1: vdisk0
Virtual disk name 2: vshdisk0
Configuration Script for Control Domain
# Define the virtual disk server.
ldm add-vdiskserver primary-vds0 primary
# Define the virtual disk server device.
ldm add-vdiskserverdevice /LDoms/Vol1/vdisk0.img vol1@primary-vds0
ldm add-vdiskserverdevice /dev/dsk/c0t6000B5D0006A0000006A0FB800130000d0s2 vol2@primary-vds0
Configuration Script for Guest Domain
VDISK0=vol1@primary-vds0
VSHDISK0=vol2@primary-vds0
[...]
ldm add-vdisk vdisk0 $VDISK0 $DOMAIN
ldm add-vdisk timeout=360 vshdisk0 $VSHDISK0 $DOMAIN
OS Installation and Setup in Guest Domains (Guest Domain)
Install the operating system in each guest domain. Referring to "Oracle VM Server for SPARC Guide" or "Fujitsu SPARC M12 and Fujitsu M10/SPARC M10 Domain Configuration Guide," complete installation of operating systems in all guest domains.
NTP Settings (Guest Domain)
This setup serves to synchronize the clocks of every node in the cluster system. Make sure to make this setting when configuring a cluster.
Carry out these settings in the guest domain before installing PRIMECLUSTER.
Checking and Setting Kernel Parameters (Guest Domain)
For running PRIMECLUSTER-related software, the OS kernel parameters need to be adjusted to the environment.
Carry out these settings in the guest domain before rebooting the system after "Installation of PRIMECLUSTER (Guest Domain)".
For details, refer to "3.2.3 Checking and Setting the Kernel Parameters".
Installation of PRIMECLUSTER (Guest Domain)
For details on installing PRIMECLUSTER, refer to "3.1 PRIMECLUSTER Installation".
To set the I/O fencing function in the guest domain, perform the settings described in "3.2.4 Setting I/O Fencing Function of GDS" before restarting the guest domain.
Configuring the Cluster (Guest Domain)
Referring to "Chapter 4 Preparation Prior to Building a Cluster" and "Chapter 5 Building a Cluster", make the initial cluster settings in the guest domain.
Note
When building PRIMECLUSTER also on the control domain, do not change the timeout value on guest OSes from 10 seconds to a different value in CF settings.
For using the Migration function of Oracle VM Server for SPARC, see "Chapter 17 When Using the Migration Function in Oracle VM Server for SPARC Environment."
Building the cluster application (Control Domain and Guest Domain)
Build the cluster application. For details on how to build the cluster application on the guest domain, see "Building Cluster Applications."
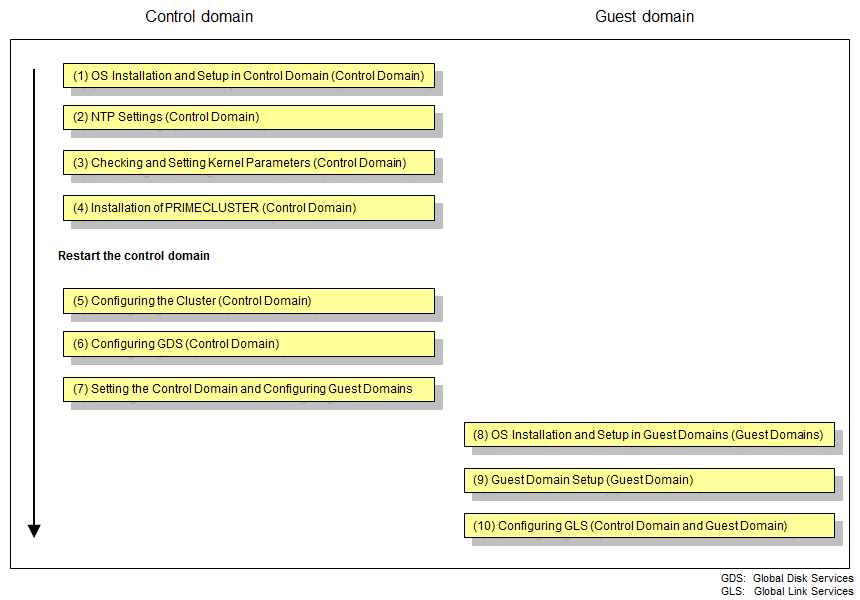
OS Installation and Setup in Control Domain (Control Domain)
Complete all preparations for configuring your Oracle VM Server for SPARC Environment by installing the operating system and the Oracle VM Server for SPARC package in the control domain. Referring to "Oracle VM Server for SPARC Guide" or "Fujitsu SPARC M12 and Fujitsu M10/SPARC M10 Domain Configuration Guide" for the details, complete all preparations through to the files for the virtual disk server devices.
Disk-Related Settings
For using the shared disk device, installation and setup of related software products are required.
Carry out these settings in the control domain before installing PRIMECLUSTER.
For details, refer to "3.2.2 Setting Up Disk Units".
At this time, do not set GDS yet. Set GDS in "Step 6. Configuring GDS (Control Domain)."
NTP Settings (Control Domain)
This setup serves to synchronize the clocks of every node in the cluster system. Make sure to make this setting when configuring a cluster.
Carry out these settings in the control domain before installing PRIMECLUSTER.
Checking and Setting Kernel Parameters (Control Domain)
For running PRIMECLUSTER-related software, the OS kernel parameters need to be adjusted to the environment.
Carry out these settings in the control domain before rebooting the system after "Installation of PRIMECLUSTER (Control Domain)".
For details, refer to "3.2.3 Checking and Setting the Kernel Parameters".
Installation of PRIMECLUSTER (Control Domain)
For details on installing PRIMECLUSTER, refer to "3.1 PRIMECLUSTER Installation".
After installing PRIMECLUSTER, make the settings for the OBP auto-boot? variable and in /etc/system.
Setting the OBP auto-boot? Variable
In order to prevent the control domain from rebooting automatically after an enforced stop, set the OBP auto-boot? variable to "false". Otherwise, the suspended control domain may be automatically rebooted, possibly causing data loss due to restored virtual in- and output from guest domains that were stopped.
Example:
{1} ok setenv auto-boot? false
auto-boot? =          false
{1} ok reset-all
After setting the OBP auto-boot? variable, reboot the node to make the OBP settings effective.
Settings in /etc/system
To prevent an automatic reboot of a panicked node, perform the following settings for /etc/system. Then restart it.
set halt_on_panic=1
After the panic occurs, the node is stopped in OBP mode with this setting.
Configuring the Cluster (Control Domain)
Referring to "Chapter 4 Preparation Prior to Building a Cluster" and "Chapter 5 Building a Cluster", make the initial cluster settings in the control domain.
Configuring GDS (Control Domain)
Referring to "Initial GDS Setup", make the GDS settings in the control domain.
For further details on how to make GDS settings, refer to the "PRIMECLUSTER Global Disk Services Configuration and Administration Guide".
Note
For enhanced availability, we recommend allocating virtual disks to mirror volumes if they are to be used as guest domain system disks.
When configuring GDS, create a root-class or local-class mirror volume on which the files for the virtual disks shall be located. Do not deploy any files for virtual disks on shared-class volumes.
When using multiple guest domains, create shared classes separately for each guest domain.
Setting the Control Domain and Configuring Guest Domains
Referring to "Oracle VM Server for SPARC Guide" or "Fujitsu SPARC M12 and Fujitsu M10/SPARC M10 Domain Configuration Guide," complete all configurations for the control and guest domains.
Sample Configuration of Control and Guest Domains
As the virtual disk used as the system disk, specify the file name or the block device.
As the shared-class volume to be used as the switching disk in the cluster, specify a block device like /dev/sfdsk/class0001/dsk/volume0001.
In such cases, make sure to specify the "slice" option.
Configuration Script for Control Domain
# Define the virtual disk server.
ldm add-vdiskserver primary-vds0 primary
# Define the virtual disk server device.
ldm add-vdiskserverdevice <disk name> <volume name>@<virtual disk service name>
ldm add-vdiskserverdevice <block name> <volume name>@<virtual disk service name>
Configuration Script for Guest Domain
VDISK0=<volume name 1>@<virtual disk service name>
VSHDISK0=<volume name 2>@<virtual disk service name>
[...]
ldm add-vdisk <virtual disk service name 1> $VDISK0 $DOMAIN1
ldm add-vdisk timeout=360 <virtual disk service name 2> $VSHDISK0 $DOMAIN1
Example:
Script example of the following configuration
Disk name 1: /LDoms/Vol1/vdisk0.img
Block name: /dev/dsk/c0t6000B5D0006A0000006A0FB800130000d0s2
Volume name 1: vol1
Volume name 2: vol2
Virtual disk service nam: primary-vds0
Virtual disk name 1: vdisk0
Virtual disk name 2: vshdisk0
Configuration Script for Control Domain
# Define the virtual disk server.
ldm add-vdiskserver primary-vds0 primary
# Define the virtual disk server device.
ldm add-vdiskserverdevice /LDoms/Vol1/vdisk0.img vol1@primary-vds0
ldm add-vdiskserverdevice options=slice /dev/sfdsk/class0001/dsk/volume0001 vol2@primary-vds0
Configuration Script for Guest Domain
VDISK0=vol1@primary-vds0
VSHDISK0=vol2@primary-vds0
[...]
ldm add-vdisk vdisk0 $VDISK0 $DOMAIN
ldm add-vdisk timeout=360 vshdisk0 $VSHDISK0 $DOMAIN
Creation of Virtual Network
For administrative/user LAN communication via virtual network (vnet) devices in the guest domain, create a virtual switch service (vsw) in the control domain and add the vnet devices to the guest domain.
Besides this, for creating network redundancy and for switching clusters after a network failure in environments using virtual network devices for user LAN communication of guest domains, GLS must be installed in both control and guest domains. For using GLS, create a virtual switch service and a virtual network device for multiple physical network devices.
See
For details on how to create a virtual network, refer to "Oracle VM Server for SPARC Guide" or "Fujitsu SPARC M12 and Fujitsu M10/SPARC M10 Domain Configuration Guide."
Note
In clusters between control domains, the only redundancy method supported by GLS is NIC switching.
OS Installation and Setup in Guest Domains (Guest Domains)
With PRIMECLUSTER, in order to enable cluster switching, an operating system must be installed in each guest domain. Referring to "Oracle VM Server for SPARC Guide" or "Fujitsu SPARC M12 and Fujitsu M10/SPARC M10 Domain Configuration Guide," complete installation of operating systems in all guest domains.
After installing the operating systems, install GLS in the guest domains.
See
For details on installing GLS, refer to the "PRIMECLUSTER GL Installation Guide".
Note
The guest domains recognize the GDS volume created in the control domain as a virtual disk. At this point, the number "0" is allocated as the slice, rendering the device name into a format like, e.g., /dev/dsk/c0d1s0. As this name is different from the device name in the control domain, be careful not to confuse the disk to be used with another one.
Example) The following is an example for using the virtual disk /dev/dsk/c0d1s0 in a guest domain.
# prtvtoc /dev/rdsk/c0d1s0
* /dev/rdsk/c0d1s0 (volume "vdisk") partition map
*
* Dimensions:
*     512 bytes/sector
*    2048 sectors/track
*      16 tracks/cylinder
*   32768 sectors/cylinder
*     874 cylinders
*     874 accessible cylinders
*
* Flags:
*   1: unmountable
*  10: read-only
*
* Unallocated space:
*       First     Sector    Last
*       Sector     Count    Sector
*           0         1         0
*
*                          First     Sector    Last
* Partition  Tag  Flags    Sector     Count    Sector  Mount Directory
 0      0    00          1  28639232  28639232
# newfs /dev/dsk/c0d1s0
Guest Domain Setup (Guest Domain)
In order to reboot the OS automatically after switching guest domains, set the OBP auto-boot? variable to "true".
Example:
{1} ok setenv auto-boot? true
auto-boot? =          true
{1} ok reset-all
After setting the OBP auto-boot? variable, reboot the guest domain to make the OBP settings effective.
Note
When the power of a node is turned on, guest domains need to stay stopped until they get started by PRIMECLUSTER. Configure the domain configuration in system controller so that all guest domains controlled by PRIMECLUSTER remain stopped when their control domain gets started. For details, refer to "Oracle VM Server for SPARC Guide" or "Fujitsu SPARC M12 and Fujitsu M10/SPARC M10 Domain Configuration Guide."
Configuring GLS (Control Domain and Guest Domain)
For information on the initial GLS setup, refer to "Chapter 5 Operation on Cluster System" in the "PRIMECLUSTER Global Link Services Configuration and Administration Guide: Redundant Line Control Function".
This section uses below example to explain the setup procedure for GLS (redundant line control function) for a 1:1 operational/standby setup of clusters between control domains with IPv4 NIC switching in an Oracle VM Server for SPARC Environment. Interface names listed in examples of setting up vary depending on the environment. Replace interface names according to the Environment.
Note
In control domain clusters, the only redundancy method supported by GLS is NIC switching.
The setting values for each category correspond to those in "Setup (GLS_Monitoring Parameter)", "Setup (GLS_Virtual Interface)", "Setup (GLS_GS Linkage Mode Monitoring Destination Information)", and "Setup (GLS_Common Parameter)" of PRIMECLUSTER Designsheets.
Configuration Example in Solaris 10 Environment
Configuration Example in Solaris 11 Environment

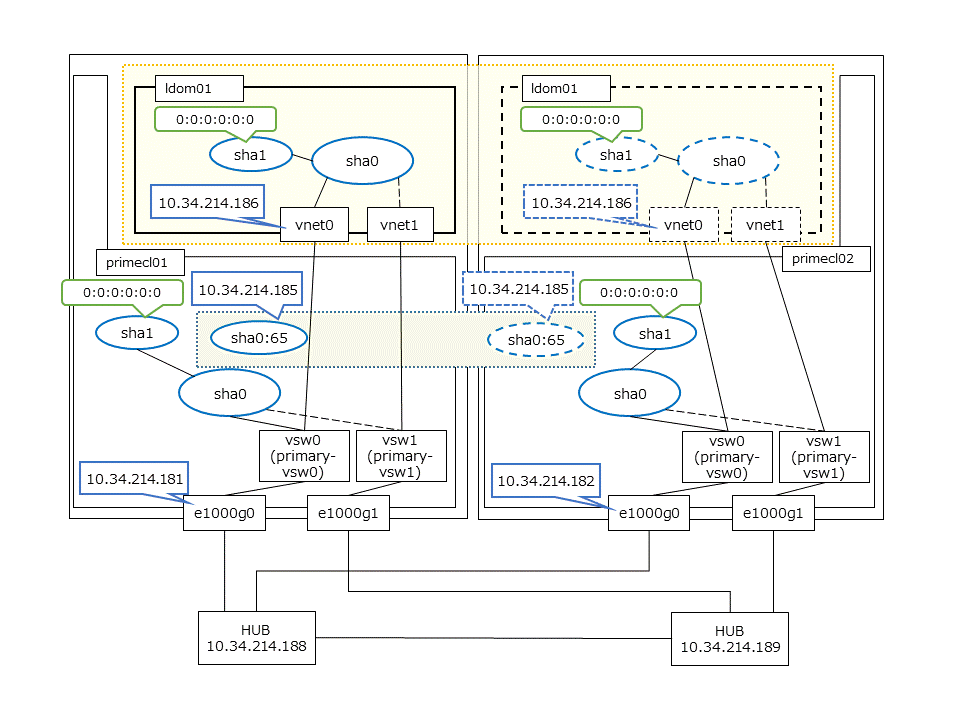
In this sample configuration, control domains primecl01 and primecl02 are forming a cluster, whereas guest domain ldom01 runs as the cluster resource. The control and guest domains share the same user LAN network lines.
When user LAN transmissions on the operational node are disabled, GLS in the control domains detects a failure in the transmission route and switches clusters. When clusters are switched, the guest domains in the operational node are stopped, and, instead, the guest domains in the standby node are started.
The IP addresses of each control domains (10.34.214.181 for primecl01, 10.34.214.182 for primecl02) can be accessed independently of their operational statuses; however, setting takeover IP addresses allows you to automatically access the control domains currently in use, even if you are not sure which one it is.
Operating Procedure
- If the operating node is [HOST-primecl01]
Make the system settings.
Define the IP addresses and host names to be used in the /etc/inet/hosts file.
10.34.214.185   takeoverIP   # virtual IP
10.34.214.181   primecl01    # physical IP of primecl01
10.34.214.182   primecl02    # physical IP of primecl02
10.34.214.186   ldom01       # physical IP of ldom01
10.34.214.188   swhub01      # IP of primary monitoring target hub
10.34.214.189   swhub02      # IP of secondary monitoring target hub
Define the subnet masks in the /etc/inet/netmasks file.
10.34.214.0 255.255.255.0
Set up interface to use.
- For Solaris 10
Add the host names from above definitions to the /etc/hostname.vsw0 file.
Contents of /etc/hostname.vsw0:
primecl01
- For Solaris 11 or later
Set up with the interface and the host name defined above using ipadm(1M) command.
Interface net0
# /usr/sbin/ipadm create-ip net0
# /usr/sbin/ipadm create-addr -T static -a primecl01/24 net0/v4
Create the virtual network to be used in the user LAN.
# ldm add-vsw net-dev=e1000g0 primary-vsw0 primary
# ldm add-vsw net-dev=e1000g1 primary-vsw1 primary
# ldm add-vnet vnet0 primary-vsw0 ldom01
# ldm add-vnet vnet1 primary-vsw1 ldom01
# touch /reconfigure
Reboot the system.
Run the following command and reboot the system. After rebooting the system, verify the interface set using ifconfig command is enabled.
# /usr/sbin/shutdown -y -i6 -g0Make the virtual interface settings.
The underlined portion specifies the physical IP address.
For Solaris 10
# /opt/FJSVhanet/usr/sbin/hanetconfig create -n sha0 -m d -i 10.34.214.185 -e 10.34.214.181 -t vsw0,vsw1
For Solaris 11 or later
# /opt/FJSVhanet/usr/sbin/hanetconfig create -n sha0 -m d -i 10.34.214.185 -e 10.34.214.181 -t net0,net1
After executing above command, check that the settings are correct.
# /opt/FJSVhanet/usr/sbin/hanetconfig print
[IPv4,Patrol]

 Name        Hostname        Mode MAC Adder/Phys ip Interface List
+-----------+---------------+----+-----------------+-------------------+
 sha0        10.34.214.185    d   10.34.214.181     vsw0,vsw1
                                                    "net0,net1" for Solaris 11 or later
[IPv6]

 Name        Hostname/prefix                   Mode Interface List
+-----------+---------------------------------+----+---------------------------+
Make the settings for HUB monitoring.
The underlined portions specify the IP addresses of the HUB to be monitored.
# /opt/FJSVhanet/usr/sbin/hanetpoll create -n sha0 -p 10.34.214.188,10.34.214.189 -b off
After executing above command, check that the settings are correct.
# /opt/FJSVhanet/usr/sbin/hanetpoll print
[ Standard Polling Parameter ]
         interval(idle)     =      5( 60) sec
         times              =      5 times
         max_retry          =      5 retry
         repair_time        =      5 sec
         link detection     =    NO
         failover mode      =    YES

[ Polling Parameter of each interface ]
 Name    Hostname/Polling Parameter
+-------+---------------------------------------------------------------+
 sha0    10.34.214.188,10.34.214.189
         hub-hub poll       =    OFF
         interval(idle)     =      5( 60) sec
         times              =      5 times
         max_retry          =      5 retry
         repair_time        =      5 sec
         link detection     =    NO
         failover mode      =    YES
Make the settings for the GLS standby patrol function.
# /opt/FJSVhanet/usr/sbin/hanetconfig create -n sha1 -m p -t sha0After executing above command, check that the settings are correct.
# /opt/FJSVhanet/usr/sbin/hanetconfig print
[IPv4,Patrol]

 Name        Hostname        Mode MAC Adder/Phys ip Interface List
+-----------+---------------+----+-----------------+-------------------+
 sha0        10.34.214.185    d   10.34.214.181     vsw0,vsw1
                                                         "net0,net1" for Solaris 11 or later
 sha1        -                p   00:00:00:00:00:00 sha0

[IPv6]

 Name        Hostname/prefix                   Mode Interface List
+-----------+---------------------------------+----+---------------------------+
Create the takeover virtual interface.
# /opt/FJSVhanet/usr/sbin/hanethvrsc create -n sha0After executing above command, check that the settings are correct.
# /opt/FJSVhanet/usr/sbin/hanethvrsc print
 ifname     takeover-ipv4    takeover-ipv6
+----------+----------------+-----------------------------------------------+
 sha0:65    10.34.214.185    -
- If the standby node is [HOST-primecl02]
Make the system settings.
Define the IP addresses and host names to be used in the /etc/inet/hosts file.
The contents to be defined are the same as for primecl01.
Define the subnet masks in the /etc/inet/netmasks file.
The contents to be defined are the same as for primecl01.
Set up interface to use.
- For Solaris 10
Add the host names from above definitions to the /etc/hostname.vsw0 file.
Contents of /etc/hostname.vsw0:
primecl02
- For Solaris 11 or later
Set up with the interface and the host name defined above using ipadm(1M) command.
Interface net0
# /usr/sbin/ipadm create-ip net0
# /usr/sbin/ipadm create-addr -T static -a primecl02/24 net0/v4
Create the virtual network to be used in the user LAN.
# ldm add-vsw net-dev=e1000g0 primary-vsw0 primary
# ldm add-vsw net-dev=e1000g1 primary-vsw1 primary
# ldm add-vnet vnet0 primary-vsw0 ldom01
# ldm add-vnet vnet1 primary-vsw1 ldom01
# touch /reconfigure
Reboot the system.
Run the following command and reboot the system. After rebooting the system, verify the interface set using ifconfig command is enabled.
# /usr/sbin/shutdown -y -i6 -g0Make the virtual interface settings.
The underlined portion specifies the physical IP address.
For Solaris 10
# /opt/FJSVhanet/usr/sbin/hanetconfig create -n sha0 -m d -i 10.34.214.185 -e 10.34.214.182 -t vsw0,vsw1
For Solaris 11 or later
# /opt/FJSVhanet/usr/sbin/hanetconfig create -n sha0 -m d -i 10.34.214.185 -e 10.34.214.182 -t net0,net1
After executing above command, check that the settings are correct.
# /opt/FJSVhanet/usr/sbin/hanetconfig print
[IPv4,Patrol]

 Name        Hostname        Mode MAC Adder/Phys ip Interface List
+-----------+---------------+----+-----------------+-------------------+
 sha0        10.34.214.185    d   10.34.214.182     vsw0,vsw1
                                                        "net0,net1" for Solaris 11 or later
[IPv6]

 Name        Hostname/prefix                   Mode Interface List
+-----------+---------------------------------+----+-------------------------+
Make the settings for HUB monitoring.
The underlined portions specify the IP addresses of the HUB to be monitored.
# /opt/FJSVhanet/usr/sbin/hanetpoll create -n sha0 -p 10.34.214.188,10.34.214.189 -b off
After executing above command, check that the settings are correct.
# /opt/FJSVhanet/usr/sbin/hanetpoll print
[ Standard Polling Parameter ]
         interval(idle)     =      5( 60) sec
         times              =      5 times
         max_retry          =      5 retry
         repair_time        =      5 sec
         link detection     =    NO
         failover mode      =    YES

[ Polling Parameter of each interface ]
 Name    Hostname/Polling Parameter
+-------+---------------------------------------------------------------+
 sha0    10.34.214.188,10.34.214.189
         hub-hub poll       =    OFF
         interval(idle)     =      5( 60) sec
         times              =      5 times
         max_retry          =      5 retry
         repair_time        =      5 sec
         link detection     =    NO
         failover mode      =    YES
Make the settings for the GLS standby patrol function.
# /opt/FJSVhanet/usr/sbin/hanetconfig create -n sha1 -m p -t sha0
After executing above command, check that the settings are correct.
# /opt/FJSVhanet/usr/sbin/hanetconfig print
[IPv4,Patrol]

 Name        Hostname        Mode MAC Adder/Phys ip Interface List
+-----------+---------------+----+-----------------+-------------------+
 sha0        10.34.214.185    d   10.34.214.182     vsw0,vsw1
                                                         "net0,net1" for Solaris 11 or later
 sha1        -                p   00:00:00:00:00:00 sha0

[IPv6]

 Name        Hostname/prefix                   Mode Interface List
+-----------+---------------------------------+----+---------------------------+
Create the takeover virtual interface.
# /opt/FJSVhanet/usr/sbin/hanethvrsc create -n sha0After executing above command, check that the settings are correct.
# /opt/FJSVhanet/usr/sbin/hanethvrsc print
ifname     takeover-ipv4    takeover-ipv6
+----------+----------------+--------------------------------------------------+
 sha0:65    10.34.214.185    -
- For guest domain [HOST-ldom01]
Make the GLS settings for guest domains on one node after another, first on the nodes that are designated to be operational, and then on the nodes designated to be standby nodes, making sure not to assign duplicate IP addresses.
Make the system settings.
Define the IP addresses and host names to be used in the /etc/inet/hosts file.
10.34.214.186   ldom01       # physical IP of ldom01
10.34.214.188   swhub1       # IP of primary monitoring target hub
10.34.214.189   swhub2       # IP of secondary monitoring target hub
Define the subnet masks in the /etc/inet/netmasks file.
10.34.214.0 255.255.255.0
Set up interface to use.
- For Solaris 10
Add the host names from above definitions to the /etc/hostname.vnet0 file.
Contents of /etc/hostname.vnet0:
ldom01
- For Solaris 11 or later
Set up with the interface and the host name defined above using ipadm(1M) command.
Interface net0
# /usr/sbin/ipadm create-ip net0
# /usr/sbin/ipadm create-addr -T static -a ldom01/24 net0/v4
Reboot the system.
Run the following command and reboot the system. After rebooting the system, verify the interface set using ifconfig command is enabled.
# /usr/sbin/shutdown -y -i6 -g0Make the virtual interface settings.
The underlined portion specifies the physical IP address.
For Solaris 10
# /opt/FJSVhanet/usr/sbin/hanetconfig create -n sha0 -m e -i 10.34.214.186 -t vnet0,vnet1
For Solaris 11 or later
# /opt/FJSVhanet/usr/sbin/hanetconfig create -n sha0 -m e -i 10.34.214.186 -t net0,net1
After executing above command, check that the settings are correct.
# /opt/FJSVhanet/usr/sbin/hanetconfig print
[IPv4,Patrol]

 Name        Hostname        Mode MAC Adder/Phys ip Interface List
+-----------+---------------+----+-----------------+-------------------+
 sha0        10.34.214.186    e                     vnet0,vnet1
                                                       "net0,net1" for Solaris 11 or later
[IPv6]

 Name        Hostname/prefix                   Mode Interface List
+-----------+---------------------------------+----+---------------------------+
Make the settings for HUB monitoring.
The underlined portions specify the IP addresses of the HUB to be monitored.
# /opt/FJSVhanet/usr/sbin/hanetpoll create -n sha0 -p 10.34.214.188,10.34.214.189 -b off
After executing above command, check that the settings are correct.
# /opt/FJSVhanet/usr/sbin/hanetpoll print
[ Standard Polling Parameter ]
         interval(idle)     =      5( 60) sec
         times              =      5 times
         max_retry          =      5 retry
         repair_time        =      5 sec
         link detection     =    NO
         failover mode      =    YES

[ Polling Parameter of each interface ]
 Name    Hostname/Polling Parameter
+-------+---------------------------------------------------------------+
 sha0    10.34.214.188,10.34.214.189
         hub-hub poll       =    OFF
         interval(idle)     =      5( 60) sec
         times              =      5 times
         max_retry          =      5 retry
         repair_time        =      5 sec
         link detection     =    NO
         failover mode      =    YES
Make the settings for the GLS standby patrol function.
# /opt/FJSVhanet/usr/sbin/hanetconfig create -n sha1 -m p -t sha0After executing above command, check that the settings are correct.
# /opt/FJSVhanet/usr/sbin/hanetconfig print
[IPv4,Patrol]

 Name        Hostname        Mode MAC Adder/Phys ip Interface List
+-----------+---------------+----+-----------------+-------------------+
 sha0        10.34.214.186    e                     vnet0,vnet1
                                                       "net0,net1" for Solaris 11 or later
 sha1        -                p   00:00:00:00:00:00 sha0

[IPv6]

 Name        Hostname/prefix                   Mode Interface List
+-----------+---------------------------------+----+---------------------------+
Start hub monitoring.
# /opt/FJSVhanet/usr/sbin/hanetpoll onActivate the virtual interface.
# /opt/FJSVhanet/usr/sbin/strhanet