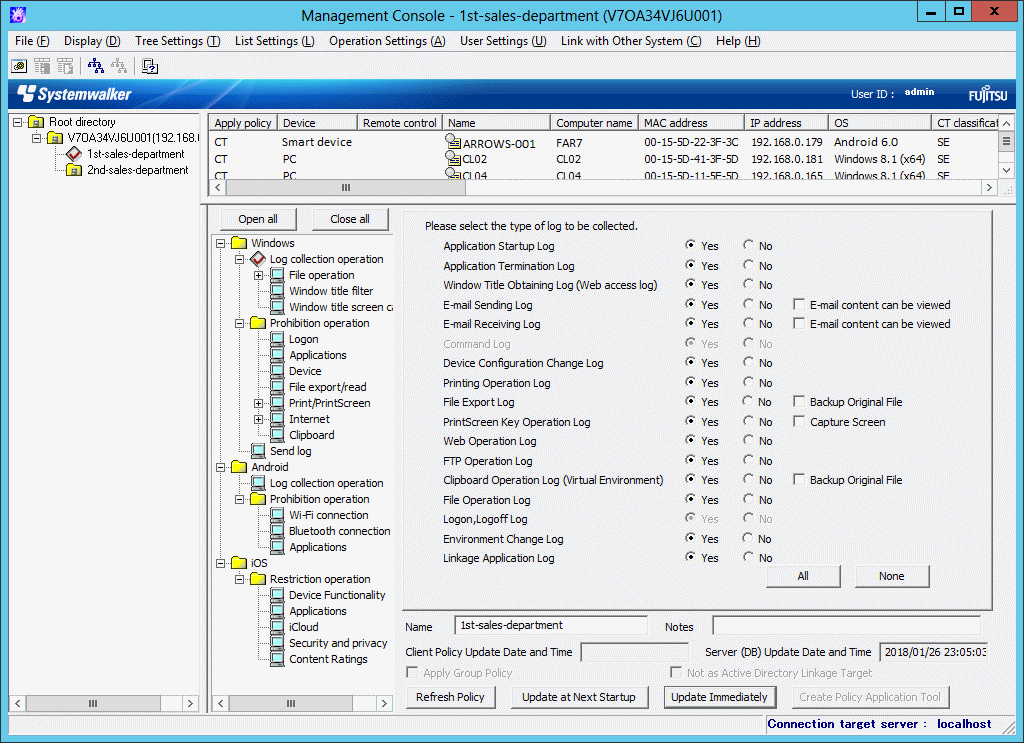
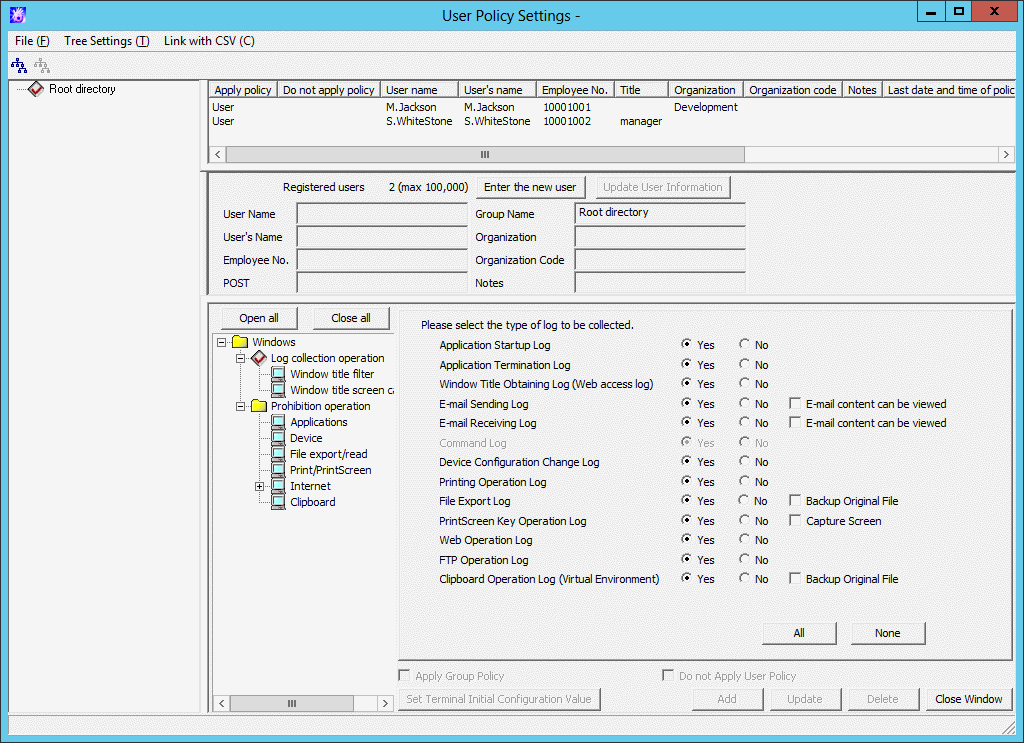
In the case of a 3-layer system structure, when creating configuration information tree manually through the Management Console, execute in each Management Server.
Create a CT group
The following describes the construction of a CT group displayed in the CT group tree.
The CT group tree is displayed in grey. If a group cannot be created, set in Do not display empty group of the Tree Settings menu. Cancel the settings.
After a CT group is created, CT policy can be set collectively for CTs in the CT group.
CT group names are displayed in ascending order of character code.
The procedure for creating a CT group is as follows.
Start the Management Console window.
Select the upper level group of the group to be created from the CT group tree.
Select Create CT Group from the File menu.
The Create CT Group window is displayed.
Enter the following information and click the Add button:
Server Name
Group Name
Specify up to 40 bytes (can be a combination of fullwidth and halfwidth characters and symbols, kanji, hiragana and katakana characters).
The group added in CT group tree is displayed.
Select Reflect CT Group Structure from the Tree Settings menu.
The created CT group is updated to the database.
If Reflect CT Group Structure is not performed, Refresh Policy, Update at Next Startup and Update Immediately buttons will be grayed out and a message prompting Reflect CT Group Structure will be displayed.
After the created CT is updated to the database, CT group policy must be set as follows. Modify the policy as needed. For details regarding the modification of policy, refer to "3.2.1 Modify CT Group Policy".
When creating a CT group under the Root directory
On the Master Management Server or Management Server where a CT group is created, policy set in the Terminal Initial Settings window will be updated.
When creating a CT group under other groups
Policy set in the upper level group of the created CT group will be updated.
The CT group created in the CT group tree can be moved to other CT groups under the same server, or directly under the server.
Even if the group has moved, CT group policy will not change. Besides, though the CT registered in the group will be moved when the CT group is moved, the policy set for CT will not change.
When a department administrator has been set in the CT group, it will be moved if the CT group is moved.
The procedure for moving a CT group is as follows.
Start Management Console.
Select the group to be moved from the CT group tree.
The selected CT group is highlighted.
Move the CT group to be moved to the target CT group under the same server by dragging and dropping.
The CT group is moved.
Select Reflect CT Group Structure from the Tree Settings menu.
The moved CT group is updated to the database.
If Reflect CT Group Structure is not performed, Refresh Policy, Update at Next Startup and Update Immediately buttons will be grayed out and a message prompting Reflect CT Group Structure will be displayed.
A CT group cannot be deleted if other CT groups or CTs exist in it. Delete the CT groups or CTs under it first. For detail on how to delete a CT, refer to "Delete CT".
The procedures for deleting a CT group is as follows.
Start the Management Console window.
Select the group to be deleted from the CT group tree.
Select Delete CT group from the File menu.
The deletion confirmation window is displayed.
Click the OK button.
The selected CT group is deleted.
Select Reflect CT Group Structure from the Tree Settings menu.
The "deleted" CT group is updated to the database.
If Reflect CT Group Structure is not performed, Refresh Policy, Update at Next Startup and Update Immediately buttons will be grayed out and a message prompting Reflect CT Group Structure will be displayed.
This section describes how to modify the name or notes of a CT group created in the CT group tree.
The procedure is as follows.
Start the Management Console window.
Select the CT group to be modified from the CT group tree.
The selected CT group is highlighted.

Enter the following information and click the Update at Next Startup or Update Immediately button:
Name: Enter the modified CT group name.
Specify up to 40 bytes (can be a combination of fullwidth and halfwidth characters and symbols, kanji, hiragana and katakana characters).
Notes: Enter the notes relating to CT group.
Specify up to 127 bytes (can be a combination of fullwidth and halfwidth characters and symbols, kanji, hiragana and katakana characters).
Select Refresh Tree from the Tree Settings.
Name of the selected CT group is modified.
If Refresh Tree in the Tree Settings menu is grayed out, structure might not be updated after a CT group has been created, moved or deleted. At this time, select Reflect CT Group Structure from the Tree Settings menu to update the structure.
Create automatic distribution file during CT registration
After CT installation, the client (CT) will be registered to the Management Server once the client (CT) communicates with the Management Server. At this time, all the clients (CTs) are placed under the Root directory.
When automatic distribution file is used during CT registration, the client (CT) will be automatically distributed to each group after the client (CT) communicates with the Management Server.
The procedure is as follows.
Export CT group information.
For details, refer to "Export CT Group Information".
Rename the CSV file to export CT group information as "DTKCTEntry.csv".
The automatic distribution file (DTKCTEntry.csv) is created and saved to Management Server during CT registration.
For details of automatic distribution file during CT registration, refer to "Automatic Distribution File During CT Registration" of Reference Manual.
Location for saving
[OS installation drive] \ProgramData\Fujitsu\Systemwalker Desktop Keeper
After CT installation, once the client (CT) communicates with the Management Server, the client (CT) will be distributed to a CT group according to the specification of automatic distribution file during CT registration.
If the content of automatic distribution file during CT registration contains error, the error will be displayed in trace file (fsw21sj0.log) of server service. At this time, all the clients (CTs) will be placed under the Root directory.
Create a user group
This section describes the construction of user group displayed in user group tree.
Point
Operate collective management of user policy through Master Management Server.
To manage user policy collectively, create, move and delete a user on the Master Management Server.
The User group tree is displayed in grey. If a group cannot be created, set in Do not display empty group of the Tree Settings menu. Cancel the settings.
Create user group one by one. Multiple users cannot be created using a CSV file.
After a user group has been created, user policy can be set collectively for users in the user group.
The procedure for creating a user group is as follows.
Start Management Console.
Select User Policy Settings from the User Settings menu.
The User Policy Settings window is displayed.

Select the upper level group of the group to be created from user group tree.
Select Create User Group from the File menu.
The Create User Group window is displayed.
Enter the following information and click the Add button.
Group Name: Specify up to 40 bytes (can be a combination of fullwidth and halfwidth characters and symbols, kanji, hiragana and katakana characters).
The message that prompts structure update is output.
Click the OK button.
The group added in user group tree is displayed.
Select Reflect CT Group Structure from the Tree Settings menu.
The created user group is updated to the database.
If Reflect CT Group Structure is not performed, the message prompting Reflect CT Group Structure will be displayed when closing the User Policy Settings window.
After the created user has been updated to the database, the user group policy must be set as follows. Modify the policy as needed. For details regarding policy modification, refer to "3.2.2 Modify User Group Policy"
When creating a user group under the Root directory
On the Master Management Server or Management Server where the user group has been created, policy set in the Terminal Initial Settings window will be updated.
When creating a user group under other groups
Policy set in the upper level group of the created user group will be updated.
This section describes how to move the created user group in the user group tree to other user groups on the same server.
Even if the group is moved, the user group policy will not change. Though the user registered in the group will be moved if the user group is moved, user policy will not change (same as the condition before moving).
When a department administrator has been set in the user group, it will be moved if the user group is moved.
The procedure for moving a user group is as follows.
Start the User Policy Settings window.
Select the user group to be moved from the user group tree.
The selected user CT group is highlighted.
Move the user group to be moved to the target user group on the same server by dragging and dropping.
The message that prompts structure update is output.
Click the OK button.
The user group is moved.
Select Reflect CT Group Structure from the Tree Settings menu.
The moved user group is updated to the database.
If Reflect CT Group Structure is not performed, the message prompting Reflect CT Group Structure will be displayed when closing the User Policy Settings window.
This section describes how to delete a user group created in the user group tree.
A user group cannot be deleted if any CT group or CT exists under it. Delete the user group or user under it first. For details on how to delete a user, refer to "Delete a User"
The procedure for deleting a user is as follows.
Start the User Policy Settings window.
Select the user group to be deleted from the user group tree.
Select Delete User Group from the File menu.
The deletion confirmation window is displayed.
Click the OK button.
The selected user group is deleted.
Select Reflect CT Group Structure from the Tree Settings menu.
The "deleted" user group is updated to the database.
If Reflect CT Group Structure is not performed, the message prompting Reflect CT Group Structure will be displayed when closing the User Policy Settings window.
This section describes how to modify the name or notes of the user group created in the user group tree.
The procedure is as follows.
Start the User Policy Settings window.
Select the user group for information modification from the user group tree.
The selected user CT group is highlighted.
Enter the following information and click the Update button.
Group Name: Enter the modified user group name.
Specify up to 40 bytes (can be a combination of fullwidth and halfwidth characters and symbols, kanji, hiragana and katakana characters).
Notes: Enter the notes relating to the user group.
Specify up to 128 bytes (can be a combination of fullwidth and halfwidth characters and symbols, kanji, hiragana and katakana characters).
Select Refresh Tree from the Tree Settings menu.
The name of the selected user group is modified.
If Refresh Tree in the Tree Settings menu is grayed out, structure may not be updated after creating, moving or deleting a user group. At this time, select Reflect CT Group Structure from the Tree Settings menu to updating configuration.