There are two methods for a single installation of a client (CT).
Installation of wizard style is carried out in interactive mode. Refer to "2.6.1.1 Wizard-style Installation".
Automatic installation can be used for silent installation according to the prepared installation setting files. Refer to "2.6.1.2 Perform Silent Installation" for details.
Note
If a user whose user name contains fullwidth characters installs a client (CT), an error message may be displayed.
When installing a client (CT), use a user name that contains halfwidth characters only.
This section describes how to newly install a client (CT) of Systemwalker Desktop Keeper in wizard style.
Items to be confirmed before installation
Refer to "Port Number List" in the Reference Manual to confirm the port number being used.
Installation
The steps to install a client (CT) in wizard style are as follows. In addition, for operating environment, refer to "Operating Environment" in the User's Guide.
Log in to Windows with the user that belongs to the Administrators group or the user that belongs to the Domain Admins group. When other applications are being used, close them.
After the DVD-ROM of Systemwalker Desktop Keeper is inserted into the PC, the installer window will be displayed:
Select CT (Client) Installation.
If the installer is not started, start the "swsetup.exe" in the DVD-ROM drive.
After the "Welcome to use Systemwalker Desktop Keeper Client installation" window is displayed, click the Next button.
The "Select the installation target" window of CT (client) will be displayed. If the installation target displayed is not to be changed, click the Next button.
If the installation target displayed is to be changed, click the Browse button of the folder expected to be changed, and click the Next button after the folder has been changed.
Note
Exclude compressed and encrypted targets
When the installation target folder of the CT (client) and the installation target folder of the following log files are taken as compressed or encrypted targets, the running of program may be affected. Therefore, do not turn on the compression or encryption settings.
The "Select the installation target" window of the log saving target to be set will be displayed. When the displayed saving target is not to be changed, click the Next button.
When the displayed saving target is to be changed, click the Browse button of the folder expected to be changed, and click the Next button after the folder has been changed.
Set folder under Windows system disk in the folder path for saving log files. (When the OS is installed to the C Drive, the C Drive will be the system disk.)
Note
Do not specify the drive with export prohibition
Because logs may be lost, do not specify the drive with export prohibition in the saving target of the log file.
Since the Enter the server information window is displayed, set the information of server to be connected and click the Next button.
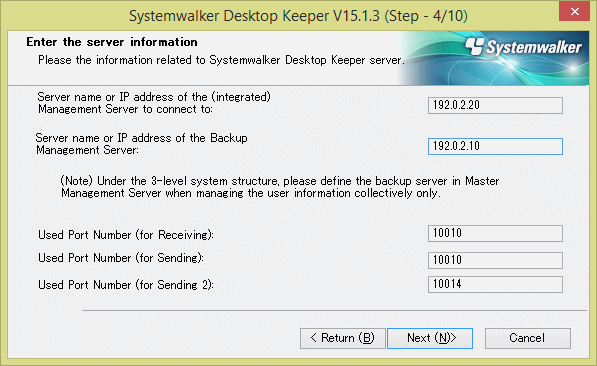
IP Address of Connected (Master) Management Server: enter the IP address or server name of the (master) Management Server to be connected.
When installing a client (CT) on the Management Server/Master Management Server, it is not required to specify IP Address of Connected (Master) Management Server. (127.0.0.1 (IPV4),::1(IPv6),127.0.0.1(IPv4/IPv6) is displayed in IP address, unable to enter).
IPv4 and IPv6 addresses can be specified. However, do not specify a link-local address, otherwise behavior is not guaranteed.
The IP address or server name must meet the following conditions:
The server name can contain up to 15 halfwidth alphanumeric characters, hyphens (-), and underscores (_).
The IPV4 IP address can contain up to 15 halfwidth numbers and periods (.).
The IP address (IPv6) can contain up to 39 halfwidth letters (A-F, a-f), numbers, and colons (:).
The server name and IP addresses cannot contain only numbers
IP Address of Backup Management Server: when the (Master) Management Server to be 127.0.0.1is abnormal, enter the IP address or computer name of the backup Management Server for inquiring user policy.
IP address of a backup Management Server can be omitted. In addition, the function is effective when all the following conditions are satisfied: IPv4 and IPv6 addresses can be specified. However, do not specify a link-local address, otherwise behavior is not guaranteed.
The Management Server is in a 3-level structure.
Users are managed collectively
Action of the client (CT) is controlled through user policy.
Selection points of the backup Management Server are as follows:
In case of the client (CT) connecting to the Master Management Server
Specify any lower-level Management Server.
In case of the client (CT) connecting to the Management Server
Specify the Master Management Server.
The IP address or server name must meet the following conditions:
The server name can contain up to 15 characters
The IP address (IPv4) can contain up to 15 characters
The IP address (IPv6) can contain up to 39 characters
The IP address (IPv4) can contain halfwidth numbers (0-9) and halfwidth periods (.)
The IP address (IPv6) can contain halfwidth alphanumeric characters (A-F, a-f, 0-9) and halfwidth colons (:)
The server name can contain halfwidth alphanumeric characters (A-Z, a-z, 0-9), halfwidth hyphens (-), and underscores (_).
The server name and IP addresses cannot contain only numbers.
Used Port Number (for Receiving): Enter the port number (for receiving at CT side) used for communication that uses the proprietary communication method (V15.1.1 or earlier communication method) between the client (CT) and server service.
Enter a value from 5001 to 60000.
Used Port Number (for Sending): Enter the port number used for communication that uses the proprietary communication method (V15.1.1 or earlier communication method) between the client (CT) and server service (for sending the client (CT) logs or receiving policies).
Enter a value from 5001 to 60000.
When entering the following items, ensure that they are not duplicated:
Used Port Number (for Sending)
Used Port Number (for Sending 2)
Used Port Number (for Sending 2): Enter the port number used for communication that uses the proprietary communication method (V15.1.1 or earlier communication method) between the client (CT) and server service (for registering the client (CT)).
Enter a value from 5001 to 60000.
When entering the following items, ensure that they are not duplicated:
Used Port number (for Sending)
Used Port Number (for Sending 2)
Note
If using the proprietary communication method (V15.1.1 or earlier communication method), it is necessary to be able to resolve the host name of the Management Server or Master Management on each machine. Otherwise, communication will not be possible between the Management Server or Master Management Server and the client (CT).
If using the secure communication method, name resolution is not mandatory.
The Set printing monitoring mode window is displayed. Select any option for printing monitoring mode and click the Next button.
Monitoring the printing of all printers set in this terminal (Recommended): Select when collecting a printing operation log at each client (CT). In this case, the printing operation log will be collected on each client (CT).
Monitoring the printing of local printer only:
Select when the printing in the client (CT) under the same Master Management Server or Management Server as the printer server is performed through the printer server. The client (CT) should also be installed on the printer server as well. In this case, printing operation log cannot be collected through the client (CT) that is not the printer server. The printing operation log will be collected through the printer server.
Note
Notes for printing monitoring mode
Unify the above selection on the client (CT) of the Master Management Server or the Management Server. If it is not unified, the printing operation log may not be collected.
If the non-server OS (Windows Server(R) 2008, Windows Server(R) 2012 or Windows Server(R) 2016) is taken as the printer server and set to Monitoring the Printing of All Printers Set in this Terminal (Recommended), no more than 10 clients can be connected to the printer server to print. At this time, set to Monitoring Printing of Local Printer Only.
Point
Register user ID on printer server
When "Monitoring Printing of Local Printer Only" is selected on the printer server before installing the client (CT), it is required to register the User ID used in the client (CT) that performs printing on the printer server. If it is not registered, the user ID of the printing log will be output as follows.
In the client (CT) that performs printing, when user authority is set for only the user ID being used, the User ID of the log will be collected as Guest.
When it is required to log on the printer server as Administrator, the User ID of the log will be collected as Administrator.
The Set E-mail Control Mode window will be displayed. Set the mode of E-mail attachment prohibited and click the Next button.
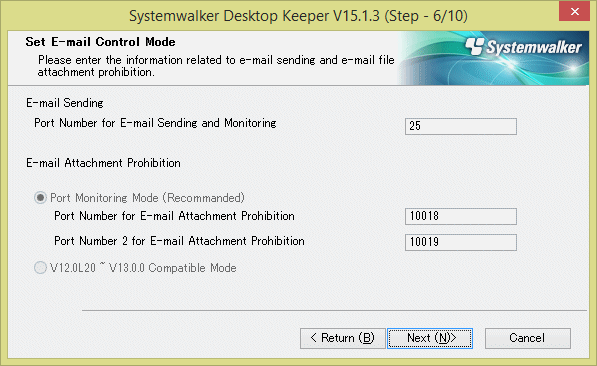
Port Number for E-mail Sending and Monitoring: When port monitoring mode is selected, enter the port number used for communication between client (CT) and SMTP server.
Specify a value from 0 to 65535.
The specified value cannot match the value of any of the settings below:
Used Port Number (for Receiving)
Used Port Number (for Sending)
Used Port Number (for Sending 2)
Port Number for E-mail Sending and Monitoring
Port Number for E-mail Attachment Prohibition
Port Number 2 for E-mail Attachment Prohibition
Port Monitoring Mode (Recommended): Select when using the prohibition function through the drive for E-mail file attachment prohibition. Normally, take this setting as default.
When updating from a version before V13.0.0, select the E-mail file attachment prohibition under port monitoring mode before setting the same prohibition action as before V13.0.0.
Port Number for E-mail Attachment Prohibition: When port monitoring mode is selected, enter the port number used internally in the E-mail attachment prohibition processing.
Specify a value from 5001 to 60000.
The specified value cannot match the value of any of the settings below:
- Used Port Number (for Receiving)
- Used Port Number (for Sending)
- Used Port Number (for Sending 2)
- Port Number for E-mail Sending and Monitoring
- Port Number for E-mail Attachment Prohibition
- Port Number 2 for E-mail Attachment Prohibition
Port Number 2 for E-mail Attachment Prohibition: When port monitoring mode is selected, enter the port number used internally in the E-mail attachment prohibition processing.
Specify a value from 5001 to 60000.
The specified value cannot match the value of any of the settings below:
- Used Port Number (for Receiving)
- Used Port number (for Sending)
- Used Port Number (for Sending 2)
- Port Number for E-mail Sending and Monitoring
- Port Number for E-mail Attachment Prohibition
- Port Number 2 for E-mail Attachment Prohibition
V12.0L20 - V13.0.0 Compatible Mode: Select when using the prohibition function based on any mode before V13.0.0. In the version upgrade starting from the version before V13.0.0, it is only required to be specified when the same prohibition action is needed.
Note
Notes for setting E-mail attachment prohibition mode
In Windows Vista(R), Windows(R) 7, Windows(R) 8, Windows(R) 10, Windows Server(R) 2008, Windows Server(R) 2012 or Windows Server(R) 2016, only port monitoring mode can be selected as the mode for E-mail file attachment prohibition.
For port of E-mail attachment prohibition, specify the port not used in other processing or during communication.
The "Creation Settings of File Exporting Utility Icon" window is displayed. Set whether to create the icon of file export utility and click the Next button.
Create in [Desktop]: Select when creating the file export utility icon.
Create in the [Send to] Menu: select when creating the file export utility icon in the Send to menu.
When the "Enter the password" window is displayed, set the password for displaying the client status and modifying the utility, and click the Next button.
The password set here is required when executing the uninstallation and maintenance commands of the client (CT). The conditions for contents to be entered are as follows:
Up to 32 bytes of single-byte alphanumeric characters as well as contents apart from the following symbols can be entered
The following symbols cannot be specified: & < > | \ " ~ ' ? : ^
Double-byte or single-byte space is not allowed.
Single-byte Kana are not allowed.
Note
This password is required when executing the uninstallation and maintenance commands of the client (CT). Pay attention to that if the password is forgotten, the uninstallation and maintenance commands will be unable to be executed.
When performing verification during client (CT) device registration, the password to be specified during installation must be the same as the client management password specified in the Terminal Operation Settings window of Management Console.
The "The installation preparation is completed." window is displayed.
When installation is started, click the Install button to start the installation.
When it is expected to confirm or modify the setting, click the Return button to reset.
After the processing has completed normally, the "Installation is completed." window will be displayed.
It is necessary to restart the operating system to use the program. Select either of the following items and click the Finish button.
[Yes, restart the computer immediately.]
[No, restart the computer later.]
Note
It is normal for the installer processing to take time due to the device load or exclusive status, so do not forcibly terminate it. However, if a forced restart is performed, complete the installation by performing an overwrite installation.
Note
If a user whose user name contains fullwidth characters installs a client (CT), an error message may be displayed.
When installing a client (CT), use a user name that contains halfwidth characters only.
Create installation settings file
Create the installation settings file (InstConf.ini) to be used in a silent installation of the client (CT) using the Sever Setting Tool.
In addition, this procedure should be followed when performing silent installation if version upgrade is performed using the self version management function.
The creation procedure is as follows:
Select Start > Systemwalker Desktop Keeper > Server > Sever settings tool or Apps > Systemwalker Desktop Keeper > Sever settings tool, and log on.
Click the Create CT Silent Installation Files button.
The following window will be displayed.

Enter the following information and click the Start to output button.
Setting Item | Value | |
|---|---|---|
Server IP address or server name(CT Management Server) | IP address or server name of the Management Server or Master Management Server that you will connect to.
- Do not specify a link-local address, otherwise behavior is not guaranteed. Note: It is necessary to be able to resolve the host name of the Management Server or Master Management on each machine. Otherwise, communication will not be possible between the Management Server or Master Management Server and the client (CT). | |
Server IP address or server name(backup Management Server) | When the connected (Master) Management Server is abnormal, enter the IP address or server name of the backup Management Server for inquiring user policy. The function will be effective all the following conditions are satisfied.
If the conditions are not applicable, set the same value as Server IP Address (CT Management Server). If a server name is specified:
If an IPv4 address is specified:
If an IPv6 address is specified:
- Do not specify a link-local address, otherwise behavior is not guaranteed. Note: IPv6 addresses can be abbreviated using RFC 5952-compliant format. Note: It is necessary to be able to resolve the host name of the Management Server or Master Management on each machine. Otherwise, communication will not be possible between the Management Server or Master Management Server and the client (CT). | |
Set port number | Port number (for receiving) | Enter the port number (for CT receiving) used for communication that uses the proprietary communication method (V15.1.1 or earlier communication method) between client (CT) and server service. |
Port number (for sending) | Enter the port number (for sending client (CT) logs or receiving policies) used for communication that uses the proprietary communication method (V15.1.1 or earlier communication method) between client (CT) and server service. | |
Port number (for sending 2) | Enter the port number used (for registering the client (CT)) for communication that uses the proprietary communication method (V15.1.1 or earlier communication method) between client (CT) and server service. | |
Port number (for E-mail attachment prohibition) | When E-mail Attachment Prohibited Function is selected as Port monitoring mode (Recommended), enter the port number used internally for E-mail attachment prohibition processing. When E-mail Attachment Prohibited Function is selected as V12.0L20 - V13.0.0 Compatible Mode, entering the port number is not required. | |
Port number (for E-mail attachment prohibition 2) | When E-mail file attachment prohibition is selected as Port monitoring mode (Recommended), enter the port number used internally for E-mail attachment prohibition processing. When E-mail file attachment prohibition is selected as V12.0L20 - V13.0.0 Compatible Mode, entering the port number is not required. | |
Port number (for E-mail sending monitoring) | Enter the port number for the E-mail sending monitoring. | |
Password (first entry) | Enter the password. Up to 32 bytes of single-byte alphanumeric characters as well as contents apart from the following symbols can be entered. Note Do not forget password This password is required during the execution of uninstallation and maintenance commands of the client (CT). Be aware that if the password is forgotten, the uninstallation and maintenance commands will be unable to be executed. Verification when registering client (CT) devices When performing verification during client (CT) device registration, the password to be specified during installation must be the same as the client management password specified in the Terminal Operation Settings window of Management Console. | |
Password (re-entry) | In order to avoid incorrect registration, re-enter the password. | |
Log output target folder | Specify the folder under the Windows system disk as the folder to save the logs of the client (CT). When the OS is installed to the C Drive, the C Drive will become the system disk. The length of absolute path that can be specified is no more than 96 single-byte characters. However, the following symbols cannot be used as the folder name. Environment variable can also be specified. Note
| |
Reboot OS after specifying installation | Specify to restart OS after installation.
| |
Installation target of client | Specify the path of the client (CT) installation folder. The absolute path length that can be specified is no more than 255 single-byte characters. However, the following symbols cannot be specified in the file name: \ / : * ? " < > | Environment variable can also be specified. Note Exclude the compressed and encrypted targets Because the operation of program might be affected, do not enable compression or encryption settings in the client installation target. | |
Printing monitoring mode | Specify the monitoring mode of printing.
Note
| |
E-mail attachment prohibition | Specify the E-mail attachment prohibited function.
| |
Apply policy immediately after logging on Windows | Specify whether to apply user policy immediately after logon.
| |
Set the creation of File Export Tool icon | Specify whether to create icons of File Export Utility.
| |
Installation settings file | Specify the saving target of silent installation setting file (InstConf.ini). The specification method is as follows:
The absolute path length that can be specified is no more than 96 single-byte characters. The following symbols cannot be specified: \ / : * ? " < > | | |
Point
Register user ID on printer server
When "Monitoring the printing of local printer only" is selected and the client (CT) is installed on the printer server, it is also necessary to register the user ID used in the printing client (CT) on the printer server. If it is not registered, the user ID for printing logs will be output as follows:
When only setting user authority to the user ID being used in the printing client (CT), User ID of log will be collected as Guest.
When it is required to log in printer server and register as Administrator at the time of printing, User ID of log will be collected as Administrator.
Perform silent installation
Before installation, refer to "Port Number List" in Reference Manual to confirm the port number being used.
When silent installation of a client (CT) is performed on a PC that has a CT installed, installation by overwriting will be performed. In this case, modify the IP address, port number and log saving target directory. In addition, even if the password used in initial installation is specified to be modified, the password will not be changed.
Logon to the PC as a user who belongs to the Administrators group of local computer or a user that belongs to the Domain Admins group of domain. When other applications are being used, close them.
Insert the setup disk into the drive.
Copy the silent installation settings file (InstConf.ini) for client (CT) created according to "Create installation settings file" to any drive or folder.
Select Run or start the command prompt.
Execute installation command (Setup.exe). The installation command is in the "win32\DTKClient" folder of setup disk.
Options are not case-sensitive.
If no option is specified, error message will be displayed and installation will be terminated.
Assume the following conditions.
Setup disk is inserted into D Drive.
The Setup.exe command is under D:\win32\DTKClient.
Installation settings file is in C:\Dtk.
D:\win32\DTKClient\Setup.exe /Silent "C:\Dtk\InstConf.ini"
Note
When executing the command in Windows Vista(R), Windows(R) 7, Windows(R) 8 , Windows(R) 10, Windows Server(R) 2008, Windows Server(R) 2012, or Windows Server(R) 2016, execute this command in the command prompt run by the administrator.
After the installation has completed, the CT silent installation file is generated and specified as "Display Dialog" and the window prompting restart of the operating system will be displayed.
The window prompting restart of the operating system will be displayed.
Then, select one of the following items and click the Finish button.
[Yes, restart the computer immediately.]: select to restart immediately.
[No, restart the computer later.]: select to restart later.