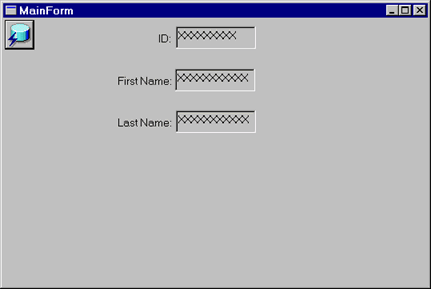
The next task is to place three label fields on the form to label the three textbox controls. When you are finished with this task, the form should appear as follows:
Figure 8.17 The form with three label fields added
If you have not placed the textbox controls in the proper location on the form, you can reposition them easily by left clicking the mouse on them and dragging them to a new location.
You may also left-click on the form outside of the textbox controls and draw a box around all three controls. Once you have all three controls contained within a box, you can select Center Controls from the Layout menu, and select the Horizontal option. This will cause all three controls to be centered horizontally on the form.
Now find the StaticText control ![]() in the Toolbox palette and click on it with the left mouse button. This control is used to create labels on a form.
in the Toolbox palette and click on it with the left mouse button. This control is used to create labels on a form.
Move the mouse back to the form and drop the first label field to the left of the top most textbox control.
Right-click the mouse on this new label and select Properties from the pop-up menu (or highlight the label by clicking on it and select Properties from the Edit menu).
You do not need change the control's name, as it will not be referred to in the application - it is a static piece of text on the form that will not change. Change the default text value in the Caption field to "ID:".
To properly align the label, click on the Right option under Alignment (Horizontal), and then click on the Vert. Center option under Alignment (Vertical). Click on the OK button to close the dialog box.
Repeat this process twice more to create a middle label whose caption reads "First Name:", and a bottom label whose caption reads "Last Name:" to the left of the remaining two textbox controls (see figure 8.17 above).