Find the TextBox Control icon ![]() in the Toolbox palette and click on it with the left mouse button. You will use this textbox control as a data input and output field on the form. Move the mouse back to the sheet and drop the first edit field near the top center of the window.
in the Toolbox palette and click on it with the left mouse button. You will use this textbox control as a data input and output field on the form. Move the mouse back to the sheet and drop the first edit field near the top center of the window.
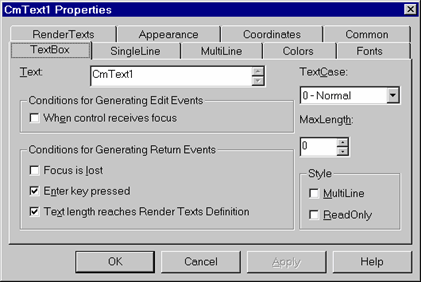
Right-click the mouse on the new textbox control and select Properties from the pop-up menu that appears. Alternatively you can select Properties from the Edit menu. The TextBox Properties dialog box appears:
Figure 8.15 The Textbox Properties dialog box

Move the mouse to the Text: field and delete "CmText1" (this is the default value that appears in this field when the form is displayed).
Select the Common tab and change the control's name from CmText1 to EMPLOYEE_ID.
Click on the RenderTexts tab. Select the RenderStyle pulldown and click on 1 - COBOL PICTURE. This specifies that you want to enter a standard COBOL PICTURE STRING definition to enforce a particular format when the user enters data. In this case you will limit the size of the EmployeeNumber field to 9 (to match the size of the actual database key field to which it is associated) and endure that the data entered is numeric.
Move the mouse to the PictureString field and enter:
9(9)
This defines a 9 character numeric field, and will prevent a user from entering more than 9 characters in this field when using this application. Click on the OK button to close the dialog box.
Note that when using the RenderTexts facility to define a numeric input, we first cleared the default text from the Text property. If you forget to do this, you will receive an error when you attempt to apply a numeric value in RenderTexts. The reason for this is that RenderTexts immediately tries to apply the numeric field validation to the default text field (e.g. "CmText1"), which is obviously an invalid numeric value.
For the following additional two textbox controls you are about to place on the form, limit their size to 20 characters using the same option to match the corresponding database-defined field sizes.
Repeat the above process twice to create two additional textbox controls directly below the one you just created. Remember to set the field data type to X(20) using the RenderTexts tab option in the TextBox Properties dialog box for these two textbox controls.
For the second textbox control, change the name of the control to "FIRSTNAME" (located in the Common tab) and delete the default text value as well. Remember to limit the size of the field to 20 characters using the RenderTexts tab in the Properties dialog box.
For the third textbox control, change the name of the control to "LASTNAME" and delete the default text value as well. Remember to limit the size of the field to 20 characters.
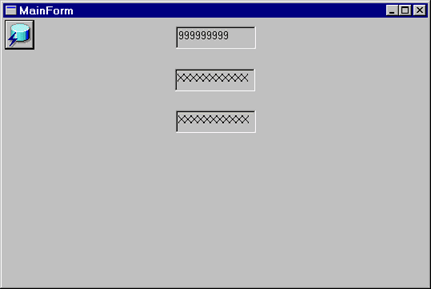
When you are finished defining the three textbox controls, your form should look something like the following:
Figure 8.16 The form after defining the 3 textbox controls
