PowerCOBOL provides developers with an intelligent application build facility.
Building an entire application from the Project Manager is as easy as right clicking the mouse on the project name and selecting Build All from the pop-up menu.
If you instead want to build only a portion of the application (for example, a specific application module), you right click on the module you want to build and select Build.
The Build facility examines all components associated with the current build request to determine the appropriate action(s), if any, to take on each of them.
For example, if an application program has not been changed since the last build took place, there is no need to re-compile it, and the Build facility will skip the compile step and move instead directly to the link step.
You can override this process by instead selecting Rebuild All or Rebuild from the pop-up menu, which forces a re-compilation of all components associated with the current build request, regardless of their current state.
If the Build All tool is invoked, the currently selected module is compiled and linked into an appropriate executable.
If the Rebuild All tool is invoked, the entire application is compiled and linked into an appropriate executable.
If you previously selected debug mode for building the application, the application is ready for use with the Debugger. You may optionally execute any built application.
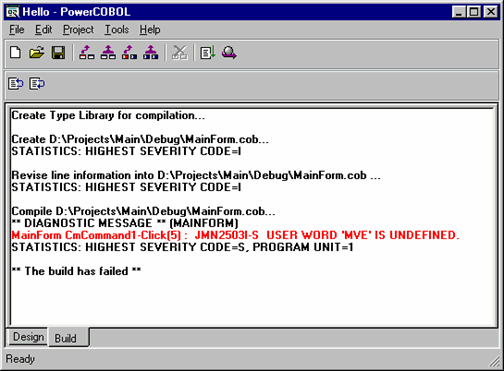
If the build process encounters an error, the Build window tab will appear within the Project Manager window. The Build window is actually a tab available at any time within the Project Manager.
Each error encountered during the build process will be listed and highlighted in red as illustrated in the following figure:
Figure 2.17 The Build window illustrating that an error has been encountered

The Build facility now becomes a very convenient tool for correcting errors throughout the application. You may move the mouse to any error (any line highlighted in red) and double click the left mouse button on it.
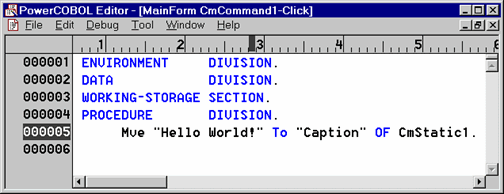
This will display the actual application source code in an edit session, and position you automatically on the line of code associated with the current error. If you were to do this for the error message shown in Figure 2.12, you would be presented with the following:
Figure 2.18 An edit session on the source code causing a build error

In this case, you would simply change the erroneous spelling of the Move statement in line 5, save the change and close the edit session. You would then be ready to rebuild the application.
The Build facility offers a number of options for correcting errors. Under the Edit menu, you will find the Next Error and Previous Error options. This allows you to move quickly between multiple errors encountered during the build in order to correct them.
You may optionally use the Jump to Previous Error and Jump to Next Error icons located on the right side of the tool bar to perform the same correction tasks.
Once you have jumped to an error message and opened and closed an edit session on the related source code, the red error highlight changes to blue to show that you've accessed the erroneous code.
Under the Build menu, there is an option called Auto Jump that you may check on or off. When this option is enabled, you will automatically be taken to the erroneous section of source code that caused the first error encountered during the build.
Once you have corrected the errors, you have a number of options to re-start the build process. For example, you may select an individual module to build or rebuild to ensure you've corrected all of its local problems without invoking the Build All or Rebuild All process for the entire application.
You may invoke Build, Rebuild, Build All or Rebuild All from the Build menu, or by selecting any of the associated icons on the tool bar.
You may additionally move back and forth from the Build facility to the Design facility freely at any time by simply left clicking the mouse on the appropriate tab near the bottom left corner of the Project Manager window.