You have the option of changing the size of the toolbar buttons. You can also add, delete, or rearrange the buttons to customize it so it is most useful to you.
To resize the buttons:
Right click anywhere on the toolbar to display the toolbar popup menu.
Click Show Large Icons from the popup menu to select it or to remove the check mark.
A check mark next to Show Large Icons in the menu indicates that large buttons are displayed.
If Show Large Icons is not checked, small buttons are displayed.
To add, delete, or rearrange the toolbar buttons:
Choose Toolbar from the OPTIONS menu to open the Customize Toolbar dialog box.
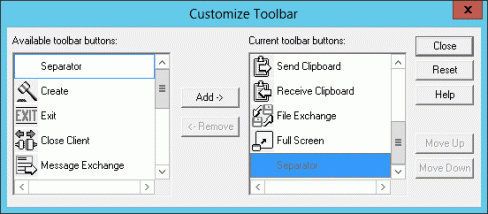
The pane on the right shows the current toolbar buttons. The pane on the left shows available tools.
Information
The toolbar buttons that are not part of the default set are shown in the table following the procedure.
To add or remove a tool:
Select a tool in the left pane. Click the Add button to add it to the tools on the toolbar. It will appear just above the tool that is selected on the right. OR...
Select a tool in the right pane. Click the Remove button to remove it from the toolbar.
Point
You can quickly add or remove buttons by double clicking them.
To rearrange the position of the tools:
Select a tool in the pane at the right.
Click the Move Up or Move Down button to move the tool.
As you add or remove tools and move them, you will see the changes reflected on the toolbar on your screen.
To finish customizing:
Click the Reset button to restore the toolbar buttons to their previous setting.
Click the Close button to close the dialog box and saves your changes.
The toolbar settings are saved so you will see them each time you start Live Help Expert.
The following table shows the toolbar buttons that are available to add to the default toolbar.
Button Name | Button | Purpose |
|---|---|---|
Close Client |
| To end the session and close the Client. Same as Close Client on the SESSION menu. |
Exit |
| Exit Live Help. Same as Exit on the SESSION menu. Live Help Client application stays running on Client's computer. |
Help |
| Start help system. Same as Contents on the HELP menu. |
Send Message |
| Send a message. Same as Message Exchange on the TOOLS menu. |
Create |
| Create a New session. Same as Create on the SESSION menu. (Not available in Live Help Monitor.) |
Transfer Method |
| Change performance settings for Screen Transfer method, color depth, wallpaper. Same as Screen Transfer Method on the OPTIONS menu. |
Scale Screen |
| Scale incoming screen to fit within Live Help window. Same as Scale Screen on the VIEW menu. |
Start Recording |
| Save content of a session held with a remote computer. Same as the Record command in the TOOLS menu. |
Pause Recording |
| Stop recording temporarily. Same as the Pause command in the TOOLS menu. |
Stop Recording |
| Stop recording and save as a session data file. Same as the Stop command in the TOOLS menu. |
Switch Mode |
| Change to instruction mode or remote control mode. Same as the Switch Mode command in the TOOLS menu. |