Note
Notes concerning the startup of web console
Do not start multiple web consoles on one PC.
Notes on displaying the web console on Windows(R) Internet Explorer(R) 10 or later
When you display the web console on Windows(R) Internet Explorer(R) 10 or later, the top of the characters will be missing.
Start Log Viewer
Start the web console through any of the following methods:
In a 2-level structure: Connect to the Management Server.
Select Start > Systemwalker Desktop Keeper > Server > Desktop Keeper Main Menu, or Apps > Systemwalker Desktop Keeper > Desktop Keeper Main Menu on Management Server.
Specify the address of browser to "http://host name or IP address of management server/DTK/index.html"
If IIS port number has been changed, specify as follows:
http:// IP address: port number/DTK/index.html
In a 3-level structure: Connect to the Master Management Server.
Select Start > Systemwalker Desktop Keeper > Server > Desktop Keeper Main Menu, or Apps > Systemwalker Desktop Keeper > Desktop Keeper Main Menu on Master Management Server.
Specify the address of browser to "http://host name or IP address of master management server/DTK/index.html"
If IIS port number has been changed, specify as follows:
http:// IP address: port number/DTK/index.html
Refer to "1.2.45 IPv6 Support" for details on the IPv6 specification.
The Login window is displayed.
Enter the following information and click the Login button.
The system administrator and department administrator log in the same way.
When performing a single sign-on link with Systemwalker Desktop Patrol, the entered User ID should be case-sensitive.
User ID: set in the Administrator Information Settings window of the Server Settings Tool.
Password: set in the Administrator information settings window of the Server Settings Tool
It is recommended to change the password regularly. For details on how to do so, refer to "Change password".
The status window is displayed.
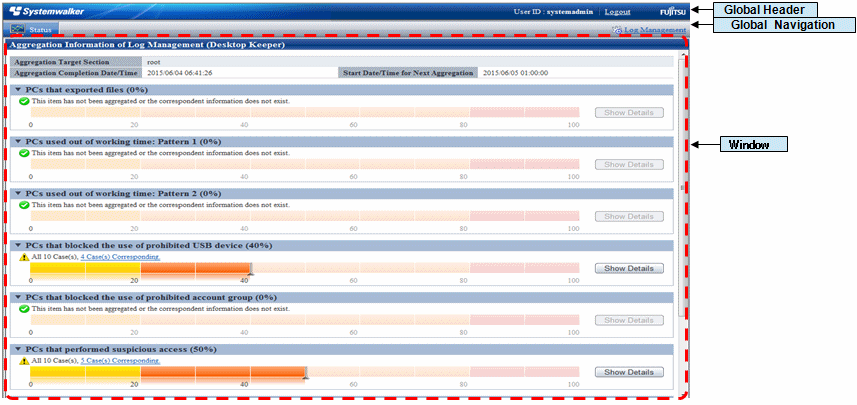
Select Log Management from Global Navigation.
Log Viewer is started, and the CT Operation Log window is displayed.
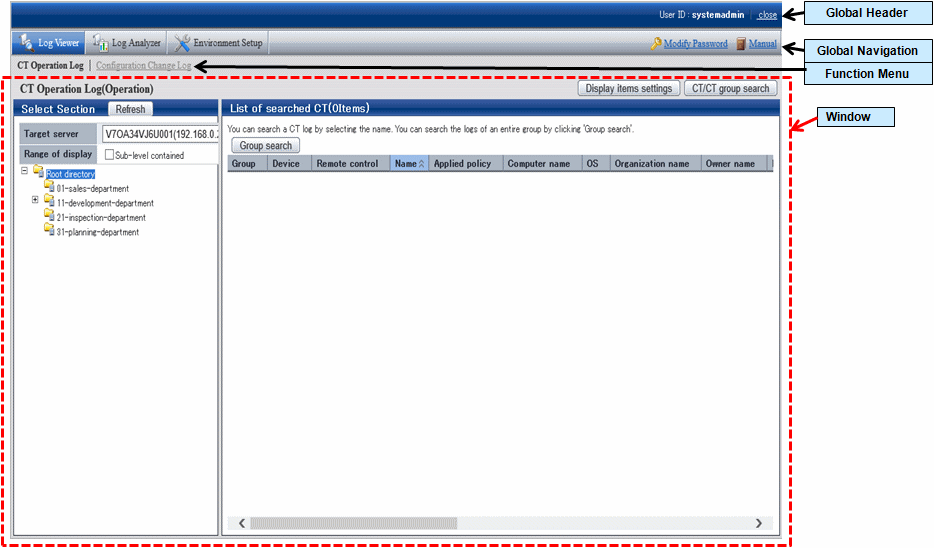
Global Header
User ID: The user ID for login is displayed.
close: Close the Log Viewer window.
Global Navigation
Log Viewer: The Log Viewer window is displayed.
Log Analyzer: The Log Analyzer window is displayed.
Environment Setup: The option window (the window used to set aggregation condition on which the aggregation results displayed in the status window are based).
Modify Password: Change the password for starting the Web Window. (Refer to "Change password" for how to change password)
Manual: Display the manual.
Function Menu
CT Operation Log: Search and display CT Operation Logs.
User operation log: Searches and displays user operation logs.
Configuration Change Log: Search and display Configuration Change Logs.
Contents
Display items settings: The selection of visible columns in List of searched CT and the display sequence can be modified. Refer to "Set visible columns in [List of searched CT]" for details.
CT/CT group search: The CT operation log(Operation) - CT/CT group search window is displayed. Search after setting the conditions if the location of client (CT), smart device (agent), and CT group under Management Server is not known.
Select Section: "Local" of the root directory and its subordinate CT groups are displayed.
Refresh: Import the latest tree structure and CT list information of server selected from Target Server.
Target server: Select the Management Server or Master Management Server to be connected with.
Range of display
If the check box is selected, the selected CT group and all its subordinate CTs will be displayed in List of searched CT
If the check box is not selected, all CTs directly under the selected CT group will be displayed in List of searched CT.
Range settings
When this item is selected, only the client (CT) or smart device (agent) that generates violation logs will be displayed in List of searched CT. When the client (CT) or smart device (agent) under the group has already been displayed in List of searched CT, after this item is selected, it will change to display only the client (CT) or smart device (agent) that generates violation logs.
When this item is not selected, clients (CTs) and smart devices (agents) under the group will be displayed in List of searched CT.
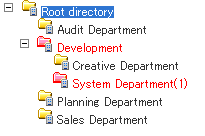
Icons of CT Group Tree
Icons displayed in the CT Group tree vary depending on the different users log in to Log Viewer.
The following describes the conditions for displaying each icon.
User logs on to Log Viewer | Displayed icon | Meaning of icon |
|---|---|---|
System administrator |
| All groups will be displayed with identical icons when the system administrator logs on to the Log Viewer. This indicates the group in which "Display the group or client (CT) and smart device (agent) that have generated violation logs in red" is not set; or no violation log has been generated though settings have been performed. |
| This indicates the group in which "Display the group or client (CT) and smart device (agent) that have generated violation logs in red" has been set and violation log has been generated in the set time. | |
| This indicates the "Deleted CT" group. | |
| This indicates the "Not Configured" group. | |
Department administrator |
| This indicates if a group has been set as the department administrator. |
| This indicates if a group has not been set as the department administrator. | |
| This indicates the group in which "Display the group or client (CT) and smart device (agent) that have generated violation logs in red" has been set and in which a violation log has been generated in the set time. | |
| This indicates that the CT group that has been set as the department administrator exists in the sub-group of this group. |
Domain display
When linking with Active Directory, the domain name is always displayed together with the server name.
Example of domain displayed during link with Active Directory:

List of searched CT: The clients (CTs) and smart devices (agents) that belong to the selected group are displayed. The item to be displayed can be selected. For the method, refer to "Set visible columns in [List of searched CT]
Set visible columns in [List of searched CT]
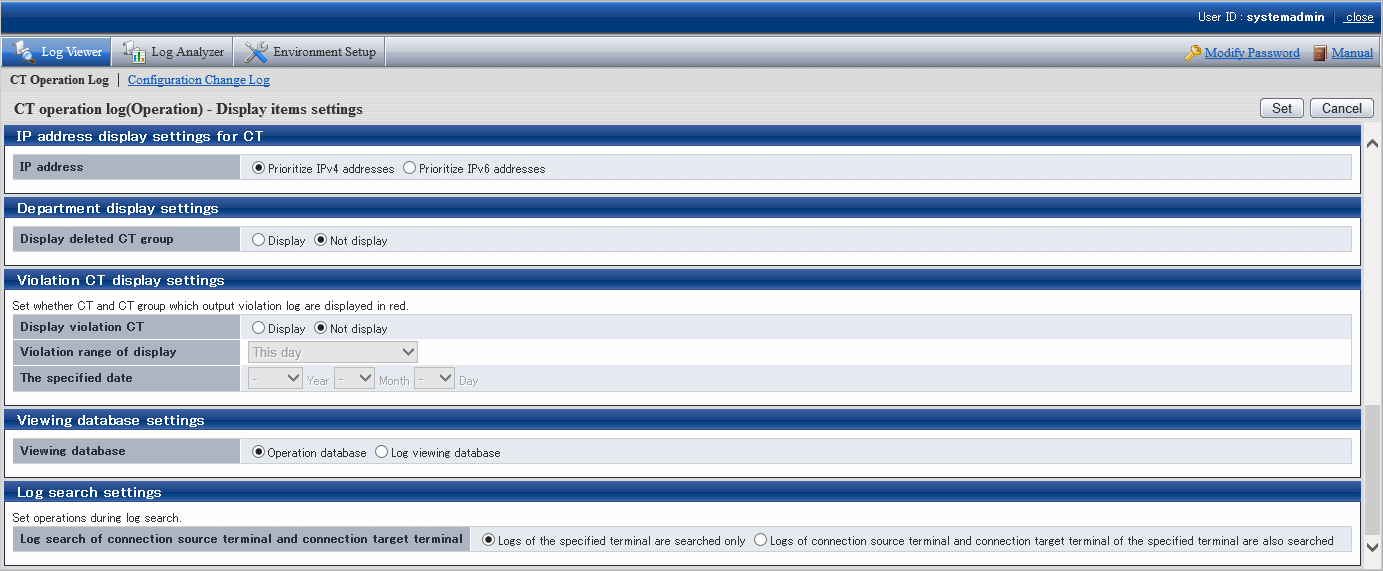
Click the Display items settings button in the CT Operation Log window.
The Display items settings window is displayed.

Invisible Column(s): Items that will not be displayed in "List of searched CT".
Visible Column(s): Items that will be displayed in "List of searched CT".
The display sequence can be modified. Items are displayed from left to right in "List of searched CT" by names in the order from top to bottom.
Item description is as follows.
Item Name | Description | |
|---|---|---|
Client (CT) | Smart device (agent) | |
Name (*1) | The name that can be added to client (CT), initial value is the computer name. | This is a name that can be given to a smart device (agent). The initial value is a telephone number, or a model name if the telephone number cannot be obtained. |
When modifying, refer to "Modify CT Policy". | ||
Group (*1) | This is the group to which the client (CT) and smart device (agent) belong. | |
Device | A client (CT) is displayed as PC. | A smart device is displayed as Smart device. |
Remote control | Blank | An overview of the remote control status is displayed.
Blank: Remote control is not implemented. |
Applied policy (*1) | This is the policy that is applied. CT: CT policy is applied. | |
Computer name (*1) | This is the computer name of client (CT). | This is the model name of the smart device (agent). |
MAC address | This is the MAC address of client (CT). | This is the MAC address of the smart device (agent). |
IP address (*2) | This is the IP address of client (CT) | This is the IP address of the smart device (agent). |
OS (*1) | This is the OS name of client (CT). | This is the OS name of the smart device (agent). |
CT classification | This is displayed as SE (for Standard Edition versions prior to V13.2.0, it is displayed as SE; for Base Edition, it is displayed with blank) | This is displayed as SE. |
CT version | This is the version of the client (CT) and smart device (agent) of Systemwalker Desktop Keeper that is installed. In addition, for correspondence of product version/edition, refer to "CT version" of Systemwalker Desktop Keeper Reference Manual. | |
DTPID | This is "User ID (+) PC Name" of Systemwalker Desktop Patrol Client (CT) This will be displayed when both Systemwalker Desktop Keeper Client (CT) and Systemwalker Desktop Patrol Client (CT) are installed on the same PC. | Blank |
Organization name (*1) | This is the organization name set in the OS of client (CT). | Blank |
Owner name (*1) | This is the owner name set in the OS of client (CT). | Blank |
Subnet mask | This is the subnet mask of the client (CT) and smart device (agent). | |
Active Directory Linkage | This shows whether the client imports information by Active Directory Linkage.
| Blank |
Network participation conditions | This is network participation situation of the client (CT).
| Blank |
Domain name | This is the name of domain to which the client belongs. | This is the model name of the smart device (agent). |
Final logon date and time (*1) | The client (CT) communicates with Master Management Server or Management Server during its startup. This is the final date and time when the server performs the following tasks on the client during communication,
The date and time are displayed or updated in the following case:
| This is the final date and time when the Master Management Server or Management Server sent a CT policy to a smart device (agent). The date and time are displayed or updated in the following cases:
|
Client policy update date and time (*1) | This is the final date and time when the Master Management Server or Management Server sends CT policy to the client (CT).
| |
Server (DB) update date and time (*1) | This is the latest date and time when the Management Server or Master Management Server updates the policy of the client (CT) and smart device (agent) and reflects it to the database (including immediate update). | |
Note | This is the information input when updating the policy of the client (CT) and smart device (agent). | |
DTP version | This is the version of Systemwalker Desktop Patrol Client installed in PC. | Blank |
Trace status | This is the setting of trace collection in client (CT).
| Blank |
Occurrence date and time of violation log (*1) | This is the date and time when violation logs are collected on the client (CT) and smart device (agent). | |
Management Server | The computer name of the management server to which the client and smart device (agent) belong. | |
Virtual PC | The following icons will be displayed if the client (CT) is installed in a virtual environment:
| Blank |
*1: Items displayed as initial value.
*2: If you disable the dual stack, the disabled IP address may continue to be displayed for a while.
Set visible columns and display sequence and click the Set button.
Display the "Deleted CT" group in [Select Department] display domain
To view the logs of a deleted (moved to "Deleted CT" group) client (CT) and smart device (agent), the "Deleted CT" group needs to be displayed in the Select Department display domain.
Nobody but the system administrator can Perform this operation.
Click the Display items settings button in the CT Operation Log window.
The Display items settings window is displayed.
Scroll the window and click the Display button in Display deleted CT group of Department display settings.
Click the Set button.
When linking with Active Directory, it will be displayed as the last group under Local group.
When Active Directory Linkage is not performed, it will be displayed as the last group under the server.
The method of viewing and searching the logs of a client (CT) and smart device (agent) that belong to the "Deleted CT" group is the same as that of viewing and searching logs of client (CT) of other CT group.
Display the group or client (CT) and smart device (agent) that have generated violation logs in red
After Violation CT display settings has been performed, the CT group in which violation logs have occurred will be displayed in red when Log Viewer is started.
After you select the CT group that is displayed in red, the rows of the client (CT) and smart device (agent) where violation logs occurred will be displayed in red in List of searched CT.
After you click the Select CT button, the column of the client (CT) and smart device (agent) where violation logs occurred will be displayed in red in Select CT. In addition, Number of violation logs will also be displayed in the visible columns.
Click the Display items settings button in the CT Operation Log window.
The Display items settings window is displayed.
Scroll the window and display Violation CT display settings.
The item descriptions for Violation CT display settings are as follows:
Item Name | Description |
|---|---|
Display violation CT | Set the group to which the client (CT) and smart device (agent) that have generated violation logs belong in the "Select Department" window and the method of displaying the client (CT) that has generated a violation log.
Initial value: Not display is select. |
Violation range of display | Set whether to display the situation in which the client (CT) and smart device (agent) that have generated violation logs exist in a certain range of time prior to the startup date of Log Viewer in red.
|
The specified date | Setting can be performed when Within the specified date is selected from Violation range of display. |
Set each item and click the Set button.
Change the database to be viewed
Select the database to view operation logs.
Click the Display items settings button in the CT Operation Log window.
The Display items settings window is displayed.
Scroll the window and display Viewing database settings.
The item descriptions for Viewing database settings are as follows:
Item Name | Description |
|---|---|
Viewing database settings | Set the database to be viewed by Log Viewer
Initial value: Select Operation database. |
Select the database to be viewed and click the Set button.
Note
Log Viewing Database
If you have not created the log viewing database and have not restored log data, you cannot set Log viewing database.
Administrators and department administrators for whom Log Viewer > view backup log is selected in Detailed Authority in the Administrator Information Settings window of the Server Settings Tool can browse the Log Viewing Database.
Modify search target
Set "Search the terminals that are specified as the search range of operation logs only", or "Also search the connection source terminal and connection target terminal of specified terminal".
Click the Display items settings button in the CT Operation Log window.
The Display items settings window is displayed.
Scroll the window and display Log search settings.
The item descriptions for Log search settings are as follows:
Item Name | Description |
|---|---|
Log search of connection source terminal and connection target terminal | Set the search range of operation log.
Initial value: Logs of the specified terminal are searched only is selected |
Select the operation log search range and click the Set button.
Change the IP address display settings
In an IPv4/IPv6 dual-stack environment, set whether to prioritize IPv4 addresses or IPv6 addresses as the IP addresses to be displayed in the Log Viewer.
Click Display items settings in the CT Operating Log window.
The Display items settings window is displayed.
Scroll the window and display IP address display settings for CT.
The item descriptions for IP address display settings for CT are as follows:
Item Name | Description |
|---|---|
IP address | Set which IP addresses are to be given priority.
Initial value: Prioritize IPv4 addresses is selected. |
Select the IP address type to be prioritized and click Set.
Change password
Select Modify Password of Global Navigation.
The Modify Password window is displayed.
Enter the following information, and click the OK button.
Current password: Enter the password that is currently used.
New password: Enter the new password with single-byte alphanumeric characters or symbols (1-32 characters).
However, "&", "\", ":", "?", """, "~", "^", "'", "<", ">", "|" and space are not allowed. In addition, the password is case-sensitive.
Enter password again: Enter the new password again.