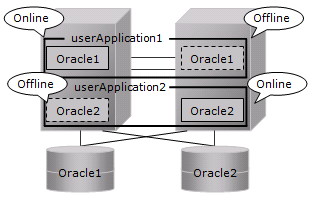
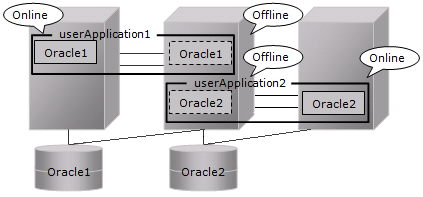
This section describes how to build a cluster application when Oracle Database software is installed on shared disks.
The table below shows the procedure for settings of Oracle Database.
No | Overview | |
|---|---|---|
Operating node | Standby node | |
1 | Install PRIMECLUSTER and PRIMECLUSTER Wizard for Oracle | Install PRIMECLUSTER and PRIMECLUSTER Wizard for Oracle. |
2 | Create userApplication | |
3 | Set up the kernel parameter | Set up the kernel parameter |
4 | Create Oracle user | Create Oracle user |
5 | userApplication startup | |
6 | Set up shared disk units | |
7 | Set up Oracle Inventory | |
8 | Set up environment variables | |
9 | Install Oracle Database | |
10 | Create Oracle listener | |
11 | Create Oracle Database | |
12 | Check Operation of Oracle Database and listener | |
13 | Set up PRIMECLUSTER Wizard for Oracle | |
14 | Create userApplication with Oracle Resources | |
15 | Check Operation of userApplication | |
For details of each step as follows.
Install PRIMECLUSTER and PRIMECLUSTER Wizard for Oracle
Install PRIMECLUSTER and PRIMECLUSTER Wizard for Oracle.
For information on how to install them, see following.
Create userApplication with No Oracle Resources
Create userApplication that does not include Oracle resources.
For information on how to create it, see following.
Set up the Kernel parameter
For information on how to set up Kernel parameter, see following.
Create Oracle user
For information on how to create Oracle user, see following.
Note
Set the path names (on shared disk) of the Oracle base directory and the Oracle home directory in Oracle user's login profile.
userApplication startup
Start up userApplication on operation node, and verify the shared disk units and the takeover IP address are enabled.
Set up shared disk units
Set the write permission for Oracle user to the shared disk.
Set up Oracle Inventory
Create Oracle Inventory directory in ORACLE_HOME on the shared disk.
$ mkdir -p $ORACLE_BASE/product/11.2.0/db_1/oraInventory
Create oraInst.loc on the shared disk.
$ cat $ORACLE_BASE/etc/oraInst.loc
inventory_loc=$ORACLE_BASE/product/11.2.0/db_1/oraInventory
inst_group=oinstall
Set up environment variables
Set up environment variables before Oracle Universal Installer(OUI) starts.
$ unset TZ PERL
$ export ORACLE_HOSTNAME=<logical IP address>
Install Oracle Database
Install Oracle Database by Oracle Universal Installer(OUI).
$ runInstaller -invPtrLoc $ORACLE_BASE/etc/oraInst.loc ORACLE_HOSTNAME=<logical IP address > [-debug]
Specify the full path of the oraInst.loc made at step 7 for the argument "$ORACLE_BASE/etc/oraInst.loc" of "-invPtrLoc".
Specify logical IP address for "ORACLE_HOSTNAME".
The "-debug" is optional.
Proceed with the installation by following the OUI prompt.
Oracle Database 11g R2
In "Select Installation Option " screen, select the "Install database software only".
Oracle Database 11g R1
In "Select Installation Method " screen, uncheck " Create Starter Database".
Create Oracle listener
Create listener and set up Net Service Name by Network Configuration Assistant (netca). Specify the logical IP address for the IP address of the listener. Start up the listener.
The files are allocated as follows:
Files | Locations | Note |
|---|---|---|
listener.ora | Share | - |
tnsnames.ora | Share | - |
<LISTENER>.log | Share | - |
Create Oracle Database
Create the database by Database Configuration Assistant (DBCA).
Allocate a database
Create a database on the shared disk. The shared disk must be activated.
The files are allocated as follows:
Files | Locations | Note | |
|---|---|---|---|
Initialization parameter file (PFILE) | Share | - | |
Server parameter file (SPFILE) | Share | - | |
Password file | Share | - | |
Control files | Share | - | |
Data files | Share | - | |
Redo log files | Share | - | |
Archived redo log files | Arbitrary | Recommend to be multiplexed, allocating on a shared disk and a local disk. | |
Flash Recovery Area | Share | - | |
log files | AUDIT_FILE_DEST | Share | - |
BACKGROUND_DUMP_DEST | Share | ||
CORE_DUMP_DEST | Share | ||
USER_DUMP_DEST | Share | ||
DIAGNOSTIC_DEST | Share | ||
Note
Note that there is sufficient space to archive for archived redo log files if they are located on shared disks. If there is insufficient space, and data updating processing through monitoring SQL hangs, an oracle resource might fail. Afterwards, the service might stop finally on both operating node and standby node, because the space of shared disk is insufficient and the failover of userApplication fails on the standby node.
Information
Check if the Oracle user has privileges to write in a shared disk before creating the database.
Create a database (In the case that the Oracle Database software is located on shared disk)
Operation node
Create a database on the operating node.
Note
If multiple Oracle homes are configured on one server, a different Oracle instance name must be assigned for each Oracle home.
Information
Refer to the Oracle Database manual.
Standby node
There is no procedure on the standby node.
Note
Do not use "cloracopy" command in PRIMECLUSTER Wizard for Oracle if Oracle Database software is located on the shared disk.
Example
In the case of Mutual standby operation and N:1 Standby operation, create a database on an operating node as well as 1:1 Standby operation. There is no procedure on the standby node. This is the same as the other operation modes.
Mutual standby
2:1 Standby
Check Operation of Oracle Database and listener
Check operation of Oracle Database and listener of each node.
Start up RMS on all nodes if RMS does not start.
# /opt/SMAW/SMAWRrms/bin/hvcm -a
Stop Oracle Database and listener on operation node.
# su - ora11gr1
$ sqlplus / as sysdba
SQL> shutdown immediate
SQL> exit
$ lsnrctl stop LISTENER
$ exit
#
Switch userApplication to the standby node.
# /opt/SMAW/SMAWRrms/bin/hvswitch <userApplication> node2RMS
Start up listener and Oracle Database on the standby node.
# su - ora11gr1
$ lsnrctl start LISTENER
$ sqlplus / as sysdba
SQL> startup
SQL> exit
$ exit
#
Execute step 2 and step 3 on all standby nodes.
Stop Oracle Database and listener.
Stop RMS on all nodes.
Note
The Oracle “TWO_TASK” environment variable must not be used. It is used to add a connect identifier to connect to Oracle instance then automatically connect to network. In PRIMECLUSTER Wizard for Oracle, network connection is not supported. Users are supposed to connect to Oracle instance in local connection (“ / as sysdba”). If network connection is required, specify “@connect identifier” instead of using the “TWO_TASK” environment variable when connecting at the connecting.
The processes other than definition of system environment variables must not be added to login.sql of Oracle DBA users. SQL can be described in the SQL*Plus profile login.sql. However, it might automatically be executed and affect ongoing operations because Oracle instance is controlled through SQL*Plus in PRIMECLUSTER Wizard for Oracle. It is available to setup the system environment variables to login.sql by SET command.
Set up PRIMECLUSTER Wizard for Oracle
Register the Oracle SYSTEM user password by "clorapass" command. See following.
Define the full path of the alert log and the listener log in /opt/FJSVclora/etc/clgetoralog.conf. See following.
Create userApplication with Oracle Resources
For information on how to create userApplication with Oracle Resources, see following.
Check operation of userApplication
For information on how to check operation of userApplication, see following.