Use the following procedure to install the product on the admin server:
Install the product on a Windows or a Linux machine.
This section explains how to install Systemwalker Software Configuration Manager on a Windows admin server.
Standard and custom installations are available when installing Systemwalker Software Configuration Manager. If you want to use the default values for all settings, then perform a standard installation, otherwise perform a custom installation.
If you want to use the default values for all settings during installation, then perform a standard installation.
The standard installation uses the following default values:
Setting value | Meaning of the setting value | Default value |
|---|---|---|
Installation directory | Installation directory for Systemwalker Software Configuration Manager | C:\Program Files (x86)\Systemwalker |
Web server port number of Systemwalker Software Configuration Manager | Port number for accessing the management console of Systemwalker Software Configuration Manager | 31500 |
Interstage Management Console port number | Port number for accessing the Interstage management console | 12000 (*1) |
Web server (Interstage HTTP Server) port number of Systemwalker Runbook Automation | Port number for accessing the web console of Systemwalker Runbook Automation | 80 (*1) |
CORBA service port number | Port number used internally | 8002 (*1) |
HTTP listener port number | Port number used internally | 28080 (*1) |
Port number of the HTTP listener for operation management | Port number for accessing the Interstage Java EE management console | 12001 (*1) |
IIOP port number | Port number used internally | 23600 (*1) |
IIOP_SSL port number | Port number used internally | 23601 (*1) |
IIOP_MUTUALAUTH port number | Port number used internally | 23602 (*1) |
JMX_ADMIN port number | Port number used internally | 8686 (*1) |
Database storage directory for CMDB Manager | Database storage folder for CMDB Manager | C:\Program Files (x86)\Systemwalker\SWRBAM\CMDB (*1) |
Subsystem-number | Subsystem number of Systemwalker Operation Manager | 9 (*1) |
Job scheduler port number of Systemwalker Runbook Automation | Port number used internally | 9690 (*1) |
Job execution control port number of Systemwalker Runbook Automation | Port number used internally | 9691 (*1) |
*1: Use the values already set if Systemwalker Software Configuration Manager is to be linked to ServerView Resource Orchestrator or if operating on the same admin server as the Systemwalker Runbook Automation Management Server.
Information
2.2.3.1.2 Custom installation" for information on the setting values.
Log in with administrator privileges.
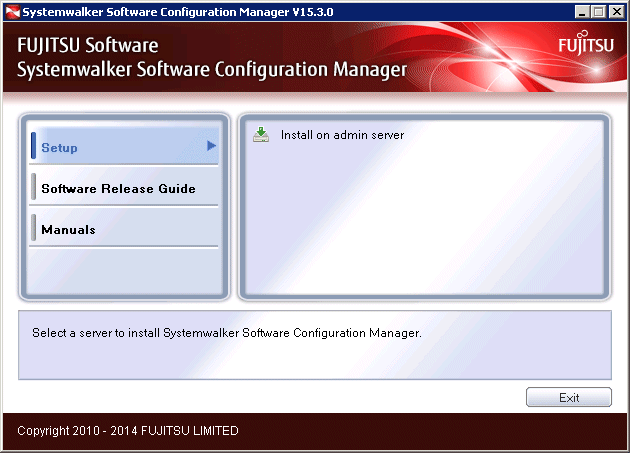
Insert the DVD-ROM labeled "Systemwalker Software Configuration Manager Media Pack V15.3.0 DISC1 (Admin Servers Program)" in the DVD-ROM drive.
The following window will be displayed:
Select Install on admin server.
Note
If this window is not displayed automatically, start the installer manually by executing "swsetup.exe" on the DVD-ROM.
When using Windows Server 2008 or later, run this command as an administrator.
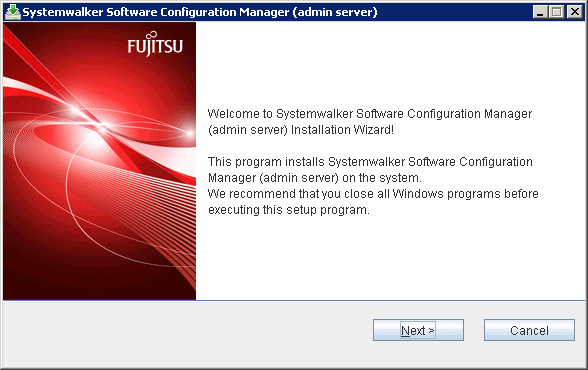
A welcome window will be displayed.
Click the Next button.
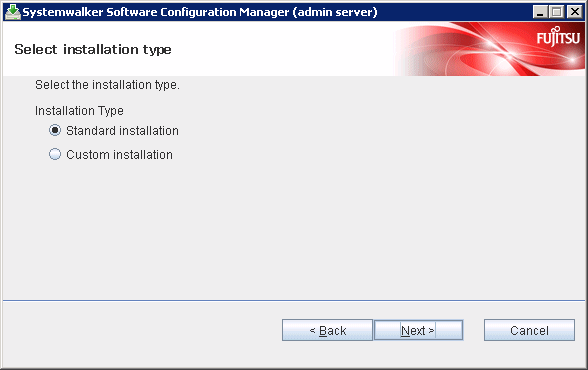
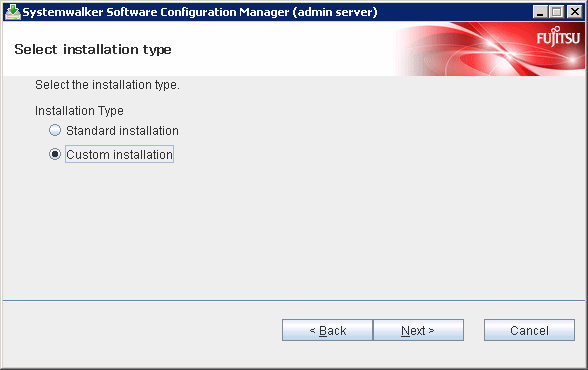
The Select Installation Type window will be displayed.
Select Standard Installation, and then click the Next button.
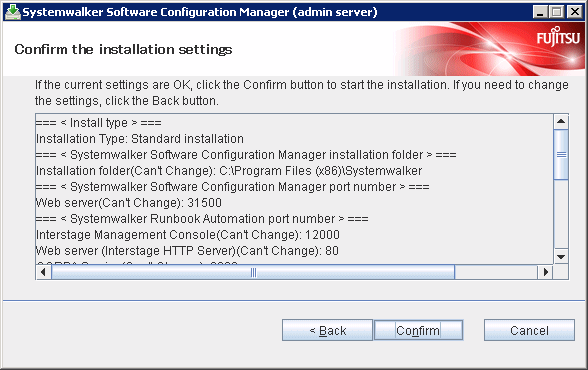
The Confirm the installation settings window will be displayed.
Check the settings, and then click the Confirm button to start the installation.
Upon successful completion, the following window will be displayed.
Click the Finish button.

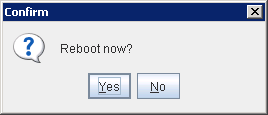
The Confirm window (prompting for system restart confirmation) will be displayed.
Click the Yes button to restart the system.
Note
It is not necessary to restart the system if Systemwalker Software Configuration Manager is to be linked to ServerView Resource Orchestrator or if operating on the same admin server as the Systemwalker Runbook Automation Management Server - the Confirm window (prompting for restart confirmation) will not be displayed.
Log in with Administrator privileges.
Insert the DVD-ROM labeled "Systemwalker Software Configuration Manager Media Pack V15.3.0 DISC1 (Admin Servers Program)" in the DVD-ROM drive.
The following window will be displayed.
Select Install on admin server.
Note
If the window is not displayed automatically, start the installer manually by executing "swsetup.exe" on the DVD-ROM.
When using Windows Server 2008 or later, run this command as an administrator.
A welcome window will be displayed.
Click the Next button.
The Select the installation type window will be displayed.
Select Custom Installation, and then click the Next button.
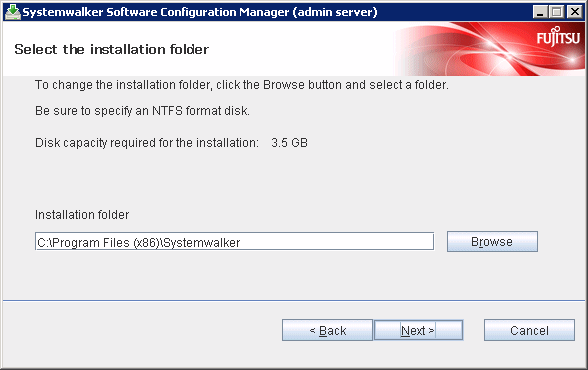
The Select the installation folder window will be displayed.
Specify the installation folder, and then click the Next button.
Note
Specify an NTFS format disk.
Specify a path up to 40 bytes long.
Specify a new folder.
Do not specify relative paths or paths that start with "\\".
Specify only alphanumeric characters, spaces, hyphens ("-"), and underscores ("_").
You can specify a directory under <system drive>\Program Files or <system drive>\Program Files (x86).
The required packages for operating Systemwalker Software Configuration Manager are installed in the following directories:
Systemwalker Software Configuration Manager installation directory
<specified installation directory>\SWCFMGA
<specified installation directory>\SWCFMGM
Systemwalker Runbook Automation installation directory
<specified installation directory>\SWRBAM
Interstage BPM installation directory
<specified installation directory>\IBPM
Interstage Application Server installation directory
<specified installation directory>\IAPS
J2EE common directory for Interstage Application Server
<specified installation directory>\J2EE
Java EE common directory for Interstage Application Server
<specified installation directory>\IJEE
Systemwalker Operation Manager installation directory
<specified installation directory>\SWOMGR
The installation directory for the following package is fixed, and cannot be changed.
PostgreSQL installation directory
%ProgramFiles%\fjsvpgs83
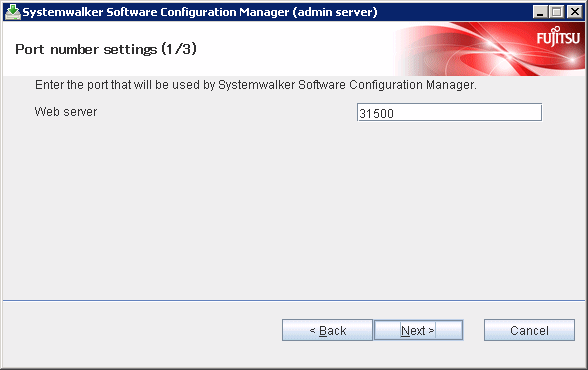
The Port number settings (1/3) window will be displayed.
Specify the port number for accessing the management console of Systemwalker Software Configuration Manager, and then click the Next button.
Note
If Systemwalker Software Configuration Manager is to be linked to ServerView Resource Orchestrator, then the setting window will not be displayed when performing the settings in this and subsequent steps (since their values have already been set), therefore you can proceed to the Confirm the installation settings window in step 11.
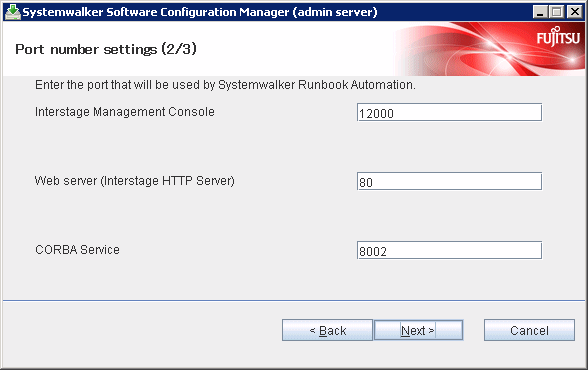
The Port number settings (2/3) window will be displayed.
Specify the port number to be used by Systemwalker Runbook Automation, and then click the Next button.
Note
If operating on the same admin server as the Systemwalker Runbook Automation Management Server, then the setting window will not displayed for this and subsequent steps (since their values have already been set), therefore you can proceed to the Confirm the installation settings window in step 11.
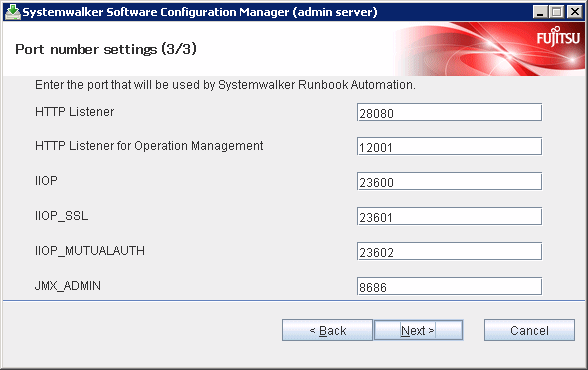
The Port number settings (3/3) window will be displayed.
Specify the port number to be used by Systemwalker Runbook Automation, and then click the Next button.
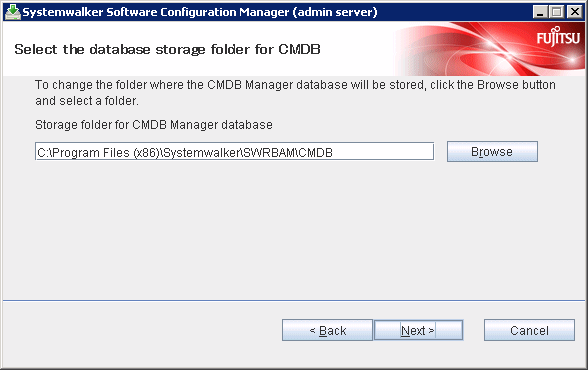
The Select the database storage folder for CMDB window will be displayed.
Specify the database storage folder for the CMDB manager, and then click the Next button.
Note
Specify an NTFS format disk for the installation folder.
Specify a path up to 64 bytes long.
Specify a new folder.
Do not specify relative paths or paths that start with "\\".
Only the following characters can be used for the folder name: alphanumeric characters, halfwidth whitespace characters, hyphens ("-"), and underscores ("_").
You can specify a directory under <system drive>\Program Files or <system drive>\Program Files (x86).
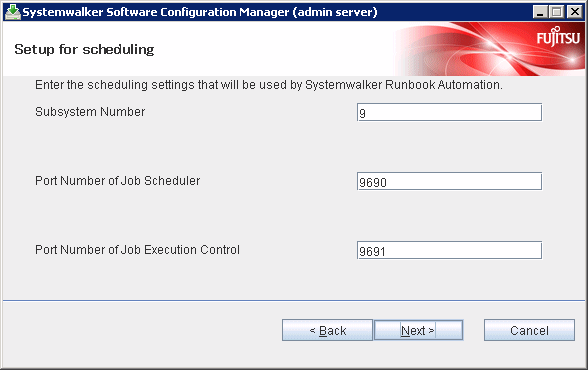
The Setup for scheduling window will be displayed.
If not operating Systemwalker Operation Manager on the same admin server, or if not using the default port number, click the Next button without changing the default values.
Note
Only change the displayed default values in the following cases:
Port number
If the default port number is already being used by other software, specify a different port number.
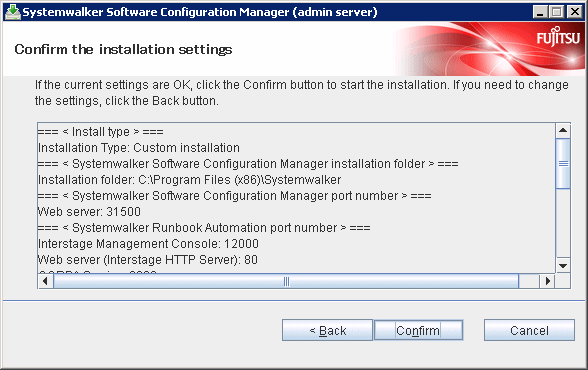
The Confirm the installation settings window will be displayed.
Check the settings, and then click the Confirm button to start the installation.
Upon completion, the window below will be displayed.
Click the Finish button.
The Confirm window (prompting for system restart confirmation) will be displayed.
Click the Yes button to restart the system.
Note
It is not necessary to restart the system if Systemwalker Software Configuration Manager is to be linked to ServerView Resource Orchestrator, or if operating on the same admin server as the Systemwalker Runbook Automation Management Server - the Confirm window (prompting for a restart confirmation) will not be displayed.
This section explains how to install Systemwalker Software Configuration Manager on a Linux admin server.
Standard and custom installations are available when installing Systemwalker Software Configuration Manager. If you want to use the default values for all settings, then perform a standard installation, otherwise perform a custom installation.
If you want to use the default values for all settings during installation, then perform a standard installation.
The standard installation uses the following default values:
Setting value | Meaning of the setting value | Default value |
Web server port number of Systemwalker Software Configuration Manager | Port number for accessing the management console of Systemwalker Software Configuration Manager | 31500 |
Interstage Management Console port number | Port number for accessing the Interstage Management Console | 12000 (*1) |
Web server (Interstage HTTP Server) port number of Systemwalker Runbook Automation | Port number for accessing the web console of Systemwalker Runbook Automation | 80 (*1) |
CORBA Service port number | Port number used internally | 8002 (*1) |
HTTP listener port number | Port number used internally | 28080 (*1) |
Port number of the HTTP listener for operation management | Port number for accessing the Interstage Java EE management console | 12001 (*1) |
IIOP port number | Port number used internally | 23600 (*1) |
IIOP_SSL port number | Port number used internally | 23601 (*1) |
IIOP_MUTUALAUTH port number | Port number used internally | 23602 (*1) |
JMX_ADMIN port number | Port number used internally | 8686 (*1) |
Database storage directory for CMDB Manager | Database storage folder for CMDB Manager | /var/opt (*1) |
Subsystem-number | Subsystem number of Systemwalker Operation Manager | 9 (*1) |
Job scheduler port number of Systemwalker Runbook Automation | Port number used internally | 9690 (*1) |
Job execution control port number of Systemwalker Runbook Automation | Port number used internally | 9691 (*1) |
*1: Use the values already set if Systemwalker Software Configuration Manager is to be linked to ServerView Resource Orchestrator or if operating on the same admin server as the Systemwalker Runbook Automation Management Server.
Information
Refer to "2.2.3.2.2 Custom installation" for information on the setting values.
Login to the system as a superuser.
Insert the DVD-ROM labeled "Systemwalker Software Configuration Manager Media Pack V15.3.0 DISC1 (Admin Servers Program)" in the DVD-ROM drive.
If the DVD-ROM has not been mounted, then mount it:
# mount -t iso9660 -r /dev/mnt <Mount point for the DVD-ROM>Start the common installer.
Run the installation command (swsetup).
# cd <Mount point for the DVD-ROM>
# ./swsetup
Note
If the DVD-ROM has been mounted automatically by the automatic mounting daemon (autofs), the swsetup command will fail to execute because the mount options will be set to "noexec".
In this case, use the "mount" command to remount the DVD-ROM appropriately before executing the installation.
The mount options for the DVD-ROM that has been mounted can be checked by executing the "mount" command without any parameters.
Start installation.
A welcome window will be displayed. Press the Enter key.
================================================================================
               Systemwalker Software Configuration Manager Setup
                                    V15.3.0
                      Copyright 2010-2014 FUJITSU LIMITED
================================================================================

Welcome to Systemwalker Setup!
The setup will install Systemwalker Software Configuration Manager.

Press ENTER.
The Select the installation target window will be displayed.
Select Install on admin server. Enter "1".
================================================================================
               Systemwalker Software Configuration Manager Setup
                                    V15.3.0
                      Copyright 2010-2014 FUJITSU LIMITED
================================================================================

<< Select the installation target >>

1. Install on admin server

================================================================================
Select one of the items above.
[q,number]
=>
The installation for the admin server will start. To start the installation process, press "y".
Systemwalker Software Configuration Manager (admin server)
Do you want to start install?
[y,n]
=>
Select the installation type. Enter "1" for standard installation.
=== < Install type > ===
Input Installation Type
[1:Standard installation,2:Custom installation][ENTER:1]
=>
Confirm the installation.
In the confirm the installation settings window, check the entered values. If they are correct, enter "y" - the installation will start.
To correct the installation information, enter the number of the item you want to correct.
=== < Install type > ===
1.Installation Type: Standard installation
=== < Systemwalker Software Configuration Manager installation folder > ===
Program location(Can't Change): /opt
Configuration file location(Can't Change): /etc/opt
Work file location(Can't Change): /var/opt
=== < Systemwalker Software Configuration Manager port number > ===
Port Number of Web server(Can't Change): 31500
=== < Systemwalker Runbook Automation port number > ===
Port Number of Interstage Management Console(Can't Change): 12000
Port Number of Web server (Interstage HTTP Server)(Can't Change): 80
Port Number of CORBA Service(Can't Change): 8002
Port Number of HTTP Listener(Can't Change): 28080
Port Number of HTTP Listener for Operation Management(Can't Change): 12001
Port Number of IIOP(Can't Change): 23600
Port Number of IIOP_SSL(Can't Change): 23601
Port Number of IIOP_MUTUALAUTH(Can't Change): 23602
Port Number of JMX_ADMIN(Can't Change): 8686
=== < Database storage folder for CMDB > ===
Database storage directory for CMDB(Can't Change): /var/opt
=== < Detailed scheduling settings > ===
Subsystem Number(Can't Change): 9
Port Number of Job Scheduler(Can't Change): 9690
Port Number of Job Execution Control(Can't Change): 9691

Install the product using these settings?
[y,q,number]
=> y
The installation will start.
Once the preparations for the installation are complete, the following message will be displayed, and the installation will start:
installing...
The installation will complete.
Upon successful completion, the following message will be displayed. Enter "y" to restart the system.
Systemwalker Software Configuration Manager (admin server) install completed.
Reboot now?
[y,n]
=>
Note
It is not necessary to restart the system if Systemwalker Software Configuration Manager is to be linked to ServerView Resource Orchestrator or if operating on the same admin server as the Systemwalker Runbook Automation Management Server - the confirm window (prompting for restart confirmation) will not be displayed.
Log in to the system as a superuser.
Insert the DVD-ROM labeled "Systemwalker Software Configuration Manager Media Pack V15.3.0 DISC1 (Admin Server Program)" in the DVD-ROM drive.
If the DVD-ROM has not been mounted, then mount it by executing the following command:
# mount -t iso9660 -r /dev/mnt <Mount point for the DVD-ROM>Start the common installer.
Run the installation command (swsetup).
# cd <Mount point for the DVD-ROM>
# ./swsetup
Note
If the DVD-ROM has been mounted automatically by the automatic mounting daemon (autofs), the swsetup command will fail to execute because the mount options will be set to "noexec".
In this case, use the "mount" command to remount the DVD-ROM appropriately before executing the installation.
The mount options for the DVD-ROM that has been mounted can be checked by executing the "mount" command without any parameters.
Start installation.
A welcome window will be displayed. Press the Enter key.
================================================================================
               Systemwalker Software Configuration Manager Setup
                                    V15.3.0
                      Copyright 2010-2014 FUJITSU LIMITED
================================================================================

Welcome to Systemwalker Setup!
The setup will install Systemwalker Software Configuration Manager.

Press ENTER.
The Select the installation target window will be displayed.
Select Install on admin server. Enter "1".
================================================================================
               Systemwalker Software Configuration Manager Setup
                                    V15.3.0
                      Copyright 2010-2014 FUJITSU LIMITED
================================================================================

<< Select the installation target >>

1. Install on admin server

================================================================================
Select one of the items above.
[q,number]
=>
The installation for the admin server will start. To start the installation process, press "y".
Systemwalker Software Configuration Manager (admin server)
Do you want to start install?
[y,n]
=>
Select the installation type. Enter "2" for custom installation.
=== < Install type > ===
Input Installation Type
[1:Standard installation,2:Custom installation][ENTER:1]
=>
Specify the port number for accessing the management console of Systemwalker Software Configuration Manager.
Note
If Systemwalker Software Configuration Manager is to be linked to ServerView Resource Orchestrator, then the setting window will not be displayed for this and subsequent steps (since their values have already been set), therefore, you can proceed to the Confirm the installation settings window in step 12.
=== < Systemwalker Software Configuration Manager port number > ===
Input Port Number of Web server
[ENTER:31500]
=>
Set the port numbers used by Systemwalker Runbook Automation.
Note
If operating on the same admin server as the Systemwalker Runbook Automation Management Server, then the setting window will not be displayed for this and subsequent steps (since their values have already been set), therefore, you can proceed to the Confirm the installation settings window in step 12.
Interstage Management Console port number
Web server (Interstage HTTP Server) port number
CORBA service port number
HTTP listener port number
Port number of the HTTP listener for operation management
IIOP port number
IIOP_SSL port number
IIOP_MUTUALAUTH port number
JMX_ADMIN port number
=== < Systemwalker Runbook Automation port number > ===
Input Port Number of Interstage Management Console
[ENTER:12000]
=>

=== < Systemwalker Runbook Automation port number > ===
Input Port Number of Web server (Interstage HTTP Server)
[ENTER:80]
=>

=== < Systemwalker Runbook Automation port number > ===
Input Port Number of CORBA Service
[ENTER:8002]
=>

=== < Systemwalker Runbook Automation port number > ===
Input Port Number of HTTP Listener
[ENTER:28080]
=>

=== < Systemwalker Runbook Automation port number > ===
Input Port Number of HTTP Listener for Operation Management
[ENTER:12001]
=>

=== < Systemwalker Runbook Automation port number > ===
Input Port Number of IIOP
[ENTER:23600]
=>

=== < Systemwalker Runbook Automation port number > ===
Input Port Number of IIOP_SSL
[ENTER:23601]
=>

=== < Systemwalker Runbook Automation port number > ===
Input Port Number of IIOP_MUTUALAUTH
[ENTER:23602]
=>

=== < Systemwalker Runbook Automation port number > ===
Input Port Number of JMX_ADMIN
[ENTER:8686]
=>
Specify the CMDB database installation folder.
=== < Database storage folder for CMDB > ===
Input Database storage directory for CMDB
[ENTER:/var/opt]
=>
Set the subsystem number and port number to be used by the schedule function.
If not operating Systemwalker Operation Manager on the same admin server, or if not using the default port number, press the Enter key without changing the default values.
Note
Only change the displayed default values in the following cases:
Port number
If the default port number is already being used by other software, specify a different port number.
=== < Detailed scheduling settings > ===
Input Subsystem Number
[ENTER:9]
=>

=== < Detailed scheduling settings > ===
Input Port Number of Job Scheduler
[ENTER:9690]
=>

=== < Detailed scheduling settings > ===
Input Port Number of Job Execution Control
[ENTER:9691]
=>
Confirm the installation.
In the confirm the installation settings window, check the entered values. If they are correct, enter "y" - the installation will start.
To correct the installation information, enter the number of the item you want to correct.
=== < Install type > ===
1.Installation Type: Custom installation
=== < Systemwalker Software Configuration Manager installation folder > ===
Program location(Can't Change): /opt
Configuration file location(Can't Change): /etc/opt
Work file location(Can't Change): /var/opt
=== < Systemwalker Software Configuration Manager port number > ===
2.Port Number of Web server: 31500
=== < Systemwalker Runbook Automation port number > ===
3.Port Number of Interstage Management Console: 12000
4.Port Number of Web server (Interstage HTTP Server): 80
5.Port Number of CORBA Service: 8002
6.Port Number of HTTP Listener: 28080
7.Port Number of HTTP Listener for Operation Management: 12001
8.Port Number of IIOP: 23600
9.Port Number of IIOP_SSL: 23601
10.Port Number of IIOP_MUTUALAUTH: 23602
11.Port Number of JMX_ADMIN: 8686
=== < Database storage folder for CMDB > ===
12.Database storage directory for CMDB: /var/opt
=== < Detailed scheduling settings > ===
13.Subsystem Number: 9
14.Port Number of Job Scheduler: 9690
15.Port Number of Job Execution Control: 9691

Install the product using these settings?
[y,q,number]
=>
The installation will start.
Once the preparations for the installation are complete, the following message will be displayed, and the installation will start:
installing...
The installation will complete.
Upon successful completion, the following message will be displayed. Enter "y" to restart the system.
Systemwalker Software Configuration Manager (admin server) install completed.
Reboot now?
[y,n]
=>
Note
It is not necessary to restart the system if Systemwalker Software Configuration Manager is to be linked to ServerView Resource Orchestrator or if operating on the same admin server as the Systemwalker Runbook Automation Management Server - the confirm window (prompting for restart confirmation) will not be displayed.