This section describes how to back up the Systemwalker Runbook Automation environment.
Back up as following steps
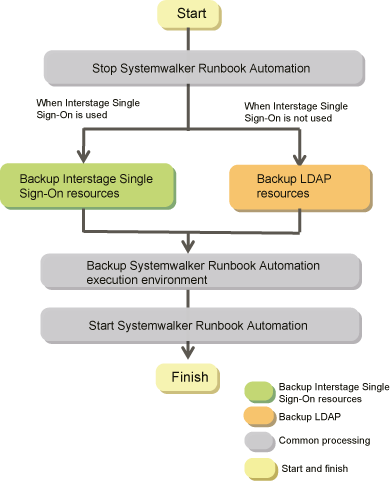
Stop Systemwalker Runbook Automation Management Server by swrba_stop command.
[Windows]
[Systemwalker Runbook Automation Management Server install directory]\bin\swrba_stop
[Linux]
/opt/FJSVswrbam/bin/swrba_stop
This section explains the procedure for backing up the Interstage Single Sign-On resources.
You do not need to execute this procedure in the environment of not using Interstage Single Sign-On authentication foundation.
Note
Here, the Interstage Single Sign-On resources constructed by using the ssoclsetup command are backed up.
For the Interstage Single Sign-On resources constructed by not using the ssoclsetup, refer to the Interstage Application Server Operator's Guide and backup the resources.
Execute procedure in this section as an administrator authority.
The Interstage Single Sign-On is stopped by using the ssoclservicectl command. Refer to the Systemwalker Runbook Automation Reference Guide for the ssoclservicectl command
[Windows]
[Systemwalker Runbook Automation Management Install Directory]\sso\bin\ssoclservicectl stop
[Linux]
/opt/ FJSVswrbam /sso/bin/ssoclservicectl stop
The Interstage Single Sign-On resources can be backed up by using the ssoclbackup command. Refer to the Systemwalker Runbook Automation Reference Guide for the ssoclbackup command.
[Windows]
Create directory for back up
mkdir X:\Backup\sso
Back up with ssoclbackup command.
[Systemwalker Runbook Automation Management Server Install Directory]\sso\bin\ssoclbackup X:\Backup\sso
[Linux]
Create directory for back up
mkdir /backup/sso
Back up with ssoclbackup command
/opt/FJSVswrbam/sso/bin/ssoclbackup /backup/sso
Note
Here, the following resources are backed up. Refer to Systemwalker Runbook Automation Reference Guide
Interstage Single Sign-On resources
Interstage HTTP Server resources
Interstage Directory Service resources
Interstage Certificate Environment resources
SSO repository name
The Interstage Single Sign-On is started by using the ssoclservicectl command. Refer to Systemwalker Runbook Automation Reference Guide for the ssoclservicectl command.
[Windows]
[Systemwalker Runbook Automation Management Server Install Directory]\sso\bin\ssoclservicectl start
[Linux]
/opt/FJSVswrba/sso/bin/ssoclservicectl start
This section explains how to back up the LDAP resources.
If you use Interstage Single Sign-On authentication infrastructure, you do not execute this steps.
If Active Directory or OpenLDAP is used for LDAP, refer to the LDAP manual before performing the backup tasks.
In the backup method explained here, the Interstage Directory Service is used and a standard database is used for the repository database.
[Windows]
In the following example, the repository "rep001" is backed up to the backup directory "X:\Backup\rep001".
Log in as the system administrator.
Stop Interstage directory service.
Stop "Interstage Directory Service(rep001)" from Control Panel- Administrative tool-Service. Or stop it by the following command.
net stop "Interstage Directory Service(rep001)"
Create a directory for backup. Note that there is no need to create a directory for rep001 in X:\Backup.
mkdir X:\Backup
Execute the backup command.
[Interstage Application Server installation directory]\bin\irepbacksys -d X:\Backup\rep001 -R rep001Start the Interstage Directory Service, if it is used.
Click Start >> Control Panel >> Administrative Tools, and then, double-click Services. From the displayed list of services, right-click Interstage Directory Service(rep001) and click Start.
Alternatively, start the Interstage Directory Service using the following command:
net start "Interstage Directory Service(rep001)"
[Linux]
In the following example, the repository "rep001" is backed up to the backup files "/backup/rep001".
Log in as the system administrator.
Stop Interstage directory service by irepstop command.
/opt/FJSVirep/bin/irepstop -R rep001
Create a directory for backup.
mkdir /backup
Execute the backup command.
/opt/FJSVirep/bin/irepbacksys -f /backup/rep001 -R rep001
If the Interstage Directory Service is used, start it.
/opt/FJSVirep/bin/irepstart -R rep001
Information
Refer to "Maintenance (Resource Backup)" in the Interstage Application Server Operator's Guide for information on how to back up the Interstage Directory Service.
This section describes how to back up the Systemwalker Runbook Automation environment.
![]()
Checking the space available in the backup directory
To check how much free space is required for the backup directory, it is necessary to check the space required for the backup directory for Systemwalker Runbook Automation and the space required for the backup directory for the CMDB.
Guides to the amount of free space required in the backup directory are as follows.
[Windows]
Space required for the backup directory = |
Process Management Database directory size specified during setup
[Linux]
Space required for the backup directory = + Total capacity in /var/opt/FJSVjmcal + Total capacity in /var/opt/FJSVJOBSC + Total capacity in /var/opt/FJSVfwseo/config/JM (*2) + Total capacity in /opt/FJSVJOBSC/bin + Total capacity in /etc/mjes + Total capacity in /var/spool/mjes + 1 MB |
Database directory size specified during setup
In the following cases, "FJSVfwseo" will be "FJSVfwsec".
When Systemwalker Centric Manager V13.4.0 is installed after Systemwalker Runbook Automation
When a version later than Systemwalker Centric Manager V13.4.0 is installed (this has nothing to do with the order of installation with regard to Systemwalker Runbook Automation)
As a guide to the amount of free space required for the backup directory, check the size of the directories below:
[Windows]
Space required for the backup directory = |
[Linux]
Space required for the backup directory = |
Backing up resources
Describes the steps for backing up backup directory X:\Backup\swrba
Login as a system administrator
Create back up directory
mkdir X:\Backup\swrba
Execute back up command
Back up the resources
[Systemwalker Runbook Automation Management Server install directory]\bin\swrba_backup X:\Backup\swrba
Backup will start.
The message below will be displayed:
Systemwalker Runbook Automation backup has started. Database backup has started. Database backup has completed successfully. File backup has started. File backup has completed successfully. Backup of the Scheduling is starting. Backup of the Scheduling has finished. Starting to back up the CMDB Manager. Finished backing up the CMDB Manager. Systemwalker Runbook Automation backup has completed successfully. |
E Backup will complete
The message below will be displayed:
Systemwalker Runbook Automation backup has completed successfully. |
Log in as a superuser on the system.
Create back up directory
mkdir /backup/swrba
Back up the resources
|
Backup will start.
The message below will be displayed:
Systemwalker Runbook Automation backup has started. Database backup has started. Database backup has completed successfully. File backup has started. File backup has completed successfully. Backup of the Scheduling is starting. Backup of the Scheduling has finished. Starting to back up the CMDB Manager. Finished backing up the CMDB Manager. Systemwalker Runbook Automation backup has completed successfully. |
Backup will complete.
The message below will be displayed:
Systemwalker Runbook Automation backup has completed successfully. |
start Systemwalker Runbook Automation Management Server by swrba_start command.
[Windows]
[Systemwalker Runbook Automation Management Server install directory]\bin\swrba_start
[Linux]
/opt/FJSVswrbam/bin/swrba_start