Start Management Console
Note
For preventing incorrect modification of policy
When leaving the PC installed with the Management Console after starting the Management Console, please close the Management Console to prevent the incorrect modification of policy settings.
For reducing the startup time of Management Console
When there are many CT number of sets to be managed (about more than 2000), the startup time of the Management Console will be delayed. By setting [Get Latest Information at Startup] of the Management Console to [Get from Master Management Server], delay can be avoided.
These settings will become valid when the Management Console is connected to the Master Management Console.
Select [Programs] - [Systemwalker Desktop Keeper] - [Management Console] - [Management Console] from the [Start] menu of the PC with the Management Console installed.
→ The [Systemwalker Desktop Keeper - Management Console] window is displayed.
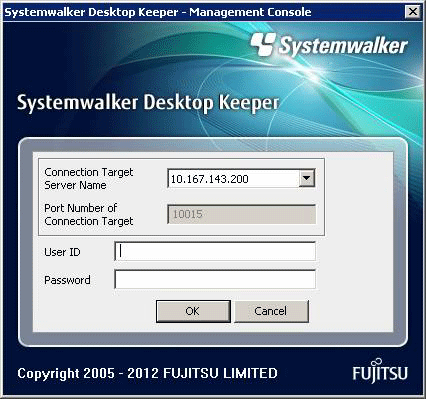
Enter the following information and click the [OK] button.
The login method of the system administrator is the same as that of a department administrator.
[Connection Target Server Name]: Select the IP address or computer name of the Management (Master Management) Server to be connected
[User ID]: It is the [User ID] set in the [Administrator Information Settings] window of the Server Settings Tool.
[Password]: it is the [Password] set in the [Administrator Information Settings] window of the Server Settings Tool.
It is recommended to modify password regularly. Please refer to “Modify Password at Startup of Management Console” for how to do so.
→ The [Management Console] window is displayed.
The information displayed in the window and menu bar varies upon the logon status of the system administrator and department administrator.
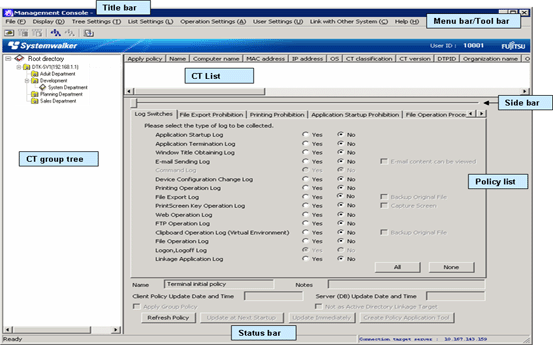
This Department describes the name of each part of the [Management Console] window.
The CT group information imported by Active Directory Linkage and the created CT group are displayed.
When confirming the latest information of CT group tree, select [Refresh Tree (All Servers)] from the [Tree Settings] menu.
When [Unfold All Trees] is selected from the [Tree Settings] menu, all CT groups will be displayed.
When [Fold All Trees] is selected from the [Tree Settings] menu, only the CT groups under the Root directory (only the CT groups under server is displayed when server is displayed and only the CT group under domain is displayed when domain is displayed)will be displayed.
When a CT group is selected, the latest CT policy set by CT group will be displayed.
The server name displayed in the CT group tree is the value that has been set in [Computer Name] of the [Server Information Settings] window of the Server Settings Tool.
The icons displayed in the CT group tree vary depending upon the person who logs on to the Management Console and the execution status of Active Directory Linkage.
The following describes the conditions for displaying each icon.
Personnel Logon to Management Console | Active Directory Linkage Status | Displaying Symbol | Meaning of Icons |
|---|---|---|---|
System Administrator | When Active Directory Linkage is performed |
| Indicates the group for which the department administrator has been set. |
| Indicates the group for which the department administrator has been set. | ||
When Active Directory Linkage is not performed or in case of the local group during Active Directory Linkage |
| Indicates the group for which the department administrator has been set. | |
| Indicates the group for which the department administrator has not been set. | ||
― |
| Indicates the “Deleted” group. | |
― |
| Indicates the “Not Configured” group. | |
department administrator | When Active Directory Linkage is performed |
| Indicates the group which has been set as the department administrator. |
| Indicates the group which is not set as the department administrator. | ||
| Indicates CT group which has been set so the department administrator exists in the sub-group under that group. | ||
When Active Directory Linkage is not performed or in case of the local group during Active Directory Linkage |
| Indicates the group which has been set as the department administrator. | |
| Indicates the group which is not set as the department administrator. | ||
| Indicates CT group which has been set so the department administrator exists in the sub-group under that group. | ||
― |
| Indicates the “Not Configured” group. |
The PC on which the CT is installed is displayed. The items displayed in the CT list are as follows:
Item Name | Description |
|---|---|
[Apply Policy] | The policy applied to the client (CT) is displayed.
|
[Name] | This refers to a name that can be given to the client (CT) and the initial value is computer name. |
[Computer name] | This refers to the computer name of the client (CT). |
[MAC address] | This refers to the MAC address of the client (CT). |
[IP address] | This refers to the IP address of the client (CT). |
[OS] | Operating system name of the client (CT). |
[CT classification] | This is displayed as [SE] when the client (CT) is in Standard Edition. |
[CT version] | This refers to the version of installed Systemwalker Desktop Keeper client (CT). In addition, please refer to “CT Version” of “Systemwalker Desktop Keeper Reference Manual” for correspondence of Version/Edition of product. |
[DTPID] | This refers to “User ID (+) PC Name” of Systemwalker Desktop Patrol client (CT). It indicates the client (CT) of Systemwalker Desktop Keeper and the client (CT) of Systemwalker Desktop Patrol are installed in the same computer. |
[Organization name] | This refers to the organization name set in the OS of the client (CT). |
[Owner name] | This refers to the owner name set in the OS of the client (CT). |
[Subnet mask] | This refers to the subnet mask set in the OS of the client (CT). |
[Link with Active Directory] | Whether the client (CT) imports information by linking with Active Directory can be displayed.
|
[Network participation status] | The network participation status of the client (CT) is displayed.
|
[Affiliated domain name] | The affiliated domain of the client (CT) can be displayed. |
[Last logon date and time] | When the client (CT) is started, it communicates with the Master Management Server or Management Server. This refers to the deadline for the server to execute the following operations in the client (CT) during the communication.
|
[Date and time of client policy update] | This refers to the final date and Time when the Management Server or Master Management Server sends CT Policy to the client (CT).
|
[Date and time of server (DB) update] | This refers to the final date and Time when the Management Server or Master Management Server updates the policy of the client (CT) and reflects to the database (including immediate update). |
[Notes] | This refers to the information entered when the policy of the client (CT) is reflected. Please refer to “Modify CT Policy” during modification. |
[Trace conditions] | This refers to the settings that are traced and collected in the client (CT).
|
[DTP version] | This is the version of Systemwalker Desktop Patrol CT installed in PC. |
[Virtual PC] | When installing the client (CT) in the virtual environment, it is displayed as follows:
|
When it is required to confirm the information in the latest CT list, perform the following operations:
When confirmation is performed by the CT,
Select a CT from the CT list. At the moment, the CT policy will be updated.
When updating information for all CTs,
Select [Refresh Tree (All Servers)] from the [Tree Settings] menu.
When updating information of all subordinate CTs in the selected Management Server,
Select [Refresh Tree (Selected Servers)] from the [Tree Settings] menu.
The items displayed in the CT list and sequence of display can be modified. The procedure is as follows.
Start the [Management Console] window.
Select [Setting of CT List Display Column] from the [List Settings] menu.
→ The [Settings of CT List Display Column] window is displayed.
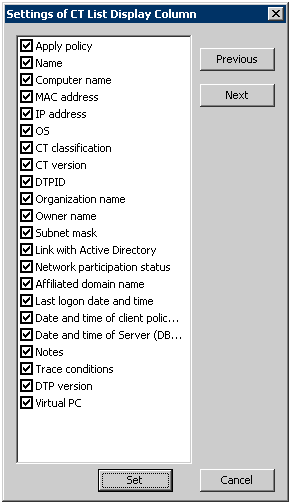
Select the checkbox displayed in the CT list.
Select the item that requires modification of display sequence by clicking the [Up] or [Down] button.
After all operations have been completed, click the [Set] button.
→The visible columns in the CT list are updated.
The items in the CT list can be moved by drag-and-drop operation. When the Management Console is started at the next time, it will still return to the display sequence before moving.
This is the window for switching each tab of the policy list.
By dragging the slide bar, each window can be switched in sequence. After stopping the drag and drop, the window of neighbor tabs will be displayed.
By clicking the slide bar, each window can be switched in order.
This displays the policies that have been set.
Please refer to “2.4.1 Perform Terminal Initial Settings” for details of how to set the policy list.
This displays the name of specified target server when the Management Console is started.
This displays the group name and level of the selected CT or CT group.
This describes the menu bar and toolbar of [Management Console] window.
Menu Bar | Toolbar | Function Summary | ||
|---|---|---|---|---|
File | [Search CT/CT Group] | - | Display the client (CT)/CT group search window . | |
[Create CT Group] | - | Display the CT group creation window. | ||
[Delete CT Group] | - | Display the CT group deletion window. | ||
[Set Department Administrator of CT Group] | - | Display the administrator registration window. When the department administrator logs on, the menu cannot be selected. | ||
[Export CT Information in CSV Format] | - | Display the [Specify a CSV File to Export CT Information] window. | ||
[Export CT Group Information in CSV Format] | - | Display the [Specify a CSV File to Export CT Group Information] window. | ||
[Import Department Administrator of CT Group in CSV Format] | - | Display the [Specify a CSV File to Import department administrator Information of CT Group] window. | ||
[Export Department Administrator of CT Group in CSV Format] | - | Display the [Specify a CSV File to Export department administrator Information of CT Group] window. | ||
[Collect Remote Material] | - | Collect the data used for trouble investigation of the selected client (CT). | ||
[CT Debugging Trace] | - | Set the collection conditions of trace logs in the selected client (CT). | ||
[Output IP Address of Subordinate CT] | - | Output the file that records the IP address of subordinate clients (CTs) (including the subordinate unit of group) under the selected CT group. | ||
[Change Password] | - | Modify password at the startup of the Management Console. | ||
[Exit] | - | Close the Management Console. | ||
[Display] | [View/Set Terminal Information] |
| Display the View/Set Policy window. | |
[Get/Control Service List] |
| Display the Get/Control Service List window. | ||
[Get/Control Process List] |
| Display the Get/Control Process List window. | ||
[Policy Settings] | [Refresh Tree (All Servers)] |
| Refresh the level status of CT group tree for all subordinate servers of Master Management Server. | |
[Refresh Tree (Selected Servers)] | - | Refresh the level status of CT group tree for the selected server in the CT group tree of the Management Console connected to the Master Management Server. | ||
[Unfold All Trees] | - | Display all CT groups. | ||
[Fold All Trees] | - | Display only the CT group under the Root directory (display only the CT group under server when server is displayed and only the CT group under domain when domain is displayed). | ||
[Do not Display Empty Group] | - | Do not display the CT group under which no client (CT) or CT group is registered. | ||
[Reflect CT Group Structure] |
| Save the level status of CT group tree. | ||
[Display Server] | - | Display the connected Management Server in the tree. As the server is always displayed when Active Directory Linkage is performed, the selection of the [Display Server] checkbox cannot be cancelled. | ||
[Display “Deleted CT” Group] | - | Display the “Deleted CT” group in configuration information tree. | ||
[List Settings] | [Setting of CT List Display Column] | - | Display the window for the settings of CT list display column. | |
[Operation Settings] | [Terminal Initial Settings] | - | Display the Terminal Initial Settings window. | |
[Terminal Operation Settings] | - | Display the Terminal Operation Settings window. | ||
[USB Device Registration] | - | Display the USB Device Registration window. | ||
[Get Latest Information at Startup] | [Get from Lower Level Management Server] | - | When the Management Console connected to the Master Management Server is started, the latest configuration information will be obtained through the lower level Management Server and the information will be displayed in the window. | |
[Get from Master Management Server] | - | When the Management Console connected to the Master Management Server is started, data inquiry and data synchronization will be performed for the lower level Management Server. The information that is currently saved by the Master Management Server will be displayed in the window. | ||
[Debugging Trace] | [No] | - | Close the trace of server service/level control service/administrator E-mail notification function. | |
[Summary] | - | Set the trace mode of server service/level control service/administrator E-mail notification function to [Summary]. | ||
[Details] | - | Set the trace mode of server service/level control service/administrator E-mail notification function to [Detail]. | ||
[Management Console Trace] | [No] | - | Close the trace of the Management Console. | |
[Summary] | - | Set the trace mode of the Management Console to [Summary]. | ||
[Details] | - | Set the trace mode of the Management Console to [Detail]. | ||
[User Settings] | [User Policy Settings] | - | Display the [User Policy Settings] window. | |
[Link with Other System] | [Link with Systemwalker Desktop Patrol] | [Import Structure Information] | - | Display the configuration information Import window. |
[Export Structure Information] | - | Display the Configuration Information Export window. | ||
[Help] | [Online Help] |
| Display the online manual. | |
[Version information] | - | Display the copyright information and version information. | ||
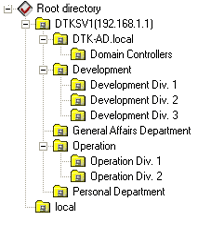
After the “Display Server” checkbox of “Tree Settings” is selected in the Management Console connected to Master Management Server, the computer name and IP address of the connected Master Management Server and Management Server will be displayed, and the CT group will be displayed on each server.
As the server is always displayed during Active Directory Linkage, the selection of [Display Server] checkbox cannot be cancelled.
[When [Display Server] is not selected (when Active Directory Linkage is not performed)]

[When [Display Server] is selected (when Active Directory Linkage is not performed)]

When Active Directory Linkage, the server name and domain name will be displayed at all times, and they cannot be hidden.
[Example of domain display when linking with Active Directory]
After [Tree Settings]-[Display Server] of the Management Console is selected, the “Deleted CT” group (when the [Display Server] checkbox is not selected, the [Display “Deleted” Group] checkbox cannot be selected.) will be displayed when [Display “Deleted” Group] of [Tree Settings] is selected.
The following is an example when Active Directory Linkage is not performed.
When Active Directory Linkage is performed, the “Deleted CT” group will be displayed under the Local group.
[Display “Deleted CT” group is not selected]
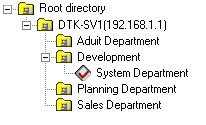
[Display “Deleted CT” group is selected]
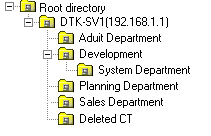
Modify Password at Startup of Management Console
Start the Management Console.
Select [Change Password] from the [File] menu.
→ The [Change Password] window is displayed.
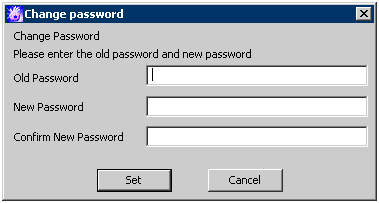
Enter the following information and click the [Set] button.
[Old Password]: Enter the password previous used.
[New Password]: Enter the new password with 1-32 characters of single-byte alphanumeric characters or single-byte symbols.
But “&”, “\”, “: ”, “?”, “””, “~”, “^”, “’”, “<”, “>”, “|” and space cannot be used. In addition, it is case-sensitive.
[Confirm New Password]: Re-enter the new password .
Click the [Set] button in the displayed confirmation window.
→Password change is completed.