This section describes how to install a new Management Server and Master Management Server of Systemwalker Desktop Keeper.
If the old version of the Management Server/Master Management Server has been installed, when installing Management Server/Master Management Server of V14.2.0, please refer to ”Chapter 4 Version Upgrade”.
Items to be confirmed before installation
Please refer to the “Operating Environment” in the “Systemwalker Desktop Keeper User’s Guide” to confirm if the required disk capacity can be ensure in the drive specified in the installation target of database related files.
Please refer to “Operating Environment” in the “Systemwalker Desktop Keeper User’s Guide” to confirm “Products that cannot be used in mixture”.
Please refer to the “Port List” in the “Systemwalker Desktop Keeper Reference Manual” to confirm the port numbers being used.
When copying the installer of Systemwalker Desktop Keeper from CD-ROM to local disk, please confirm that the path of the copying target does not contain double-byte characters.
Steps to install a Management Server/Master Management Server are as follows. In addition, please refer to the “Systemwalker Desktop Keeper User’s Guide” for information on the operating environment.
Log in to Windows with a user that belongs to the Administrators group or a user that belongs to the Domain Admins group. If other applications are being used, please close them.
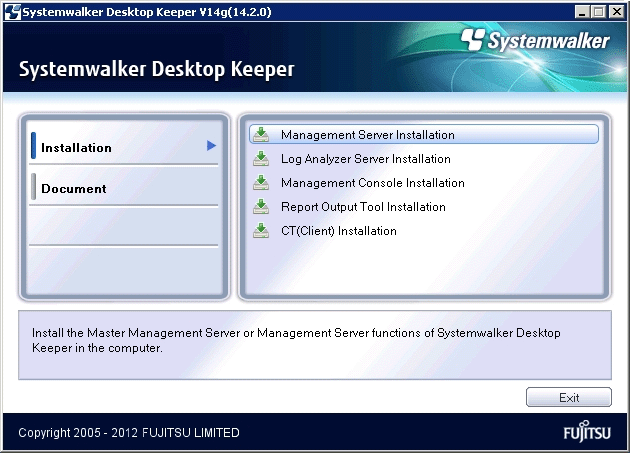
After the CD-ROM of Systemwalker Desktop Keeper is inserted into the PC, the following window will be displayed:
Please select “Management Server Installation”.

If the above-mentioned installer is not started, please start “swsetup.exe” from the CD-ROM drive.
After the “Welcome to user Systemwalker Desktop Keeper Server installation” window is displayed, please click the [Next] button.
The “Select the installation target” window of server functions is displayed.
If the installation target displayed is not to be changed, click [Next].
If the installation target displayed is to be changed, please click the [Browse] button of the folder to be changed, and click the [Next] button after the folder has been changed.
Note
Please remove compressed and encrypted targets
When the installation target folder of server functions and the installation target folder of the following database related files are taken as compressed or encrypted target, the running of the application might be affected. Therefore, please do not perform compression or encryption settings.
The “Select the installation target” window of database related file is displayed.
When the installation target displayed is not to be changed, click [Next].
When the installation target displayed is to be changed, please click the [Browse] button of the folder to be changed, and then click the [Next] button.
The maximum length of the installation folder path of database related file is 10 bytes. Multi-byte characters such as space, Hiragana, Katakana and Chinese characters cannot be specified. In addition, the following drives cannot be specified:
Root directory of drive (C:\, D:\, etc.)
Network drive
Drive not in NTFS format
When the Symfoware database system has already been installed, the bound Symfoware Server will not be installed. Even if installation target of database related file has been specified, the installation target of the Symfoware database system will not be changed.
The “Select the installation target” window for IIS main directory settings is displayed.
When installation target displayed is not to be changed, please click the button [Next].
When installation target displayed is to be changed, please click the [Browse] button of the folder to be changed, and then click the [Next] button.
Please make sure to specify the home directory of [Default Web Site].
The “Enter the password” window is displayed. Please set the primary administrator password of Server Administrative Tools, and click the [Next] button.
In addition, the password set here is also the password of Secure Admin in Sever Setting Tool, Backup Tool and Restoration Tool. The conditions of input content are as follows:
Up to 32 bytes of single-byte alphanumeric characters and symbols apart from the following can be entered.
Symbols that cannot be entered are “&”“<”“>”“|”“\”“"”“~”“'”“?”“:”“^”.
Double-byte and single-byte spaces cannot be entered.
Single-byte kana cannot be entered.
Note
Please do not forget the password
Please do not forget the primary administrator password of the Server Administrative Tools because the operating environment cannot be constructed without the password. Therefore, it may be required to uninstall Management Server and install again.
The “The installation preparation is completed.” window is displayed.
To start the installation, please click [Install] to start the installation process.
To check or modify the settings, please click the [Return] button to reset.
Note
Do not restart at moment
Sometimes the window “Microsoft Visual C++ 2005 SP1 Redistributable Package” will be displayed during installation, but please do not restart and continue the installation of Management Server.
Moreover, if restart has been executed by mistake, the installation of Management Server will be interrupted. Reinstallation will be needed.
After the processing has completed normally, the “Installation is completed.” window will be displayed.
To use the program, it is required to restart the system. Select one of the following items and click the [Finish] button.
[Yes, restart the computer immediately].
[No, restart the computer later].
In addition, when Symfoware Server has already been installed, the indication for restart will not be displayed. Therefore, please restart the system manually right after the [Finish] button is clicked.
After installing the Management Server, the database environment required for running the Management Server must be created. Please refer to “2.2.3 Construct Database ” and execute the construction of database.