The procedure of creating the user management Information is as follows.
User registration
Settings of operation authority
Record the user management information to a file in CSV format, and user can be registered by uploading this file.
For details of the CSV file format, please refer to the "Systemwalker Desktop Patrol Reference Manual".
New Registration
The method of new registration by uploading is as follows.
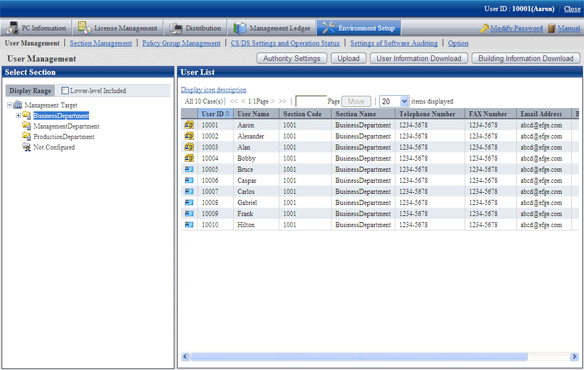
Login to the Main Menu and click [Environment Setup].
→The following window is displayed.
Click the [Upload] button.
→The following window is displayed.
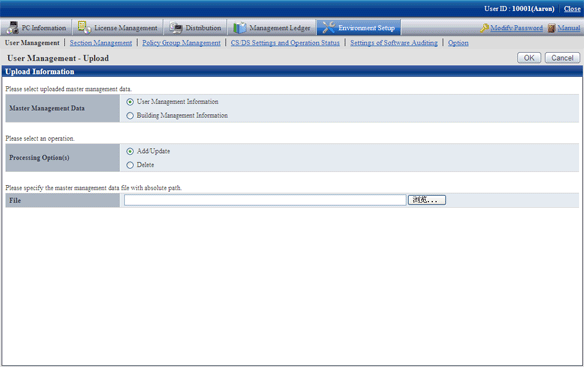
Select the following items.
[Master Management Data]
Select the management information to be updated.
User Management Information
Building Management Information
[Processing Option(s)]
Select the operation from the following content.
Item | Meaning |
|---|---|
[Add/Update] | Add/Update the data that has been registered in Master data. Register new data in which the value of key item of the data to be uploaded should not be duplicated as the value of “Key Item” of the management information that has been registered. Update the data in which the value of the key item of data to be uploaded is matched with the value of [Key Item] of the management information that has been registered. * The [Key Item] is the initial item of management information created in CSV format. |
[Delete] | Delete the data that has been registered in Master data. Delete the data in which the value of [Key Item] of the data to be uploaded is the same as the value of [Key Item] of the management information that has been registered, * The [Key Item] is the initial item of management information created in CSV format. |
[File]
Select the file in CSV format.
After the specification has completed, click the [OK] button.
→The upload result is displayed.
When error occurred, the list of users that cannot be added/updated due to inconsistence of user management information can be downloaded.
For error content, please refer to the error content of “dtpmast.exe (Master data construction)” command in “Systemwalker Desktop Patrol Reference Manual”.
Modify a registration
The method of modifying the registered Master data is as follows.
Login to the Main Menu and click [Environment Setup].
→The following window is displayed.
Select a section from the tree of the left field.
→ The organizations under the selected section is displayed on the right field.
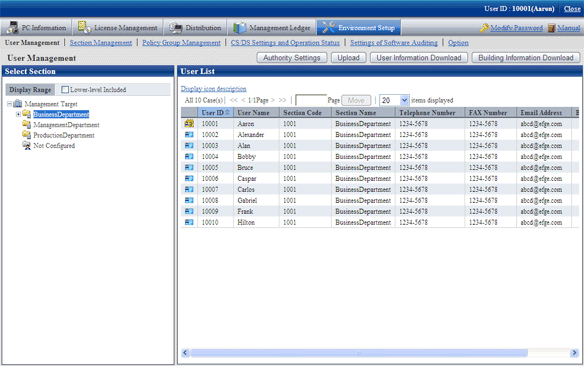
Click the [User Information Download] button.
→The following window is displayed.

Click the [Building Information Download] button, the following window will be displayed.
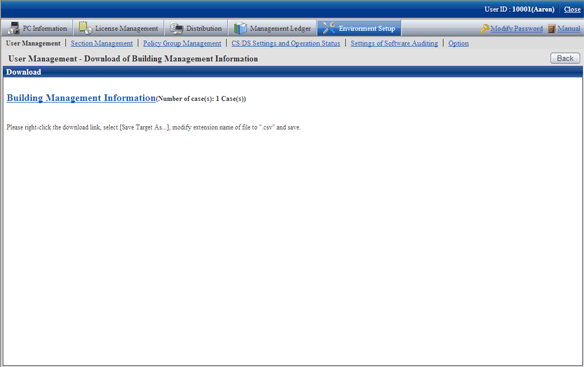
Right-click the download anchor and select "Save to a file" or "Save the link". Please save it by the ".csv" extension.
In case of section management account user, the master data of the belonging section and the section under it can be downloaded. The master data containing upstream and other section cannot be downloaded.
Edit the downloaded file and create a data file according to the purpose of addition, updating, or deletion.
Note
When modifying and saving the downloaded file with CSV format using Microsoft Excel, please pay attention to the following.
Although the double quotation marks are used for displaying values in the original file, they may disappear after modifying and saving with Excel.
→At this time, add double quotation marks using text editor .etc.
When the front part is 0, like "000001", in the original file, after modifying and saving with Excel, the number 0 in the front part will disappear and will be replaced by "1".
→In this case, when modifying with Excel, please use the user format that displays "0" at upstream, or add the single quotation marks in the front of the value, and it is recognized compulsorily as a character item in Excel.
Note
When editing CSV files, edit the password information of each user, and replace the password after uploading.
When using the original password of each user, make the set password effective by omitting the password information in CSV files.
As in new registration mentioned above, register the management information with CSV format in the "User management - Upload" window.
For the user that has been registered, the code of section to which it belongs cannot be modified and user management information cannot be deleted.
When trying to delete the user of system account, the user will be moved to the not Configured account under the status of system account. If you really want to delete this user, please execute the deletion process again after modifying the authority.
When deleting building management information, since “Building Code: 9990” is the code used internally in the system, it cannot be deleted.
After a section has been deleted, the user of “Section Management Account” that belongs to the deleted section will become “User Account”.
Operation authority is assigned to users.
Operation authority has the following three types. For details, please refer to “1.1 Operation Authority ”.
System account
Section management account
User account
In addition, authority setting of system account can only be performed when login with system account.
The procedure is as follows.
Login to the Main Menu and click [Environment Setup].
→The following window is displayed.
Click the [Authority Settings] button.
→The following window is displayed.

Select the authority of the setting target, and then click the "Next" button.
→The following window is displayed.
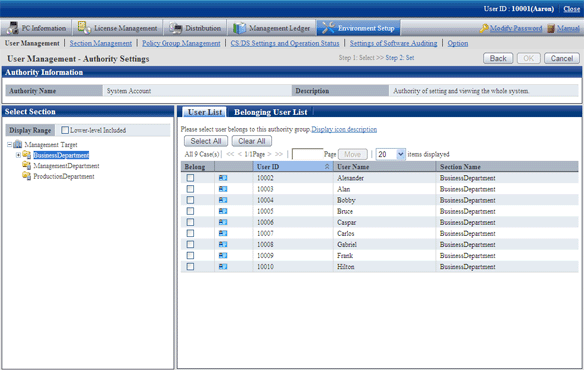
Select a section in the tree view of the left field.
→The users that belong to the selected section are displayed in the right field.
In addition, the user without a password will not be displayed.
Select the user to perform authority setting, and click the "OK" button.
→ The user authority will be set.
When confirming the users with authority set, go to step "3." again to operate, and click the "Belonging User List" tab to confirm.
→The List of Belonging Users is displayed.