
| ETERNUS SF XL-DATA/MV V13 User's Guide |
Contents
Index
 
|
| Chapter 2 : Setting the Operating Environment | > 2.5 Disk Utility | > 2.5.2 Data Transfer Volume Initialization |
The Disk Utility has an option of using an initialization wizard to initialize a disk displayed on the Tree View as a data transfer volume.
The following are the initialization procedures of the initialization wizard and the sequence of screen shots. Operation
Start the initialization with the initialization wizard
| Menu Bar | [Tree(T)] - [Initialize(I)] - [Initialization Wizard(W)] |
| Toolbar |  |
| Tree view popup menu(right click) | [Initialize(I)] - [Initialization Wizard(W)] |
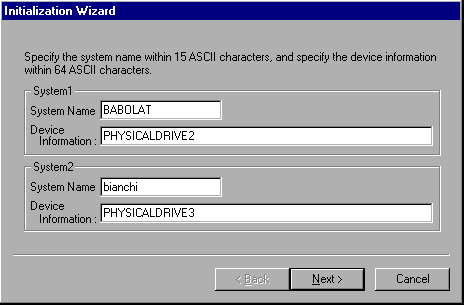
Initialization Wizard (1/3)

Specify the following information for both systems performing data transfer by XL-DATA/MV.
[System Name] Required
Specify the system name within 15 ASCII characters.
The specified value varies for each corresponding system type.
| For UNIX servers | : | Specify the node name that is displayed using the uname command with the -n option. |
| For Windows Server 2003(x64) | : | Specify the computer name displayed in the [Computer name Changes] window, which is accessed by pressing the [Change] button of the [Computer Name] tab in the [System Properties] window of the [My Computer] properties. |
| For Windows Server 2008(x64) | : | Specify the computer name displayed in the [System] properties window of the [Computer] properties. |
[Device Information]
For the device name, specify within 64 ASCII characters the name of the disk selected (highlighted) for initialization on the current tree view.
The device name varies depending on the type of the system specified for [System Name].
| For UNIX servers | : | Specify the full path of the character device name. (Example: /dev/rdsk/c1t0d0s2) Note that the [Next >] button is enabled when text starting with "/" is specified. |
| For IA servers | : | Specify the physical drive name of the device. (Example: PHYSICALDRIVE2) Note that the [Next >] button is enabled when a string starting with "PHYSICALDRIVE" is specified. |
Click the [Next >] button after specifying the above.
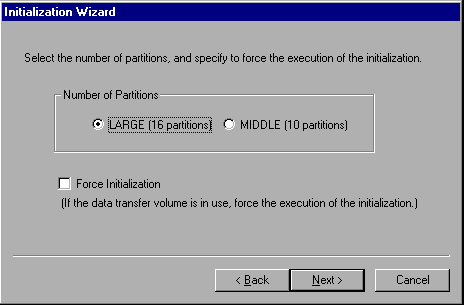
Initialization Wizard (2/3)

Specify the following information for the initialization information.
[Number of Partitions]
Select LARGE (16 partitions) or MIDDLE (10 partitions) for the number of partitions of the data transfer volume.
The value to specify varies depending on the size of the disk to use for the data transfer volume and the multiprocessing level of transfers.
Refer to "Supported Disks and Logical Units" for more information.
[Force Initialization]
If the data transfer volume is stuck in the "in use" status due to an event such as a system shutdown during data transfer, specify this to force the execution of the initialization.
Click the [Next >] button after specifying the above.
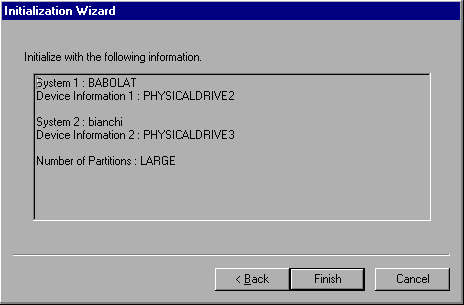
Initialization Wizard (3/3)

The initialization contents specified using the wizard is displayed.
After confirming the initialization contents, click the [Finish] button.
Initialization Confirmation Message

When the initialization confirmation message is displayed, double check to see if the correct disk is going to be initialized.
If correct, click the [Yes] button.
The initialization process of the data transfer volume starts converting the target disk to a data transfer volume, then the initialization contents are displayed on the list view of the Disk Utility.

To return to the previous steps of the initialization wizard, click the [< Back] button.
Click the [Cancel] button to quit anytime during the initialization.
Contents
Index
 
|