This section explains how to register managed servers.
The following features are available for managed servers.
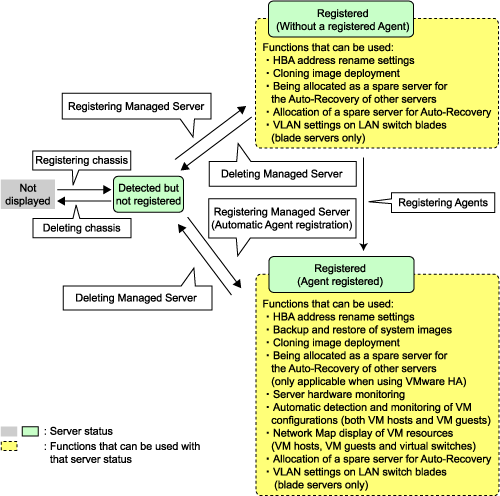
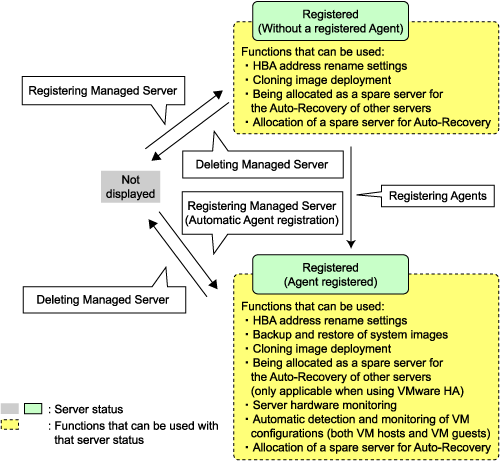
Without a registered Agent
HBA address rename settings
Cloning image deployment
Being allocated as a spare server for the Auto-Recovery of other servers
Allocation of a spare server for Auto-Recovery
VLAN settings on LAN switch blades
With a registered Agent
HBA address rename settings
Backup and restore of system images
Cloning image deployment
Being allocated as a spare server for the Auto-Recovery of other servers (only applicable when using VMware HA)
Server hardware monitoring
Automatic detection and monitoring of VM configurations (both VM hosts and VM guests)
Network Map display of VM resources (blade servers only): VM hosts, VM guests and virtual switches
Allocation of a spare server for Auto-Recovery
VLAN settings on LAN switch blades
Note
If a server whose Agent was registered appears as "unknown" on the resource tree, refer to "15.3 "unknown" Server Status" in the "ServerView Resource Coordinator VE Operation Guide" to resolve any issue that this server may be experiencing.
To register a blade server (PRIMERGY BX series), its enclosing chassis must be registered first.
When using VIOM for I/O virtualization, VIOM server profiles should be registered in advance according to the procedure described in "6.1.1.1 Registering VIOM Server Profiles [Windows]".
To register servers other than PRIMERGY BX servers, refer to "6.1.3.2 Registering Rack-Mount or Tower Servers".
Figure 6.1 State transition diagram for managed servers
Use the following procedure to register blade servers (PRIMERGY BX series).
In the RC console resource tree, right-click an unregistered server blade in the target chassis, and select [Register]-[Server] from the popup menu.
The [Register Server] dialog is displayed.
In the [Register Server] dialog, set up the following items.
Enter a name to assign to this physical server.
Enter no more than 15 characters, including alphanumeric characters or hyphens ("-"). This name should start with an alphabet character.
Enter the IP address used by this server on the Admin LAN.
For servers running a physical OS or VM host
Resource Coordinator VE will automatically obtain this IP address, and register the Agent installed on the server.
If ServerView Agent (mandatory software) is not running, "Message number 67231" will be displayed. In this case, server registration succeeds but the Agent is not registered.
For other servers
Enter the Admin LAN IP address of this server.
The Agent will not be registered automatically, but can be manually registered after server registration if necessary.
This option is displayed if the target server runs a physical OS or VM host.
Select the appropriate server OS category (Physical OS or VM host).
Selecting "VM Host" activates the user name and password input fields. Those refer to the user name and password entered during installation of this VM host.
For a Physical OS
Select "Windows/Linux".
For a VM host
Select "VM Host" and enter the VM host login account information.
This login account information will be used by Resource Coordinator VE to control and communicate with the registered VM host.
Enter the name of a user account with administrative authority over this VM host.
Enter the password of the above VM host user account.
Note
For details about the network interface used for the Admin LAN, refer to "3.2.1 Network Configuration".
If an incorrect network interface is used, Resource Coordinator VE will not be able to detect the correct IP address from the operating system running on the target server.
An Admin LAN IP address is required even when registering a spare server.
Enter an IP address that does not conflict with the IP address of any other managed server on the Admin LAN.
The Admin LAN (IP address) will be detected automatically if an operating system is running on the target server. However, the following cases may occur depending on detection timing.
The Admin LAN (IP address) is not obtained automatically even though an operating system is running.
The Admin LAN (IP address) is obtained automatically even though an operating system is not running.
In this case, cancel the server registration process, right-click the chassis in the resource tree, and select [Update] from the popup menu. The IP address is updated to the correct value (it takes several seconds to obtain the information and to update).
Register the server again after checking that the IP address has the correct value in the Resource Details tab of the server to be registered.
When registering a newly-mounted PRIMERGY BX 900 server, the recognition of this server's Admin LAN MAC address may take time and cause registration failures (showing error message number 61142).
In such cases, after the registration has failed, right-click the target server and select [Update] from the popup menu to request an update of hardware properties. This will update the MAC address to the correct value. This may also take a few minutes to obtain hardware information and update internal properties.
Confirm that the correct MAC address is displayed for this server in the [Resource Details] tab before registering the server again.
A server running a VM host can still be registered as a physical OS if its Server OS category is set to "Windows/Linux". A VM host server that was mistakenly registered as a physical OS should be deleted and re-registered as a VM host.
Click the <OK> button.
The registered server will be displayed under the resource tree.
Note
When a server Agent is registered on a VM host, all VM guests running on that VM host are also registered automatically. Whenever a VM guest is created, modified, deleted or moved on a registered VM host, the changes are automatically updated in the resource tree.
The VM guest name displayed in the RC console is either the VM name defined in its virtualization software or the hostname defined in the guest OS.
The timing at which the hostname of a guest OS is detected and displayed varies according the virtualization product used. Refer to "A.3 Functional Differences between Products" for details.
It is not recommended to use duplicate names for physical OS's, VM hosts, and VM guests. Otherwise, these resources cannot be managed from the command-line.
When registering a server on which an Agent was installed, it is necessary to either reboot the server or restart its "Deployment service" (explained in the "5.2 Agent" section) after server registration. This step has to be done before running any image operation (system image backup or cloning image collection).
For information on re-starting Agents, refer to the "5.2 Agent" section.
This section explains how to register a rack-mount or tower server.
Figure 6.2 State transition diagram for managed servers
Use the following procedure to register rack-mount or tower servers:
In RC console resource tree, right-click "Server Resources", and select [Register]-[Server] from the popup menu.
The [Register Server] dialog is displayed.
In the [Register Server] dialog, enter the following items.
Input items differ depending on whether the "Register agent" checkbox is selected, as described below. If selected, Resource Coordinator VE will attempt to detect and register its Agent after server registration. Otherwise, the Agent won't be detected, but can later be registered if required.
Without Agent registration
The following input items are required.
Physical server name
Remote Management Controller
IP address
User name
Password
Server management software (ServerView)
Association with server management software (ServerView)
SNMP community
Admin LAN
IP address
MAC address (NIC1)
SAN Boot/Admin LAN Redundancy
MAC address (NIC2)
With Agent registration
The following input items are required.
Physical server name
Remote Management Controller
IP address
User name
Password
Server management software (ServerView)
Association with server management software (ServerView)
SNMP community
Admin LAN
IP address
Server OS
Category
Admin LAN Redundancy
MAC address (NIC2)
Enter a name to assign to this physical server.
Enter no more than 15 characters, including alphanumeric characters or hyphens ("-"). This name should start with an alphabet character.
Enter the IP address of this server's remote management controller.
Enter the name of a remote management controller user account with administrative authority over this server.
Enter no more than 16 characters, including alphanumeric characters or symbols (ASCII characters 0x20 to 0x7e).
Enter the password of the above remote management controller user account.
Enter no more than 16 characters, including alphanumeric characters or symbols (ASCII characters 0x20 to 0x7e).
This field can be omitted if no password has been set for this user account.
For PRIMERGY servers
Select "Enable" and enter a SNMP community.
For servers other than PRIMERGY servers
Select "Disable".
By default, "Enable" is selected.
Enter the SNMP community that was set on this server.
Select "public", or enter an arbitrary string.
Enter no more than 32 characters, including alphanumeric characters, underscores ("_") or hyphens ("-").
Enter the IP address used by this server on the Admin LAN.
Enter the MAC address of this server's Admin LAN network interface.
Enter a MAC address in either one of the following two formats: hyphen-delimited ("xx-xx-xx-xx-xx-xx"), or colon-delimited ("xx:xx:xx:xx:xx:xx").
MAC addresses will be automatically detected when the "Register agent" option is selected.
Enter the MAC address of the second Admin LAN network interface. This network interface is to be used by the HBA address rename setup service, or to enable Admin LAN redundancy on the registered server.
Enter a MAC address in either one of the following two formats: hyphen-delimited ("xx-xx-xx-xx-xx-xx"), or colon-delimited ("xx:xx:xx:xx:xx:xx").
This field can be omitted in the following cases.
- When not using the HBA address rename setup service.
- When not using GLS for Admin LAN redundancy on the managed server.
- For a spare server whose primary servers are not using Admin LAN redundancy.
This option is displayed if the target server runs a physical OS or VM host.
Select the appropriate server OS category (Physical OS or VM Host).
Selecting "VM host" activates the user name and password input fields. Those refer to the user name and password entered during installation of this VM host.
For a Physical OS
Select "Windows/Linux".
For a VM host
Select "VM Host" and enter the VM host login account information.
This login account information will be used by Resource Coordinator VE to control and communicate with the registered VM host.
Enter the name of a user account with administrative authority over this VM host.
Enter the password of the above VM host user account.
Enter the MAC address of the second Admin LAN network interface. This network interface will be used to enable Admin LAN redundancy on the registered server.
Enter a MAC address in either one of the following two formats: hyphen-delimited ("xx-xx-xx-xx-xx-xx"), or colon-delimited ("xx:xx:xx:xx:xx:xx").
This field can be omitted in the following cases.
- When not using GLS for Admin LAN redundancy on the managed server.
- For a spare server whose primary servers are not using Admin LAN redundancy.
Note
For details about the network interface(s) used on the Admin LAN, refer to "3.2.1 Network Configuration".
If an incorrect network interface is used, Resource Coordinator VE will use a wrong MAC address for the Admin LAN.
An Admin LAN IP address is required even when registering a spare server.
Enter an IP address that does not conflict with the IP address of any other managed server on the Admin LAN.
A server running a VM host can still be registered as a physical OS if its Server OS category is set to "Windows/Linux". A VM host server that was mistakenly registered as a physical OS should be deleted and re-registered as a VM host.
Click the <OK> button.
The registered server will be displayed under the resource tree.
Note
After registering a server, please verify that the information registered for its remote management controller is correct. This can be verified by trying out power operations (from Resource Coordinator VE) against that server. Refer to "Chapter 6 Power Control" in the "ServerView Resource Coordinator VE Operation Guide" for details on power operations.
When using HBA address rename setup service, please confirm that the registered server can boot properly using the HBA address rename setup service.
If the server can not boot properly, make sure that the specified MAC address (NIC2) is correct.
When a server Agent is registered on a VM host, all VM guests running on that VM host are also registered automatically. Whenever a VM guest is created, modified, deleted or moved on a registered VM host, the changes are automatically updated in the resource tree.
The VM guest name displayed in the RC console is either the VM name defined in its virtualization software or the hostname defined in the guest OS.
The timing at which the hostname of a guest OS is detected and displayed varies according its virtualization software. Refer to "A.3 Functional Differences between Products" for details.
It is not recommended to use duplicate names for physical OS's, VM hosts, and VM guests. Otherwise, these resources cannot be managed from the command-line.
When registering a server on which an Agent was installed, it is necessary to either reboot the server or restart its "Deployment service" (explained in the "5.2 Agent" section) after server registration. This step has to be done before running any image operation (system image backup or cloning image collection).
For information on re-starting Agents, refer to the "5.2 Agent" section.
Use the following procedure to register SPARC Enterprise servers:
In RC console resource tree, right-click "Server Resources", and select [Register]-[SPARC Enterprise] from the popup menu.
The [Register SPARC Enterprise] dialog is displayed.
In the [Register SPARC Enterprise] dialog, enter the following items.
Physical server name
"Register agent" checkbox
Remote management controller (XSCF)
IP address
user name
password
SNMP community
Admin LAN
IP address
Enter the following item when registering a server Agent.
Server OS
Category
Enter a name to assign to this physical server.
Enter no more than 15 characters, including alphanumeric characters or hyphens ("-"). This name should start with an alphabet character.
If no Agent was installed on the target server
Do not select this checkbox if no Agent was installed yet on the target server. Server registration will complete without Agent registration.
A server Agent can later be installed and registered if required.
If an Agent was installed on the target server
Select this checkbox if an Agent was already installed on the target server. Agent registration will be automatically performed at the end of the server registration process.
Enter the IP address of this server's remote management controller (XSCF).
Enter the name of a XSCF user account with administrative authority over this server.
Enter no more than 31 characters, including alphanumeric character, underscores ("_") or hyphens ("-"). This should start with an alphabet character.
This user should have "platadm" privileges.
Enter the password of the above XSCF user account.
Enter no more than 32 characters, including alphanumeric character and any of the following symbols.
"!", "@", "#", "$", "%", "^", "&", "*", "[", "]", "{", "}", "(", ")", "-", "+", "=", "~", ",", ">", "<", "/", "'", "?", ";", ":"
Enter the SNMP community that was set on this server's remote management controller (XSCF).
Select "public", or enter an arbitrary string.
Enter no more than 32 characters, including alphanumeric characters, underscores ("_") or hyphens ("-").
Enter the IP address used by this server on the Admin LAN.
"Solaris" is selected by default. This option can not be changed.
Click the <OK> button.
The registered server will be displayed under the resource tree.
Note
After registering a server, please verify that the information registered for its remote management controller (XSCF) is correct. This can be verified by trying out power operations (from Resource Coordinator VE) against that server. Refer to "Chapter 6 Power Control" in the "ServerView Resource Coordinator VE Operation Guide" for details on power operations.