|
PRIMECLUSTER Wizard for Oracle Configuration and Administration Guide 4.2 - Linux for Itanium -
|
Contents
 
|
Appendix C Procedure for Updating of the CRS Control
This section describes the procedure for updating the CRS control (Oracle Clusterware control) in PRIMECLUSTER Wizard for Oracle 4.1A40 environment to 4.2A30 version. It might be necessary for the procedure to see "2.3 Oracle RAC 10g Scalable Operation".
The procedure depends on the management of the CRS (hereinafter called "Oracle Clusterware") after updating.

- It is necessary to grasp userApplication configuration (relation of SysNode, userApplication and resources) before updating. It should be done in PRIMECLUSTER Wizard for Oracle 4.1A40 environment (before updating to 4.2A30) by Cluster Admin or hvdisp command.
- "Case of Configuration X" in the following steps is the direction only for Configuration X.
If the direction is not written clearly, it suits all cases.
- The following steps should be done after completing the installation of PRIMECLUSTER Wizard for Oracle 4.2A30.
- Stop RMS on all nodes if it is running.
- Start up Oracle Clusterware.
Execute the following commands in super user authority on a node where execute "hvw" command.
|
# /etc/init.d/init.crs start <Return> |
When Oracle Clusterware startup is completed, be sure to confirm that "crs_stat" command can be executed correctly.
|
# su - <Oracle User>
$ crs_stat |
- Execute the following command on a node where Oracle Clusterware startup is completed.
|
# hvw -n <Configuration Name> |
- Select Application-Edit in the "Main configuration menu" screen.
- Select userApplication name including target resources in the "Application selection menu" screen.
- Select Oracle(Ora_xxx) in the "Settings of turnkey wizard "WIZSTANDBY"" screen.
- Select the target resource name in the "Oracle (Ora_xxx:consistent)" screen.
(e.g. Oracle10gNAPResource=ora.rac.rac1.inst)

- Select "SELECTED: xxx" in the "Setting menu" screen.

- Select "PreOnlineScript=XXX" in the " Setting menu:Detail setting for Oracle10gNAPResource[x]=xxx " screen.
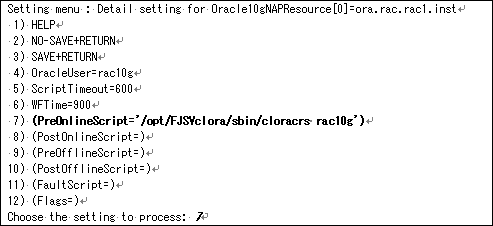
- Remove or modify the PreOnlineScript.
- - Case of Configuration A or B
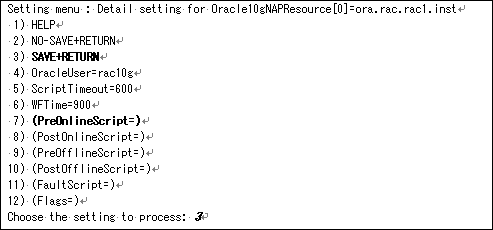
Select "NONE" in the "Setting menu:PreOnlineScript for OracleRAC10g Nodeapps resource" screen.

- Confirm that the PreOnlineScript has been removed, and then select "SAVE+RETURN".
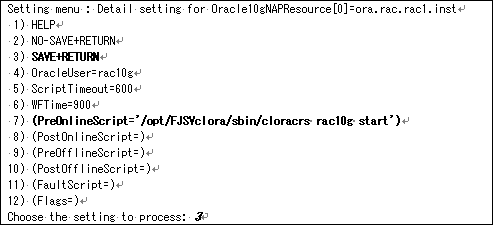
- - Case of Configuration C
Select "FREECHOICE" and enter the command in the "Setting menu:PreOnlineScript for OracleRAC10g Nodeapps resource" screen.

Confirm that the PreOnlineScript has been modified, and then select "SAVE+RETURN".
- Perform the procedure appropriate for a configuration.
- - Case of Configuration A
Jump to next.
- - Case of Configuration B
Add Oracle Clusterware resource to the Oracle resource of existence. Refer to step "3-6" of "2.3.4 userApplication with Oracle Clusterware".
- - Case of Configuration C
Jump to next.
- Select SAVE+EXIT for registration.
- - Case of Configuration A
- Repeat the step 4 to 11 for other Oracle RAC instance resources if necessary.
- Jump to next.
- - Case of Configuration B or C
- Repeat the step 4 to 11 for other Oracle RAC instance resources if necessary.
- Finally, jump to the step 14".
- Create an Oracle Clusterware resource and userApplication newly. (This step is only for Configuration A.)
- Create an Oracle Clusterware resource.
Perform the step 1 to 11 in "2.3.4 userApplication with Oracle Clusterware".
- Edit the Oracle RAC instance resource.
Perform the same procedure of the step 4 to 8, and jump to the screen of the PreOnlineScript.
In the step 5, the Oracle RAC instance resource that exists on the same node as the userApplication including the Oracle Clusterware resource created in the step 2) should be selected.
- Set the PreOnlineScript of the Oracle RAC instance resource.
Select "FREECHOICE", and enter the path as follows, referring to the step 9 in "2.3.5 userApplication with Oracle RAC Instances and Listeners".
|
/opt/FJSVclora/sbin/clorastartwait <userApplication name created in the step 2)> |
- Confirm that the PreOnlineScript has been set, and then select "SAVE+RETURN".
- Select SAVE+EXIT for registration.
- Repeat the step 2) to 5) above for other Oracle RAC database if necessary.
- Execute Configuration-Generate and Configuration-Activate in the "Main configuration menu" screen.
All Rights Reserved, Copyright(C) FUJITSU LIMITED 2009