

| PRIMECLUSTER Wizard for Oracle Configuration and Administration Guide 4.2 - Linux for Itanium - |
|
Contents
|
| Chapter 2 Environment Setup | > 2.3 Oracle RAC 10g Scalable Operation |
This section describes how to register Oracle instance resources on each node using the RMS Configuration Wizard. Before resource registration, it is necessary to associate the Oracle instances with Oracle 10g RAC. Out of the Oracle 10g resources that are displayed with the "crs_stat" command, the ora.*.inst resources must be registered.

Refer to the following example:
|
$ crs_stat -t Name Type Target State Host ora....1.lsnr application ONLINE ONLINE node1 ora.node1.gsd application ONLINE ONLINE node1 ora.node1.ons application ONLINE ONLINE node1 ora.node1.vip application ONLINE ONLINE node1 ora....2.lsnr application ONLINE ONLINE node2 ora.node2.gsd application ONLINE ONLINE node2 ora.node2.ons application ONLINE ONLINE node2 ora.node2.vip application ONLINE ONLINE node2 ora....rac.db application ONLINE ONLINE node1 ora....1.inst application ONLINE ONLINE node1 ora....2.inst application ONLINE ONLINE node2 $ |
In the above configuration, "ora....1.inst" included in node1, and "ora....2.inst" included in node2 are registered as a resource respectively.

Before configuring userApplication, make sure that Oracle Clusterware has been activated on the node where RMS Configuration Wizard is running, so the "crs_stat" command can be executed correctly with Oracle DBA user.
If Oracle Clusterware has not been activated, execute the following command as a root user.
|
# /etc/init.d/init.crs start |
When Oracle Clusterware startup is completed, be sure to confirm that the "crs_stat" command can be executed correctly.
|
# su - <Oracle User> $ crs_stat |


The following setup values are recommended. The other attributes not described below are optional.
|
Attributes |
Values |
|
AutoStartUp |
Optional |
|
AutoSwitchOver |
No |
|
PersistentFault |
1 |
|
Attributes |
Values |
|
AutoStartUp |
Optional |
|
AutoSwitchOver |
No |
|
PersistentFault |
1 |

Be sure to set AutoStartUp=yes when the Oracle instance is activated from Oracle Clusterware right after OS startup, data inconsistency might occur (default: no). If the controlling userApplication is not used, select AutoStartUp=yes.
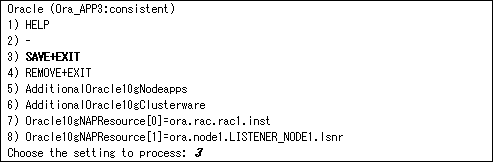
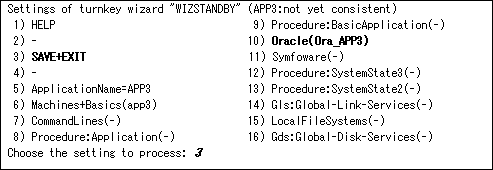
Save the above settings by selecting SAVE+EXIT.
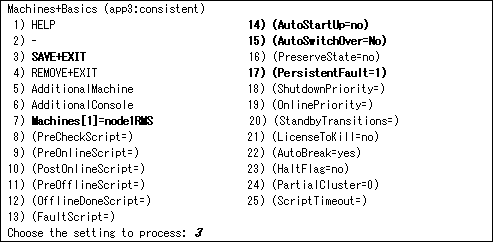

PersistentFault setup
PersistentFault remains the same resource status (Faulted) even after RMS is restarted in the event of a resource failure. Users are supposed to locate the fault and check completion of recovery processing then start userApplication manually. For example, if a failure occurs, the users can detect which userApplication failed even after server reboot. Even though AutoStartUp setup is set, userApplication will not be started, however, automatic startup will prevent recurrence of the failure.
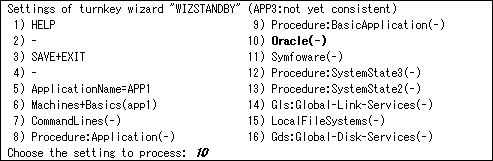
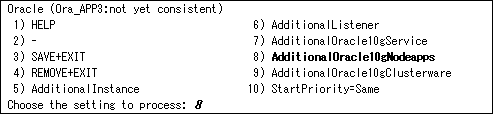

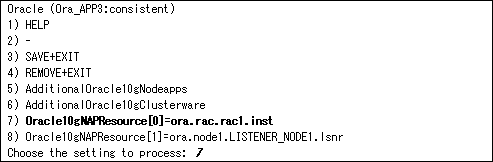
Based on the Oracle RAC 10g resource name that is set in the AdditionalOracle10gNodeapps, the Wizard for Oracle resource name is created on the RMS instance. For details, refer to"2.3.2 Oracle Software Installation and Configuration".

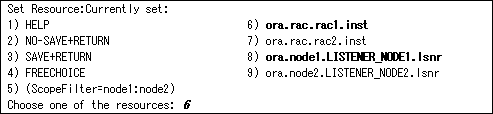

Do not register the resources of the other nodes at the same time.
It is possible to prevent it by specifying a node name as ScopeFilter. The following sample indicates that CRS resources on node1 are listed.
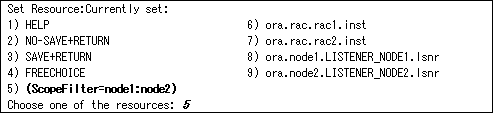


The resource name begins with "Ora_<ApplicationName>_" instead of "ora" of the CRS resource name of Oracle RAC(displayed with "crs_stat" command).
The RMS resource name is generated based on the CRS resource name as follows:
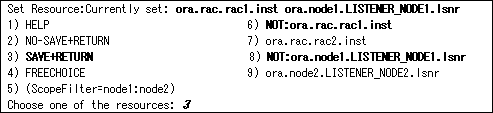
Confirm that CRS resources selected at previous screen appear after "Currently set". After that, select SAVE+RETURN.

Do not register the resources of the other nodes at the same time.


|
Attributes |
Description |
|
|
OracleUser |
Oracle DBA user name |
|
|
ScriptTimeout |
Timeout of Oracle RAC Instance and Listener resource startup and stop Default : 900 s (300s - 86400s) |
|
|
WFTime |
Waiting time for resource failure recovery through Oracle Clusterware |
|
|
PreOnlineScript |
Executed before online processing. |
|
|
PostOnlineScript |
Executed after online processing. |
|
|
PreOfflineScript |
Executed before offline processing. |
|
|
PostOfflineScript |
Executed after offline processing. |
|
|
FaultScript |
Executed when a fault occurs. |
|
|
Flags |
NullDetector |
Selects whether or not a resource should be monitored. |


|
/opt/FJSVclora/sbin/clorastartwait <userApplication with Oracle Clusterware> |
Specify the following userApplication "Configuration A":
For app3 : app1
For app4: app2
|
Contents
|