
| ETERNUS SF Disk Space Monitor User's Guide - Microsoft(R) Windows Server(TM) 2003/Solaris(TM) Operating System/Linux - 13.0 |
Contents
Index
 
|
| Part 2 Installation (Basic) | > Chapter 4 Installation and Setup |

This section explains how to set up the following functions:
The explanations in this section assume that the system will manage resource information within the server by using the "Push" method as communication mode.
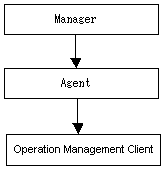
Install and set up this product in the following order:

The setup explanations in this section follow this order. Perform these operations in the same order as they are presented.
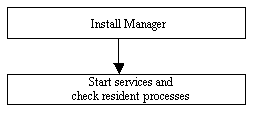
This section explains how to install the Manager. The installation procedure is as follows:

The explanations in this section follow this procedure. Perform these installation and setup operations in the same order as they are presented.
Refer to Chapter 3, "Installation Conditions and Resource Estimation" for the installation conditions.
When the installer starts, it prompts the user to specify the following items. Therefore, before starting the installation process, check or decide which settings to use.

|
No. |
Prompt item |
Description |
|---|---|---|
|
1 |
Installation directory |
This is the path to the directory where fixed resources such as execution modules are installed. |
|
2 |
Variable file directory |
This is the path to the directory where files that change during operation are stored. |


|
No. |
Prompt item |
Description |
|---|---|---|
|
1 |
Installation directory |
This is the path to the directory where fixed resources such as execution modules are installed. |
|
2 |
Definition file directory |
This is the path to the directory where definition files that are referenced during operation are stored. |
|
3 |
Variable file directory |
This is the path to the directory where files that change during operation are stored. |
The installation procedure is as follows:


On some machines, the installer may not start automatically. In this case, start the installer manually using the following procedure:
|
CD-ROM drive:\dsmSetup.exe |

|
# mkdir -p /cdrom/cdrom0 (*1) # /usr/sbin/mount -F hsfs -o ro /dev/dsk/cntndnsn /cdrom/cdrom0 (*2) # *1: This step is required only if the /cdrom/cdrom0 directory does not exist. *2: Adjust "n" in "cntndnsn" to match the CD-ROM drive on the machine where the program will be installed. |
|
# cd /cdrom/cdrom0/FJSVssqc/manager/packages # ./install.sh |

|
# mount -r -t iso9660 /dev/cdrom /mnt/cdrom (*1) *1 Change "/mnt/cdrom" depending on the CD-ROM drive location in the installation environment. |
|
# cd /mnt/cdrom/FJSVssqc/manager/packages # ./install.sh |
Start the program by referring to Chapter 5, "How to Start and Stop Resident Processes". Also, check that resident processes are running normally.
This section explains how to install Agent functions.
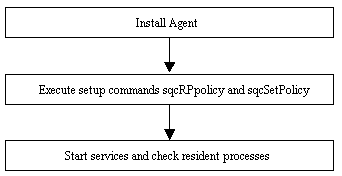
The installation procedure is as follows:

The explanations in this section follow this procedure. Perform these installation and setup operations in the same order as they are presented.
Refer to Chapter 3, "Installation Conditions and Resource Estimation" for the installation conditions.
When the installation process starts, it prompts the user to specify the following items. Therefore,
before starting the installation process, check or decide which settings to use.

|
No. |
Prompt item |
Description |
|---|---|---|
|
1 |
Installation directory |
This is the path to the directory where fixed resources such as execution modules are installed. |
|
2 |
Variable file directory |
This is the path to the directory where files that change during operation are stored. |
|
3 |
Alert action when thresholds are exceeded |
Select either "syslog" (output message to the event log) or "centric" (Centric Manager event linkage) as the alert action taken when thresholds are exceeded. If "Centric Manager event linkage" is selected, alerts will be sent to Centric Manager when thresholds are exceeded. For this option, Systemwalker Centric Manager must be installed on this same machine. |
|
4 |
Manager address |
This is the host name or IP address of the Manager that this Agent will connect to.
|
|
5 |
Method for sending data to the Manager |
Select whether the data collected by the Agent is to be "pushed" to the Manager or "pulled" from the Manager. Normally select "push". |


|
No. |
Prompt item |
Description |
|---|---|---|
|
1 |
Installation directory |
This is the path to the directory where fixed resources such as execution modules are installed. |
|
2 |
Definition file directory |
This is the path to the directory where definition files that are referenced during operation are stored. |
|
3 |
Variable file directory |
This is the path to the directory where files that change during operation are stored. |
|
4 |
Alert action when thresholds are exceeded |
Select either "syslog" (output message to the event log) or "centric" (Centric Manager event linkage) as the alert action taken when thresholds are exceeded. If "Centric Manager event linkage" is selected, alerts will be sent to Centric Manager when thresholds are exceeded. For this option, Systemwalker Centric Manager must be installed on this same machine. |
|
5 |
Manager address |
This is the host name or IP address of the Manager that this Agent will connect to.
|
|
6 |
Method for sending data to the Manager |
Select whether the data collected by the Agent is to be "pushed" to the Manager or "pulled" from the Manager. Normally select "push". |
The installation procedure is as follows:


On some machines, the installer may not start automatically. In this case, start the installer manually using the following procedure:
|
CD-ROM drive:\dsmSetup.exe |

|
# mkdir -p /cdrom/cdrom0 (*1) # /usr/sbin/mount -F hsfs -o ro /dev/dsk/cntndnsn /cdrom/cdrom0 (*2) # *1: This step is required only if the /cdrom/cdrom0 directory does not exist. *2: Adjust "n" in "cntndnsn" to match the CD-ROM drive on the machine where the program will be installed. |
|
# cd /cdrom/cdrom0/FJSVssqc/agent/packages # ./install.sh |

|
# mount -r -t iso9660 /dev/cdrom /mnt/cdrom (*1) *1 Change "/mnt/cdrom" depending on the CD-ROM drive location in the installation environment. |
|
# cd /mnt/cdrom/FJSVssqc/agent/packages # ./install.sh |
Execute the sqcRPolicy and sqcSetPolicy commands by referring to Chapter 13, "Creating and Applying Collection Policies".

To collect disk-related performance information for Windows systems, first enable information collection by executing the diskperf Windows command, as shown in the following example:
|
diskperf -y |
Refer to the Windows Help files for details on the diskperf command. Be sure to enable information collection for both physical and logical drives.

Start the program by referring to Chapter 5, "How to Start and Stop Resident Processes". Also, check that resident processes are running normally.
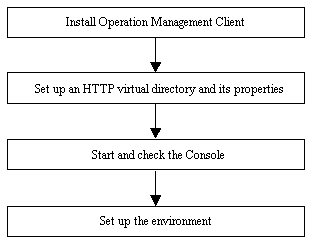
This section explains how to install the operation management client. The installation procedure is as follows:

The explanations in this section follow this procedure. Perform these installation and setup operations in the same order as they are presented.
Refer to Chapter 3, "Installation Conditions and Resource Estimation" for the installation conditions
When the installer starts, it prompts the user to specify the following items. Therefore, before starting the installation process, check or decide which settings to use.
|
No. |
Prompt item |
Description |
|---|---|---|
|
1 |
Installation directory |
This is the path to the directory where fixed resources such as execution modules are installed. |
|
2 |
Manager address |
This is the host name or IP address of the Manager that the operation management client connects to. |
The installation procedure is as follows:


On some machines, the installer may not start automatically. In this case, start the installer manually using the following procedure:
|
CD-ROM drive:\dsmSetup.exe |


The procedure for installing the operation management client from the Solaris/Linux edition of the CD is as follows:
|
CD-ROM drive:\FJSVssqc\tools\DSMSETUP.exe |
An HTTP virtual directory and properties for this virtual directory must be set up for the operation management client. Set up this directory by referring to Chapter 16, "Setting up an HTTP Communication Environment".
Specify the following URL in a Web browser and check that the Console starts.
|
http://host name of the operation management client/SSQC/AdminConsole.html |
Use the following procedure to set up the environment.
After these environments have been set up, the Monitor, Drill Down, and Report views of the Console window can be displayed.

For redundant Manager operations, set up environments for the operation management clients connected to each Manager.
This section describes the procedure for uninstalling this software.


While uninstalling, when the display targets other windows, the progress bar is hidden behind the window. In that case, please display the window in the progress bar forward by clicking the task of uninstallation in the taskbar and other methods.

When uninstalling the operation management client, OCMM 5.1 (which is installed at the same time) must be uninstalled manually. Select the following program from the application list and click either the Add/Remove button or the Change/Remove button.


Files that have been added after the installation are also deleted, so back up these files if necessary.
|
# su <RETURN> |
|
# pkgrm FJSVdsmag <RETURN> |
|
# pkgrm FJSVdsmmg <RETURN> |


Files that have been added after the installation are also deleted, so back up these files if necessary.
|
# su <RETURN> |
|
# rpm -e FJSVdsmag <RETURN> |
|
# rpm -e FJSVdsmmg <RETURN> |
Contents
Index
 
|