

| ETERNUS SF Recovery Manager for Oracle EE 13.0.1 User's Guide - Solaris(TM) Operating System - |
|
Contents
|
This chapter explains how to install and configure Recovery Manager for Oracle.
The following hardware is required to use this software.
Solaris machine of Ultra SPARC or higher version
i.e. PRIMEPOWER/Fujitsu S series/GP-S Family/Star Fire/SUN Enterprise/SUN
The memory of 300MB or more is required.
Because this software runs on an Oracle database, the system must satisfy the operation requirements of Oracle databases. For details of Oracle database operation requirements, refer to the Oracle Database Installation Guide.
The swap space of 300MB or more is required.
Because this software runs on an Oracle database, the system must satisfy the operation requirements for Oracle databases. For details of Oracle database operation requirements, refer to the Oracle Database Installation Guide.
A CD-ROM that reads the RockRidge format is required.
The following is required to execute high-speed backup and recovery operations using the advanced copy function:
Either ETERNUS3000/6000 or ETERNUS GR Series (hardware that can execute OPC/ EC) is required.
The following software is required to use this software:
The following Solaris is supported:
Note: Solaris x86 (Intel platform version) is not supported.
The software requires the following versions of Oracle database products:
JRE 1.4.2 is required.
The X Window system is required.
The following is required to execute high-speed backup and recovery operation using the advanced copy function:
ETERNUS SF AdvancedCopy Manager (hereafter referred to as "ACM") operable on Solaris 8 or Solaris 9 is required.
ETERNUS SF AdvancedCopy Manager 13.0 or later version
The following is required for the cluster operation of the database:
Only PRIMECLUSTER is supported as the cluster software.
In addition, the following is required for the Oracle Real Application Cluster (hereafter referred to as "RAC") operation of the database:
This section explains how to estimate the disk space required to install Recovery Manager for Oracle.
To install Recovery Manager for Oracle for the first time, each file system requires the following disk space. If necessary, extend the size of file system concerned.
| File system | Mount point | Required disk space |
| root file system | / | 0 byte |
| opt file system | /$DIR1 *1 | 50M bytes + (1M byte * n) *2 |
*1: "$DIR1" refers to the directory name specified at the time of installing Recovery Manager for Oracle (default: /opt/FJSVrmfo).
*2: "n" refers to the number of database instances that manage the backup and recovery operation.
The following disk space must be available for the backup execution log and recovery execution log output by Recovery Manager for Oracle. If necessary, extend the size of file system concerned.
| Execution log output destination directory | Required disk space |
| /$DIR2 *1 | 10M bytes + (30MB * n) *2 |
*1: "$DIR2" refers to the path of the execution log output destination directory specified at the time of installing Recovery Manager for Oracle (Default: /opt/FJSVrmfo/log).
*2: "n" refers to the number of database instances that manage the backup and recovery operation.
The swap space refers to the swap size is required for the standard operation of Recovery Manager for Oracle. When the swap space exceeds that provided by the system, extend the swap space.
| Swap size | Type of operation |
| 300MB | Backup and recovery operation |
Recovery Manager for Oracle occupies the following semaphore resources:
Note: If already specified, add the following values.
|
Kernel parameter |
Value |
|
SEMMNS |
60 * n *1 |
*1: "n" refers to the number of database instances that manage the backup and recovery operation.
This section explains the preparation required for installing Recovery Manager for Oracle:
Confirm that the hardware and software prerequisites for installing Recovery Manager for Oracle are satisfied.
For the installation prerequisites, refer to the section "Pre-requisites before Installation".
Confirm that Recovery Manager for Oracle has not been installed.
|
pkginfo -l FJSVrmfo <ENTER> |
If a software package name is output as the result of the above operation, it means that Recovery Manager for Oracle has already been installed. In this case, remove the output package from the system. Refer to the section "Uninstall Procedure" on how to remove the package.
Confirm that sufficient disk space is available to install Recovery Manager for Oracle.
Refer to the section "Estimating resources" for disk space used by Recovery Manager for Oracle.
The installation procedure of Recovery Manager for Oracle is explained as follows:
Log in as root.
When the volume management software is in use (default for Solaris), the software automatically mounts the CD-ROM to "/cdrom" upon inserting the CD-ROM to the disk drive. In this case, select [3. Execute "pkgadd (1M)" command]. If the volume management software is not in use, mount the CD-ROM manually. The root privileges are required to mount and unmount the CD-ROM.
Install the software using the pkgadd (1M) command.
|
# pkgadd -d /cdrom/cdrom0/pkg FJSVrmfo |

The above procedure may not work in some hardware configurations or settings. In such a case, change "n" in "/cdrom/cdromn" according to the hardware configuration.
To install in the default directory, enter [y]. To change the directory, enter [n].
When [n] is entered, the system asks the user to specify the destination directory for installation. Enter the name of the new directory.
|
Processing package instance <FJSVrmfo> from </cdrom/fjsvrmfo/pkg> Copyright (c) FUJITSU Limited 2005 - 2006 |
Specify the directory to which Recovery Manager for Oracle outputs the execution log.
To use the default directory, press <Enter>. To change the directory, enter the name of a new directory and press <Enter>.
|
The work area is necessary for this package. |
When [y] is entered (if either the default value is selected or the directory was changed in step 5, above, a reconfirmation message will be displayed), the following installation pre-processing will be executed:
|
Using </opt> as the package base directory. |
A message is displayed confirming installation with super user (root) privileges.
To continue installation, enter [y]. To cancel installation, enter [n].
|
This package contains scripts which will be executed with super-user |
The installation process will be executed.
|
Installing ETERNUS SF Recovery Manager for Oracle EE as <FJSVrmfo> |
Log in as root.
Execute the "pkgrm (1M)" command to uninstall.
|
# pkgrm FJSVrmfo <ENTER> |
To continue uninstallation, enter [y]. To cancel uninstallation, enter [n].
The following package is currently installed:
   FJSVrmfo        ETERNUS SF Recovery Manager for Oracle EE
                   (sparc) 13.0

Do you want to remove this package? [y, n, ?, q] y |
To continue uninstallation, enter [y]. To cancel uninstallation, enter [n].
|
Removal of <FJSVrmfo> was successful. |
Note: After the uninstallation completes, confirm that the "/opt/FJSVrmfo" is removed.
This section explains how to configure for Recovery Manager for Oracle.
Recovery Manager for Oracle operates with the root privileges.
Recovery Manager for Oracle runs as a Java application.
A path for Java commands must be set in the root environment variable PATH (for example, set "/etc/.login" and "/etc/profile").
Example: Confirm Java command version.
|
# java -version |
Confirm that the version displayed after "Java version" is "1.4.2" as shown above.
The following environment variables relating to Oracle must be set in the root environment (for example, set "/etc/.login" and "/etc/profile"):
|
Environment variable |
Value |
|
ORACLE_HOME |
$ORACLE_HOME of the database to be backed up (hereafter referred to as "target database") |
|
LD_LIBRARY_PATH |
$ORACLE_HOME/lib *1 |
*1: For a 64-bit version Oracle database, the value should be "$ORACLE_HOME/lib32:$ORACLE_HOME/lib".
When the data file (tablespace) backup operation is executed by the advanced copy function and is in the cluster operation (HA and RAC), the following environment variable must be set in the root environment (for example, set "/etc/.login" and "/etc/profile").
|
Environment variable |
Value |
|
SWSTGNODE *1 |
Logical host name |
*1: For details of the environment variable SWSTGNODE, refer to the "ETERNUS SF AdvancedCopy Manager Operator's Guide for cluster environment".
Confirm that the database requirements are satisfied for Recovery Manager for Oracle to run the backup and recovery operation.
The backup operation cannot be executed in the NOARCHIVELOG mode. Confirm that the operation is in the ARCHIVELOG mode.
Example: Confirm ARCHIVELOG mode
|
% setenv ORACLE_SID orcl |
Confirm that the database log mode is ARCHIVELOG mode and that the auto archive function is enabled.
Refer to the manual, "Oracle Database Administrator's Guide" on how to set the password file authentication.
Follow the procedure below to confirm that the Oracle Net has been configured correctly.
Log in to the target database server as the Oracle Install user, and confirm that the listeners are activated using the "lsnrctl status" command.
Example: Confirm activation of the listeners
| % lsnrctl status LISTENER : <snip> : (DESCRIPTION=(ADDRESS=(PROTOCOL=tcp)(HOST=dbsvr01)(PORT=1521))) Services Summary... Service " orcl.world " has 1 instance(s). Instance " orcl ", status UNKNOWN, has 1 handler(s) for this service... Service " orcl.world" has 1 instance(s). The command completed successfully |
Confirm that the target database listener service has been activated as shown above.
Confirm that the file "tnsnames.ora" containing the connect string to the target database, is located under the $ORACLE_HOME/network/admin directory set as directed in the section, "Setting Oracle related environment"
Confirm also that SYSDBA connection to the target database is possible as root user.
To connect with the SYSDBA privileges as root user, the setting of password file authentication must have been performed.
Example: Confirming SYSDBA connection as root user
| # id uid=0(root) gid=1(other) # $ORACLE_HOME/bin/sqlplus /nolog SQL*Plus: Release 10.1.0.3.0 - Production on Fri Mar 25 11:21:40 2005 Copyright (c) 1982, 2004, Oracle. All rights reserved. SQL> connect sys/sys@orcl as sysdba Connected. |
Confirm (as above) that the database can be connected normally with SYSDBA privileges with CONNECT string, as root user.
Confirm that NLS_LANG is set for an environment variable of the Oracle Install user.
The disk layout of the resources used in the backup and recovery operation by Recovery Manager for Oracle must be confirmed to be correct.
Confirm that the database disk layout is suitable to the backup and recover operation.
For details, refer to the section, "Disk Resources Allocation".
Confirm that a volume is available for creating the recovery catalog database and that the file systems (ufs) have been created using the "newfs" command.
Confirm that the following backup volumes are available:
For details of each backup volume, refer to the section, "Disk Resources Allocation".
Confirm that the OPC/EC can be used.
If the data file (tablespace) has been created on the file system, the ACM backup and restore pre and post-processing script must be customized so that unmounting and mounting of the transaction volume (the mount point of the data file volume) must be skipped when executing the OPC/EC.
To customize the script for the backup and restore pre and post-processing, refer to the section, "Backup and Restore Pre and Post-Processing" in the "ETERNUS SF AdvancedCopy Manager Operation Guide".
As with the data file (tablespace), the Oracle Install user must be granted permission to read the physical devices (/devices*@*, raw) corresponding to the raw devices (/dev/rdsk) in the OPC/EC backup destination.
When permission is not granted properly, the following message is output to the backup execution log file, and the backup operation ends in error.
| ORA-19625: error identifying file /dev/rdsk/******** ORA-27041: unable to open file SVR4 Error: 13: Permission denied Additional information: 2 |
This section explains how to set up the environment for Recovery Manager for Oracle backup and recovery operation.
The flow of environment setup is described as follows:
All of the following procedures must be executed as root.
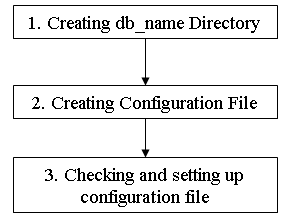
Log in to the database server *1 and create a directory under the "/opt/FJSVrmfo/conf" directory with the name of the database (db_name) to be backed up and recovered by Recovery Manager for Oracle.
*1: Log in to the primary node in the cluster operation (HA and RAC).
Example: When the database name (db_name) is "orcl"
|
# id |
Specify the directory name with the database name using alphanumeric characters comprising 8 or less bytes (case sensitive).
Create the configuration files under the directory created as directed in the section, "1. Creating db_name Directory".
The following configuration files must be created:
File name: rmfo_system.ini
Basic information such as database operation is set in the file.
Parameters to be set are explained as follows:
|
Parameter name |
Description |
Value |
Restrictions etc. |
|
|
1 |
Database name |
db_name at the time of "create database" |
Alphanumeric characters of 8 bytes or less. The same value as the directory name created in the section, "Creating db_name directory" |
|
|
2 |
Version and level of the Oracle database product |
1 or 2
|
|
|
|
3 |
Edition of the Oracle database product |
1 or 2
|
|
|
|
4 |
ORACLE_HOME directory path name where the Oracle database product has been installed |
Value of ORACLE_HOME, the Oracle Install user environment variable |
256 bytes or less Note: ASCII characters only (no nulls) |
|
|
5 |
Connect string |
Connect string used to connect to the database via Oracle Net |
Alphanumeric characters of 64 bytes or less |
|
|
6 |
Database operation form |
1, 2 or 3
|
|
|
|
7 |
Number of nodes comprising the database |
|
1 to 4 |
|
|
8 |
Install user of the Oracle database product |
Oracle install user name |
Alphanumeric characters of 8 bytes or less |
|
|
9 |
Install user group of the Oracle database product |
Name of the group where Oracle Install users belong |
Alphanumeric characters of 8 bytes or less |
|
|
10 |
Host name |
|
Alphanumeric characters of 8 bytes or less |
|
|
11 |
ORACLE_SID name |
|
Alphanumeric characters of 21 bytes or less |
*1 SE : Standard Edition
*2 EE : Enterprise Edition
An example of parameter setting is shown as follows:
Example: Setting for the single server operation
|
DB_NAME=orcl |
File name: rmfo_syspw.ini
The password for the database login user sys (SYSDBA) is set in the file.
The file is encrypted as directed in the section, "Checking and setting up configuration file".
An example of parameter setting is shown as follows:
Example:
|
change_on_install |
Note: The maximum number of lines is 1.
File name: rmfo_node.ini
Information on nodes that comprise the database is set in the file.
Set the node list file in the cluster operation only (HA and RAC). (Not required in the single server operation)
Add lines equivalent to the number of nodes in the following format:
|
Node|ORACLE_SID|Application| |
Note: The maximum number of lines is two for the cluster operation (HA) and four for the cluster operation (RAC).
Specify the node name (real host name).
Specify the value obtained from executing the 'hostname" command.
Restrictions: Alphanumeric characters of 8 bytes or less
Note: The real host name displayed by the "hostname" command and the node name displayed by the "cftool -n" command of PRIMECLUSTER must be the same (case sensitive).
Specify the ORACLE_SID name corresponding to the node name.
Restrictions: Alphanumeric characters of 8 bytes or less. The value must be the same for both nodes in the cluster operation (HA) and different for each node in the cluster operation (RAC).
Specify the name of the user application that contains the cluster resources (gResource) of Oracle instances corresponding to the node names.
Restrictions: Alphanumeric characters of 64 bytes or less. The value must be the same for both nodes in the cluster operation (HA) and different for each node in the cluster operation (RAC).
An example of parameter setting is shown as follows:
Example: In the cluster operation (HA)
|
hanode1|orcl|app1| |
Example: In the cluster operation (RAC) of four-node configuration
|
racnode1|rac01|app1| |
File name: rmfo_bkcom.ini
The basic backup information is set in the file.
Parameters to be set are explained as follows:
|
Parameter name |
Description |
Value |
Restrictions |
|
|
1 |
How to backup data files |
1 to 3
|
|
|
|
2 |
Data file volume type |
1 or 2
|
|
|
|
3 |
The number of backup management generations |
1 to 3 (generations) |
1 to 3 *1 |
|
|
4 |
Storage period of backup execution log |
1 to 31 (days) |
1 to 31 |
|
|
5 |
Number of alert log display lines on the recovery screen (from the bottom) |
100 (lines) |
A value other than 100 is not permitted *2 |
|
|
6 |
Trace level (information output to the execution log) |
1 or 2
|
|
*1: 2 to 3 for EC. Setting '1' is not permitted for EC.
*2: Set 100
An example of parameter setting is shown as follows:
Example: To backup data files using the OPC
|
BK_TYPE=2 |
File name: rmfo_bkdbf.ini
The data files backup information is set in the file.
Add the number of lines equivalent to the number of backup destination volumes in the following format:
|
Mount point|volume|volume type| |
Note: The maximum number of lines is 1024.
Specify the mount point name of the data file backup output destination volume.
Restrictions: Alphanumeric characters of 256 bytes or less always starting with "/".
Specify the physical disk volume name
Restrictions: Alphanumeric characters of 256 bytes or less always starting with "/dev".
Specify the volume type of the file system.
The following values can be specified:
1: ufs
2: ufs logging
3: sfxfs *1
4: sfcfs *2
*1: GFS local file system
*2: GFS shared file system
GFS: Global File Services
An example of parameter setting is shown as follows:
Example: When there are two backup output destinations.
|
/bkset/orcl/dbf1|/dev/dsk/c3t16d3s0|1| |
# When the data file volume type (DBF_TYPE) is the file systems
Add the number of lines equivalent to the number of backup destination volumes in the following format:
|
Mount point|Target volume|Backup volume (1)|Backup volume (2)|Backup volume (3)| |
Note: The maximum number of lines is 1024.
Specify the name of the mount point where the data file (tablespace) of the target database is located.
Restrictions: Alphanumeric characters of 256 bytes or less always starting with "/".
Specify the name of the physical disk volume where the data file (tablespace) of the target database is located.
Specify the volume name displayed in the "Device" row of the "/opt/FJSVswsts/bin/swstdevdisp -t" command.
Restrictions: Alphanumeric characters of 256 bytes or less always starting with "/dev".
Specify the name of the OPC/EC backup destination volume (first generation) for the target volume.
Specify the volume name displayed in the "Device" row of the "/opt/FJSVswsts/bin/swstdevdisp -b" command.
Restrictions: Alphanumeric characters of 256 bytes or less always starting with "/dev".
Specify the name of the OPC/EC backup destination volume (second generation) for the target volume.
Specify when the number of backup management generations (BK_GEN) is two or more.
Specify the volume name displayed in the "Device" row of the "/opt/FJSVswsts/bin/swstdevdisp -b" command.
Restrictions: Alphanumeric characters of 256 bytes or less always starting with "/dev".
Specify the name of the OPC/EC backup destination volume (third generation) for the target volume.
Specify when the number of backup management generations (BK_GEN) is three or more.
Specify the volume name displayed in the "Device" row of the "/opt/FJSVswsts/bin/swstdevdisp -b" command.
Restrictions: Alphanumeric characters of 256 bytes or less always starting with "/dev".
An example of parameter setting is shown as follows:
Example: When the number of OPC/EC backup generation managements is two
|
/orcl/dbf1|/dev/dsk/c3t16d10s0|/dev/dsk/c3t16d20s0|/dev/dsk/c3t16d21s0|| |
# When the data file volume type (DBF_TYPE) is a raw device
Add the number of lines equivalent to the number of backup target volumes in the following format:
|
Tablespace|Target volume|Backup volume (1)|Backup volume (2)|Backup volume (3)| |
Note: The maximum number of lines is 1024.
Specify the name of the target database tablespace.
Restrictions: Alphanumeric characters of 30 bytes or less
Specify the volume name of the block logical device (/dev/dsk) corresponding to the data files (raw device) allocated to the target database tablespace.
Specify the volume name displayed in the "Device" row of the "/opt/FJSVswsts/bin/swstdevdisp -t" command.
Restrictions: Alphanumeric characters of 256 bytes or less always starting with "/dev".
Specify the name of the OPC/EC backup destination volume (first generation) for the target volume.
Specify the volume name displayed in the "Device" row of the "/opt/FJSVswsts/bin/swstdevdisp -b" command.
Restrictions: Alphanumeric characters of 256 bytes or less always starting with "/dev".
Specify the name of the OPC/EC backup destination volume (second generation) for the target volume.
Specify when the number of backup management generations (BK_GEN) is two or more.
Specify the volume name displayed in the "Device" row of the "/opt/FJSVswsts/bin/swstdevdisp -b" command.
Restrictions: Alphanumeric characters of 256 bytes or less always starting with "/dev".
Specify the name of the OPC/EC backup destination volume (third generation) for the target volume.
Specify when the number of backup management generations (BK_GEN) is three or more.
Specify the volume name displayed in the "Device" row of the "/opt/FJSVswsts/bin/swstdevdisp -b" command.
Restrictions: Alphanumeric characters of 256 bytes or less always starting with "/dev".
An example of parameter setting is shown as follows:
Example: When the number of the OPC/EC backup generation managements is 1 and multiple data files are allocated to the system table space
|
system|/dev/dsk/c3t16d10s0|/dev/dsk/c3t16d20s0||| |
File name: rmfo_bkctl.ini
The control files backup information is set in the file.
Specify in the following format:
|
Mount point|volume|volume type| |
Note: The maximum number of lines is 1.
Specify the mount point name of the backup output destination volume of the control files.
Restrictions: Alphanumeric characters of 256 bytes or less always starting with "/".
Specify the physical disk volume name.
Restrictions: Alphanumeric characters of 256 bytes or less always starting with "/".
Specify the volume type of the file system.
The following values can be specified:
1: ufs
2: ufs logging
3: sfxfs
4: sfcfs
An example of parameter setting is shown as follows:
Example:
|
/bkset/orcl/ctl|/dev/dsk/c3t16d4s6|1| |
File name: rmfo_arch.ini
Information on the output destination of the archived redo log files is set in the file.
Set the file in the cluster operation (RAC). (Not required in the single server operation or cluster operation (HA)
Specify in the following format:
|
Node|Mount point|volume|volume type| |
Note: The maximum number of lines is four.
Specify the same name as the node in the node list file.
Specify the mount point name of the directory specified in the initial parameter, "log_archive_dest" or "log_archive_dest_1".
Specify the physical disk volume name.
Restrictions: Alphanumeric characters of 256 bytes or less always starting with "/".
Specify the volume type of the file system.
Restrictions: Always set "4" (sfcfs:GFS shared file system).
Example: For the cluster operation (RAC) of four-node configuration
|
racnode1|/racdb/arch01|/dev/sfdsk/racdb/dsk/arch01|4| |
File name: rmfo_bkarch.ini
The backup information on the archived redo log file is set in the file.
Specify in the following format:
|
Node|Mount point|volume|volume type| |
Note: The maximum number of lines is one for the single server operation and cluster operation (HA), and four for the cluster operation (RAC).
Specify the same name as the node in the node list file.
Set the node in the cluster operation (RAC). (No value is available in the single server operation or cluster operation (HA))
Specify the mount point name of the backup output destination volume of the archived redo log file.
Restrictions: Alphanumeric characters of 256 bytes or less always starting with "/".
Specify the physical disk volume name.
Restrictions: Alphanumeric characters of 256 bytes or less always starting with "/dev".
Specify the volume type of the file system.
The following values can be specified:
1: ufs
2: ufs logging
3: sfxfs
4: sfcfs
An example of parameter setting is shown as follows:
Example: For the single operation and cluster operation (HA)
|
|/orcl/arch|/dev/dsk/c3t16d5s0|1| |
Example: For the cluster operation (RAC) in the four-node configuration
|
racnode1|/racdb/bk_arch01|/dev/dsk/c3t16d5s0|1| |
File name: rmfo_catalog.ini
Information on the recovery catalog database is set in the file.
Parameters to be set are explained as follows:
|
Parameter name |
Description |
Value |
Restrictions |
|
|
1 |
Recovery catalog database name |
Name of any unused database*1 |
Alphanumeric characters of 8 bytes or less |
|
|
2 |
Name of a listener for recovery catalog database connection |
Name of any unused listener*2 |
Alphanumeric characters of 64 bytes or less |
|
|
3 |
Port number used by the listener for recovery catalog database connection |
Any unused port number *3 |
1024 to 65535 |
|
|
4 |
Name of the mount point of the volume where the recovery catalog database is created |
Name of any unused mount point *4 |
Alphanumeric characters of 256 bytes or less starting with "/" |
|
|
5 |
Name of the physical disk volume where the recovery catalog database is created |
Name of a unused physical disk volume |
Alphanumeric characters of 256 bytes or less starting with "/dev" |
|
|
6 |
How to back up the recovery catalog database |
1 or 2
|
|
|
|
7 |
Mount point of the backup destination volume |
Fixed at "NONE" |
Always specify "NONE" |
|
|
8 |
Name of the physical disk volume of the backup destination volume |
Name of a unused physical disk volume *5 |
Alphanumeric characters of 256 bytes or less starting with "/dev" |
*1: Recovery Manager for Oracle creates the recovery catalog database during environment setup.
*2: Recovery Manager for Oracle creates the listeners for recovery catalog database connection during environment setup.
*3: The port number specified for the listener for recovery catalog database connection is allocated.
*4: When the method of recovery catalog database backup is OPC (R_BK_TYPE=2), specify the volume name displayed in the "Device" row of the "/opt/FJSVswsts/bin/swstdevdisp -t" command.
*5: When the method of recovery catalog database backup is OPC (R_BK_TYPE=2), specify the volume name displayed in the "Device" row of the "/opt/FJSVswsts/bin/swstdevdisp -b" command.
Example:
|
R_DB_NAME=r_orcl |
Perform simplified checking of the configuration files set up as directed in the section, "Creating the configuration files", encrypt the sys password file, and create the RMAN recovery catalog database to build the backup and recovery environment.
Log in to the database server*1 and execute the configuration command. "/opt/FJSVrmfo/bin/rmfoconfig".
*1: Log in to the primary node (node for which the configuration file has been created) in the cluster operation (HA and RAC)
|
# /opt/FJSVrmfo/bin/rmfoconfig DB_NAME all |
|
Parameter |
Explanation |
|
DB_NAME |
Specify the name of the database subject to the backup operation |
|
all |
required |
|
# id |
This section explains the procedure for changing the backup and recovery environment.
To change the database configuration, edit the files setup as directed in the section, "Setup Backup and Recovery Environment", and execute the configuration command "/opt/FJSVrmfo/bin/rmfoconfig".
The flow of changing the backup and recovery environment is explained as follows:
The following processing must be executed as root.
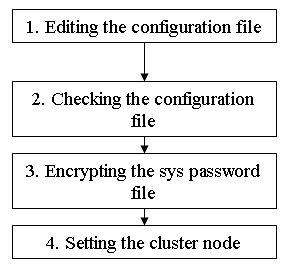
Edit the files set up as directed in the section "Creating Configuraiotn File" according to the changes in the database configuration.
Do not edit the Recovery catalog database definition file (rmfo_catalog.ini).
Check the configuration file after it is edited.
Log in to the database server*1 and execute the configuration command "/opt/FJSVrmfo/bin/rmfoconfig".
*1: Log in to the primary node (node for which the configuration file has been created) in the cluster operation (HA and RAC)
Example of execution: When the database name is "orcl"
|
# id |
When the password of the login user of the database, sys(SYSDBA), has been changed, specify the new password in the " rmfo_syspw.ini" file, and encrypt it.
Log in to the database server*1 and execute the configuration command (/opt/FJSVrmfo/bin/rmfoconfig).
*1: Log in to the primary node (node for which the configuration file has been created) in the cluster operation (HA and RAC).
Example of execution: When the database name is "orcl"
|
# id |
The cluster node must be set in the cluster operation (HA and RAC).
Log in to the database server*1 and execute the configuration command (/opt/FJSVrmfo/bin/rmfoconfig).
*1: Log in to the primary node (node for which the configuration file has been created) in the cluster operation (HA and RAC)
Example of execution: When the database name is "orcl"
|
# id |
Explanation of the configuration command
|
# /opt/FJSVrmfo/bin/rmfoconfig DB_NAME option |
|
Operand |
Explanation |
|
DB_NAME |
Specify the name of the database for which the environment is to be set up. |
|
Option |
Explanation |
|
check |
Checks the configuration file |
|
enc |
Encrypts the "rmfo_syspw.ini" file |
|
dec |
Decrypts the "rmfo_syspw.ini" file |
|
cls |
Sets the cluster node |
|
crdb |
Creates the RMAN recovery catalog database |
|
rmdb |
Deletes the RMAN recovery catalog database |
This section explains the procedure for removing the backup and recovery environment.
The flow of removing the backup and recovery environment is explained as follows:
The following processing must be executed as root.
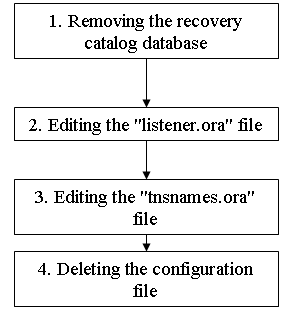
Remove the recovery catalog database that manages backup operations of the target database.
Log in to the database server*1 and execute the configuration command, "/opt/FJSVrmfo/bin/rmfoconfig".
*1: Log in to the primary node (node for which the configuration file has been created) in the cluster operation (HA and RAC)
Example of execution: When the database name is "orcl"
|
# id |
Edit the "$ORACLE_HOME/network/admin/listener.ora" file using vi etc.
Delete the part defining the listener for recovery catalog database connection.
Delete the following:
|
LSNR_NAME = |
*1: In the cluster operation (HA and RAC), the "$ORACLE_HOME/network/admin/listener.ora" file on every cluster node must be edited.
Edit the "$ORACLE_HOME/network/admin/tnsnames.ora" file using a text editor (for example vi).
Delete the part defining the recovery catalog database connection.
Delete the following:
|
R_DB_NAME = |
*1: In the cluster operation (HA and RAC), the "$ORACLE_HOME/network/admin/tnsnames.ora" file on every cluster node must be edited.
Delete the "db_name directory" created as directed in the section, "Setup Backup and Recovery Environment".
Example: When the database name (db_name) is "orcl"
|
# id |
In the cluster operation (HA and RAC), the "db_name directory" of all nodes comprising the cluster must be deleted.
Explanation of the configuration command "/opt/FJSVrmfo/bin/rmfoconfig"
|
# /opt/FJSVrmfo/bin/rmfoconfig DB_NAME option |
|
Operand |
Explanation |
|
DB_NAME |
Specify the name of the database for which the environment is set up |
|
Option |
Explanation |
|
rmdb |
Deletes the RMAN recovery catalog database |
|
Contents
|