

| PRIMECLUSTER Global Link Services Configuration and Administration Guide: Redundant Line Control Function 4.1 (for Solaris(TM) Operating System) |
|
Contents
Index
|
| Appendix B Examples of configuring system environments | > B.1 Example of configuring Fast Switching mode (IPv4) |
This section describes an example configuration procedure of the network shown in the diagram below.
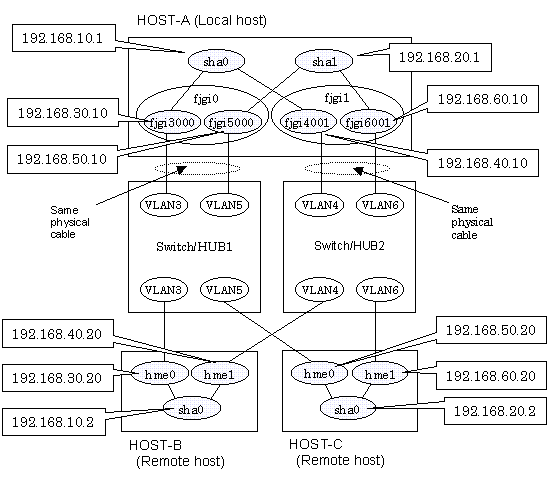
1-1) Define IP addresses and hostnames in /etc/inet/hosts file.
192.168.10.1 hosta1 # HOST-A Virtual IP 192.168.20.1 hosta2 # HOST-A Virtual IP 192.168.30.10 hosta3 # HOST-A Physical IP (Tagged VLAN interface) 192.168.40.10 hosta4 # HOST-A Physical IP (Tagged VLAN interface) 192.168.50.10 hosta5 # HOST-A Physical IP (Tagged VLAN interface) 192.168.60.10 hosta6 # HOST-A Physical IP (Tagged VLAN interface) 192.168.10.2 hostb1 # HOST-B Virtual IP 192.168.30.20 hostb3 # HOST-B Physical IP 192.168.40.20 hostb4 # HOST-B Physical IP 192.168.20.2 hostc2 # HOST-C Virtual IP 192.168.50.20 hostc5 # HOST-C Physical IP 192.168.60.20 hostc6 # HOST-C Physical IP |
1-2) Write the hostnames defined above in /etc/hostname."interface-name" files. If a file does not exist, create a new file.
- Contents of /etc/hostname.fjgi3000
|
hosta3 |
- Contents of /etc/hostname.fjgi4001
|
hosta4 |
- Contents of /etc/hostname.fjgi5000
|
hosta5 |
- Contents of /etc/hostname.fjgi6001
|
hosta6 |
1-3) Define the subnet mask in /etc/inet/netmasks file.
192.168.10.0 255.255.255.0 192.168.20.0 255.255.255.0 |
Run the following command to reboot the system. Make sure fjgi3000, fjgi4001, fjgi5000 and fjgi6001 are enabled as IPv4 interfaces after rebooting the system.
/usr/sbin/shutdown -y -i6 -g0
/opt/FJSVhanet/usr/sbin/hanetconfig create -n sha0 -m t -i 192.168.10.1 -t fjgi3000,fjgi4001
/opt/FJSVhanet/usr/sbin/hanetconfig create -n sha1 -m t -i 192.168.20.1 -t fjgi5000,fjgi6001
/opt/FJSVhanet/usr/sbin/strhanet
1-1) Define IP addresses and hostnames in /etc/inet/hosts file. Defined information is the same as for HOST-A.
1-2) Write the hostnames defined above in /etc/hostname."interface-name" files. If a file does not exist, create a new file.
- Contents of /etc/hostname.hme0
|
hostb3 |
- Contents of /etc/hostname.hme1
|
hostb4 |
1-3) Define the subnet mask in /etc/inet/netmasks file. Defined content is same as HOST-A.
Run the following command to reboot the system. Make sure hme0 and hme1 are enabled as IPv4 interfaces after rebooting the system.
/usr/sbin/shutdown -y -i6 -g0
/opt/FJSVhanet/usr/sbin/hanetconfig create -n sha0 -m t -i 192.168.10.2 -t hme0,hme1
/opt/FJSVhanet/usr/sbin/strhanet
1-1) Define IP addresses and hostnames in /etc/inet/hosts file. Defined information is the same as for HOST-A.
1-2) Write the hostnames defined above in /etc/hostname."interface-name" files. If a file does not exist, create a new file.
- Contents of /etc/hostname.hme0
|
hostc5 |
- Contents of /etc/hostname.hme1
|
hostc6 |
1-3) Define the subnet mask in /etc/inet/netmasks file. Defined content is same as HOST-A.
Run the following command to reboot the system. Make sure hme0 and hme1 are enabled as IPv4 interfaces after rebooting the system.
/usr/sbin/shutdown -y -i6 -g0
/opt/FJSVhanet/usr/sbin/hanetconfig create -n sha0 -m t -i 192.168.20.2 -t hme0,hme1
/opt/FJSVhanet/usr/sbin/strhanet
|
Contents
Index
|