This section describes the setup procedure of the shutdown facility for the PRIMERGY, PRIMEQUEST, and virtual machine environment (KVM environment).
The setup procedure for the shutdown facility is different depending on the model/configuration.
The following shows the shutdown agents required for each hardware model/configuration. IPMI, kdump, iRMC, libvirt, and vmchkhost in each table represent the abbreviated names of shutdown agents.
Server model | Shutdown agent | |
|---|---|---|
IPMI | kdump | |
RX series | Y | Y (*1) |
Y: Necessary -: Not necessary
(*1) The following environments are excluded.
- RHEL8 environment in RX1330M3
- RHEL8 environment in RX4770M3
- RHEL8 environment in TX1320M3
- RHEL8 environment in TX1330M3
- CX1430M1 environment
Server model | Shutdown agent | ||
|---|---|---|---|
iRMC | |||
Panic | Reset | Poweroff | |
PRIMEQUEST 3000 B model | Y | Y | - |
PRIMEQUEST 3000 (except B model) | Y | Y | Y |
Y: Necessary -: Not necessary
Server model | Shutdown agent | |
|---|---|---|
libvirt | ||
Panic | Reset | |
PRIMERGY | Y | Y |
PRIMEQUEST 3000 series | Y | Y |
Y: Necessary
When using the host OS failover function in virtual machine environment (KVM environment), set the following shutdown agents. The shutdown agent that are set on the guest OS are the same as those used in the virtual machine function.
Server model |
| Shutdown agent | ||||||||
|---|---|---|---|---|---|---|---|---|---|---|
IPMI | kdump | iRMC | libvirt | vmchkhost | ||||||
Panic | Reset | Poweroff | Panic | Reset | Checking the status | |||||
PRIMERGY | RX series | Host OS | Y | Y | - | - | - | - | - | - |
All | Guest OS | - | - | - | - | - | Y | Y | Y | |
PRIMEQUEST | 3000 series | Host OS | - | - | Y | Y | Y | - | - | - |
All | Guest OS | - | - | - | - | - | Y | Y | Y | |
Y: Necessary -: Not necessary
(*1) The following environments are excluded.
- RHEL8 environment in RX1330M3
- RHEL8 environment in RX4770M3
- RHEL8 environment in TX1320M3
- RHEL8 environment in TX1330M3
- CX1430M1 environment
See
For details on the shutdown facility, see the following manuals:
"2.3.5 PRIMECLUSTER SF" in "PRIMECLUSTER Concepts Guide"
"Chapter 7 Shutdown Facility" in "PRIMECLUSTER Cluster Foundation (CF) Configuration and Administration Guide"
If the cluster partition occurred due to a fault in the cluster interconnect, all the nodes would still be in the state of accessing the user resources. For details on the cluster partition, see "1.2.2.1 Protecting data integrity" in "PRIMECLUSTER Concepts Guide."
In order to guarantee the data consistency in the user resources, SF must determine the node groups of which nodes remain to survive and which nodes need to be forcibly stopped.
The weight assigned to each node group is referred to as "Survival priority" in PRIMECLUSTER.
The greater the weight of the node, the higher the survival priority. Conversely, the less the weight of the node, the lower the survival priority. If the multiple node groups have the same survival priority, the node group that will survive is determined in the following order.
The node group having the largest number of nodes
The node group including the node whose name is the earliest in alphabetical order
Survival priority can be calculated based on the following formula:
Survival priority = SF node weight + ShutdownPriority of userApplicationNote
When SF calculates the survival priority, each node will send its survival priority to the remote node via the administrative LAN. If any communication problem of the administrative LAN occurs, the survival priority will not be able to reach. In this case, the survival priority will be calculated only by the SF node weight.
Weight of node. Default value = 1. Set this value while configuring the shutdown facility.
Set this attribute when userApplication is created. For details on how to change the settings, see "11.1 Changing the Operation Attributes of a userApplication."
See
For details on the ShutdownPriority attribute of userApplication, see "D.1 Attributes available to the user" in "PRIMECLUSTER Reliant Monitor Services (RMS) with Wizard Tools Configuration and Administration Guide."
The typical scenarios that are implemented are shown below:
Set the weight of all the nodes to 1 (default).
Set the ShutdownPriority attribute of every userApplication to 0 (default).
Set the "weight" of the node to survive to a value more than double the total weight of the other nodes.
Set the ShutdownPriority attribute of every userApplication to 0 (default).
In the following example, node1 is to survive:
Set the "weight" of all the nodes to 1 (default).
Set the ShutdownPriority attribute of userApplication whose operation is to continue to a value more than double the total of the ShutdownPriority attributes of other userApplications and the weights of all the nodes.
Set the ShutdownPriority attribute within the range of 1 to 20.
In the following example, the node for which app1 is operating is to survive:
Set the "weight" of the node to survive to a value more than double the total weight of the other nodes which have lower priority.
Set the ShutdownPriority attribute of every userApplication to 0 (default).
In the following example, node1, node2, node3, and node4 are to survive in this order:
Set the "weight" of all the nodes to 1 (default).
Set the value that is power of 2 (1, 2, 4, 8, 16, ...) to the ShutdownPriority attribute of userApplication if its operation must be continued.
Calculate the minimum value to be set to the ShutdownPriority attribute using the following formula. The value must be power of 2 (1, 2, 4, 8, 16, ...) and equal to or larger than the calculated value.
The number of configuration node - 1
Example: In 2-node configuration, (2 - 1) = 1. The minimum settable value to ShutdownPriority attribute is 1.
Example: In 3-node configuration, (3 - 1) = 2. The minimum settable value to ShutdownPriority attribute is 2.
Example: In 4-node configuration, (4 - 1) = 3. The minimum settable value to ShutdownPriority attribute is 4.
The following example shows the survival priority of nodes on which userApplication runs. Sequentially app1, app2, and app3 are prioritized.
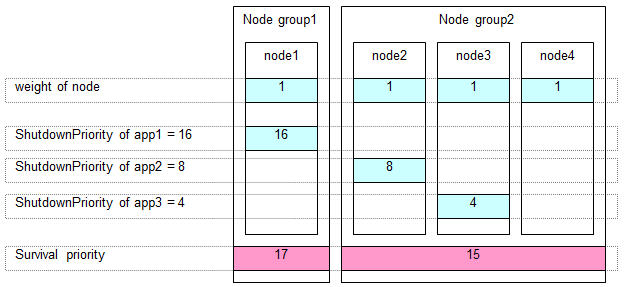
Set the "weight" of nodes to a power-of-two value (1,2,4,8,16,...) in ascending order of survival priority in each cluster system.
The "weight" set to a guest OS should have the same order relation with a corresponding host OS.
For example, when setting a higher survival priority to host1 than host2 between host OSes, set a higher survival priority to node1 (corresponding to host1) than node2-4 (corresponding to host2) between guest OSes.
Set the ShutdownPriority attribute of every userApplication to 0 (default).
In the following example, node1, node2, node3, and node4 are to survive in this order:

For the setup flow for the shutdown facility in PRIMERGY RX/TX/CX series, take the following steps.
However, Step 4 is not required for a RHEL8 environment in RX1330M3, RX4770M3, TX1320M3, or TX1330M3 and for a CX1430M1 environment.
Checking the shutdown agent information
Setting up the shutdown daemon
Configuring the IPMI shutdown agent
Configuring the kdump shutdown agent
Starting up the shutdown facility
Test for forced shutdown of cluster nodes
For the detailed setup procedure, refer to "5.1.2.3 Setup Procedure for Shutdown Facility in PRIMERGY."
For the setup flow for the shutdown facility in PRIMEQUEST 3000 series, take the following steps.
Checking the shutdown agent information
Configuring the iRMC shutdown agent
Setting up the shutdown daemon
Starting the iRMC asynchronous monitoring daemon
Setting the I/O completion wait time(for using other than ETERNUS disk array as the shared disk)
Starting up the shutdown facility
Test for forced shutdown of cluster nodes
For the detailed setup procedure, refer to "5.1.2.4 Setup Procedure for Shutdown Facility in PRIMEQUEST 3000 Series."
When using the host OS failover function
When using the host OS failover function in a KVM environment, for the setup flow for the shutdown facility, take the following steps.
Setting up the shutdown facility on the host OS in PRIMERGY/PRIMEQUEST
Checking the shutdown agent information in the guest OS
Configuring the libvirt shutdown agent
Configuring the vmchkhost shutdown agent
Starting up the shutdown facility
Setting up the host OS failover function on the host OS (PRIMEQUEST only)
Test for forced shutdown of cluster nodes
For the detailed setup procedure, see the following.
5.1.2.3 Setup Procedure for Shutdown Facility in PRIMERGY
5.1.2.4 Setup Procedure for Shutdown Facility in PRIMEQUEST 3000 Series
5.1.2.5 Setup Procedure for Shutdown Facility in Virtual Machine Environment
When not using the host OS failover function
When not using the host OS failover function in a KVM environment, for setup flow for the shutdown facility, take the following steps.
Checking the shutdown agent information in the guest OS
Configuring the libvirt shutdown agent
Starting up the shutdown facility
Test for forced shutdown of cluster nodes
For the detailed setup procedure, refer to "5.1.2.5 Setup Procedure for Shutdown Facility in Virtual Machine Environment."
This section describes the procedure for setting up the shutdown facility in PRIMERGY.
Set the shutdown agents necessary for a server model to be used.
Note
When creating a redundant administrative LAN used in the shutdown facility by using GLS, set as below.
For taking over the IP address between nodes
Configure GLS by using the logical IP address takeover function of the NIC switching mode.
For the shutdown facility, specify a physical IP address instead of a logical IP address.
For not taking over the IP address between nodes
Configure GLS by using the physical IP address takeover function of the NIC switching mode.
In an environment where a serial console is used, if the serial console is set to 300 to 38400 bps, the shutdown agent may not work correctly, and the operation may not be switched. Set the serial console to 57600 to 115200 bps.
When installing this software on PRIMERGY(without RX4770M3, RX1330M3, TX1320M3, TX1330M3), it is necessary that the installation of software prerequisites is completed.
OS Status Notification
Download from "PRIMERGY Tools" - "PRIMERGY Specific Software" on UpdateSite.
RX/TX/CX series (except CX1430M1)
Check the following settings in iRMC (integrated Remote Management Controller) necessary for setting the IPMI shutdown agent.
IP address of iRMC
User defined in iRMC
User password defined in iRMC
Also, check the following.
An administrator privilege must be set in the defined user in iRMC.
The defined user password in iRMC must be set with seven-bit ASCII characters other than the following characters.
> < " / \ = ! ? ; , &
IPMI (IPMI over LAN) must be enabled.
CX1430M1
Check the following settings in BMC (Baseboard Management Controller) necessary for setting the IPMI shutdown agent.
IP address of BMC
User defined in BMC
User password defined in BMC
Also, check the following.
An administrator privilege must be set in the defined user in BMC.
The defined user password in BMC must be set with seven-bit ASCII characters other than the following characters.
> < " / \ = ! ? ; , &
Create /etc/opt/SMAW/SMAWsf/rcsd.cfg on all the nodes as shown below.
Create the rcsd.cfg file by a root user and change the permission to 600.
RX/TX/CX series
<CFNameX>,weight=<weight>,admIP=<myadmIP>:agent=SA_ipmi,timeout=<timeout>
<CFNameX>,weight=<weight>,admIP=<myadmIP>:agent=SA_ipmi,timeout=<timeout>
CFNameX : Specify the CF node name of the cluster host. weight : Specify the weight of the SF node. myadmIP : Specify the IP address of the administrative LAN used in the shutdown facility of the cluster host. It is not the IP address of iRMC or the management blade. Available IP addresses are IPv4 and IPv6 addresses. IPv6 link local addresses are not available. When specifying an IPv6 address, enclose it in brackets "[ ]". (Example: [1080:2090:30a0:40b0:50c0:60d0:70e0:80f0]) If you specify a host name, make sure it is listed in /etc/hosts. SA_ipmi : Specify the IPMI shutdown agent. timeout : Specify the timeout duration (seconds) of the IPMI shutdown agent. For the IPMI shutdown agent, specify 25 seconds. |
Example:
node1,weight=1,admIP=10.20.30.100:agent=SA_ipmi,timeout=25
node2,weight=1,admIP=10.20.30.101:agent=SA_ipmi,timeout=25
Note
For using STP (Spanning Tree Protocol) in the administrative LAN used in the shutdown facility, it is necessary to set the timeout value to the current value plus (+) 50 (seconds), taking into account the time STP needs to create the tree and an extra cushion. This setting increases the time required for failover.
The contents of the rcsd.cfg file must be the same on all the nodes. If different, it does not work.
Information
When the "/etc/opt/SMAW/SMAWsf/rcsd.cfg" file is to be created, the "/etc/opt/SMAW/SMAWsf/rcsd.cfg.template" file can be used as a prototype.
In RX/TX/CX series, for the server with iRMC (integrated Remote Management Controller) or BMC (Baseboard Management Controller) installed, configure the IPMI shutdown agent.
You must configure the IPMI shutdown agent before you configure the kdump shutdown agent.
Starting the IPMI service
Execute the following command on all the nodes to check the startup status of the IPMI service.
# /usr/bin/systemctl status ipmi.service
ipmi.service - IPMI Driver
    Loaded: loaded (/usr/lib/systemd/system/ipmi.service; disabled)
    Active: inactive (dead)
If "inactive" is displayed in "Active:" field, execute the following command.
If "active" is displayed in "Active:" field, it is not necessary to execute the command.
# /usr/bin/systemctl start ipmi.serviceSetting the startup operation of the IPMI service
Make sure that the current IPMI service is enabled on all the nodes.
# /usr/bin/systemctl list-unit-files --type=service | grep ipmi.service
ipmi.service disabled
If "disabled" is displayed in "ipmi.service" field, execute the following command.
If "enabled" is displayed in "ipmi.service" field, it is not necessary to execute the following command.
# /usr/bin/systemctl enable ipmi.serviceEncrypting the password
Execute the sfcipher command to encrypt passwords of a user for the shutdown facility.
Example: If the password specified when setting up iRMC or BMC is "bmcpwd$"
# sfcipher -c
Enter User's Password:  <- enter bmcpwd$
Re-enter User's Password:  <- enter bmcpwd$
/t1hXYb/Wno=
Note: It is not necessary to insert '\' in front of the special characters specified as the password.
For information on how to use the sfcipher command, see the "sfcipher" manual page.
Note
For the passwords specified when setting up iRMC or BMC, seven-bit ASCII characters are available.
Among them, do not use the following characters as they may cause a problem.
> < " / \ = ! ? ; , &
Setting the shutdown agent
Create /etc/opt/SMAW/SMAWsf/SA_ipmi.cfg on all the nodes as shown below.
Create the SA_ipmi.cfg file by a root user and change the permission to 600.
For IPv4 address
CFName1  ip-address:user:passwd {cycle | leave-off}
CFName2  ip-address:user:passwd {cycle | leave-off}
For IPv6 address
CFName1 [ip-address]:user:passwd {cycle | leave-off}
CFName2 [ip-address]:user:passwd {cycle | leave-off}
CFNameX          : Specify the CF node name of the cluster host.
ip-address       : Specify the Ip address for iRMC or BMC
                   in the server where a cluster host is operating.
                   Available IP addresses are IPv4 and IPv6 addresses.
                   IPv6 link local addresses are not available.
                   When specifying the IPv6 address, enclose it in brackets "[ ]".
                   (Example: [1080:2090:30a0:40b0:50c0:60d0:70e0:80f0])
user             : Specify the user defined when setting up iRMC or BMC.
passwd           : Password defined when setting up iRMC or BMC.
                   Specify the password encrypted in Step 3.
cycle            : Reboot the node after forcibly stopping the node.
leave-off        : Power-off the node after forcibly stopping the node.
Example 1:
When the IP address of iRMC or BMC of node1 is 10.20.30.50 and the IP address of iRMC or BMC of node2 is 10.20.30.51
node1  10.20.30.50:root:/t1hXYb/Wno= cycle
node2  10.20.30.51:root:/t1hXYb/Wno= cycle
Example 2:
When the IP address of iRMC or BMC of node1 is 1080:2090:30a0:40b0:50c0:60d0:70e0:80f0 and the IP address of iRMC or BMC of node2 is 1080:2090:30a0:40b0:50c0:60d0:70e0:80f1
node1 [1080:2090:30a0:40b0:50c0:60d0:70e0:80f0]:root:/t1hXYb/Wno= cycle
node2 [1080:2090:30a0:40b0:50c0:60d0:70e0:80f1]:root:/t1hXYb/Wno= cycle
Information
When the "/etc/opt/SMAW/SMAWsf/SA_ipmi.cfg" file is to be created, the "/etc/opt/SMAW/SMAWsf/SA_ipmi.cfg.template" file can be used as a prototype.
Note
Check if the setting contents of the /etc/opt/SMAW/SMAWsf/SA_ipmi.cfg file are correct. If there is an error in the setting contents, the shutdown facility cannot be performed normally.
Check if the IP address (ip-address) of iRMC or BMC corresponding to the cluster host's CF node name (CFNameX) of the /etc/opt/SMAW/SMAWsf/SA_ipmi.cfg file is set. If there is an error in the setting, a different node may be forcibly stopped.
The contents of the SA_ipmi.cfg file must be the same on all the nodes. If different, it does not work.
Configure the kdump shutdown agent after configuring the IPMI shutdown agent.
The following procedures are not required for a RHEL8 environment in PRIMERGY RX1330M3, RX4770M3, TX1320M3, or TX1330M3 and for a PRIMERGY CX1430M1 environment.
Perform the following procedures.
Initializing the configuration file for the kdump
Execute the following command on any one of the cluster nodes.
# /etc/opt/FJSVcllkcd/bin/panicinfo_setupIf the following message is output, the setting file (rcsd.cfg) of the shutdown daemon has an error. Correct the file.
panicinfo_setup: ERROR: Reading the Shutdown Facility configuration failed.
If the following message is output, the setting file (SA_ipmi.cfg) of the shutdown agent has an error. Correct the file.
panicinfo_setup: ERROR: Reading the Shutdown Agent configuration failed.
In the environment where panicinfo_setup has already been executed, the following massage is output.
panicinfo_setup: WARNING: /etc/panicinfo.conf file already exists.
(I)nitialize, (C)opy or (Q)uit (I/C/Q) ?
In the case, input "I".
Note
To execute the command, CF and CF services (CFSH and CFCP) must be activated. For details, see "5.1.1 Setting Up CF and CIP."
Setting crash dump collection
Change /etc/opt/FJSVcllkcd/etc/SA_lkcd.tout as follows on all the nodes.
Before change
PANICINFO_TIMEOUT 5
RSB_PANIC 0
After change
PANICINFO_TIMEOUT 10
RSB_PANIC 3
Change the timeout value of SA_lkcd in the /etc/opt/SMAW/SMAWsf/rcsd.cfg file as follows on all the nodes.
Before change
agent=SA_lkcd,timeout=20
After change
agent=SA_lkcd,timeout=25
Start or restart the shutdown facility on all the nodes.
Starting the shutdown facility
Check if the shutdown facility has been started on all the nodes.
# sdtool -sOn a node where the shutdown facility has already been started, execute the following commands to restart the shutdown facility.
# sdtool -e
# sdtool -b
After about 30 seconds from the stop operation (sdtool -e), Perform the start operation (sdtool -b). If the command is executed continuously for a short period of time, the following message may be output to the system log, but no action is required.
rcsd died abnormally. Restart it.
On a node where the shutdown facility has not been started, execute the following command to start the shutdown facility.
# sdtool -b
Checking the status of the shutdown facility
Check the status of the shutdown facility on all the nodes.
# sdtool -sInformation
If InitFailed is displayed in Init State, it means that a problem occurred during initialization of that shutdown agent.
If TestFailed is displayed in Test State, it means that a problem occurred while the agent was testing whether or not the node displayed in the Cluster Host field could be stopped. Some sort of problem probably occurred in the software, hardware, or network resources being used by that agent.
If Unknown is displayed in Shut State, it means that SF has not yet stopped the node.
If Unknown is displayed in Init State, it means that SF has not yet initialized SA or tested the route.
Unknown is displayed temporarily in Test State or Init State until the actual status can be confirmed.
If TestFailed or InitFailed is displayed, check /var/log/messages. After the failure-causing problem is resolved and SF is restarted, the status display changes to InitWorked or TestWorked.
Note
The shutdown agent is incorrectly set.
The IPMI shutdown agent is used without the user password of the shutdown facility encrypted.
Take the following procedure:
Execute the following command on all the nodes to stop the shutdown facility.
# sdtool -eReview the settings of shutdown facility.
Execute the following command on any node to apply changes of the configuration file.
# /etc/opt/FJSVcllkcd/bin/panicinfo_setupAfter the following message is displayed, select "I."
panicinfo_setup: WARNING: /etc/panicinfo.conf file already exists.
(I)nitialize, (C)opy or (Q)uit (I/C/Q) ?
Execute the following command on all the nodes to start the shutdown facility.
# sdtool -bExecute the following command on all the nodes and make sure that the shutdown facility operates normally.
# sdtool -sAfter setting up the shutdown facility, conduct a test for forced shutdown of cluster nodes to check that the correct nodes can be forcibly stopped.
For the detail of the test for forced shutdown of cluster nodes, refer to "1.4 Test."
Note
Make sure that the shutdown agents are listed in the following order in the /etc/opt/SMAW/SMAWsf/rcsd.cfg file: SA_lkcd followed by SA_ipmi. If the order is reversed, then getting kdump may fail.
Example) The following is a setup example.
fuji2,weight=1,admIP=10.20.30.100:agent=SA_lkcd,timeout=25:SA_ipmi,timeout=25
fuji3,weight=1,admIP=10.20.30.101:agent=SA_lkcd,timeout=25:SA_ipmi,timeout=25
This section describes the setup procedure for the shutdown facility in PRIMEQUEST 3000 series.
Note
When a node needs to be panicked via iRMC/MMB, set a dump environment (kdump).
Note the following points when configuring the cluster system using the extended partitions (except B model).
Up to 4 nodes can be supported per cluster system.
VGA/USB/rKVMS of Home SB must be assigned to any one of the extended partitions (it can also be an extended partition not configuring the cluster system). If VGA/USB/rKVMS of Home SB is "Free" without an assignment, iRMC asynchronous monitoring function cannot operate correctly.
For how to assign VGA/USB/rKVMS to the extended partitions, refer to the following manual:
PRIMEQUEST 3000 Series Tool Reference (MMB)
When creating a redundant administrative LAN used in the shutdown facility by using GLS, set as below.
For taking over the IP address between nodes
Configure GLS by using the logical IP address takeover function of the NIC switching mode.
For the shutdown facility, specify a physical IP address instead of a logical IP address.
For not taking over the IP address between nodes
Configure GLS by using the physical IP address takeover function of the NIC switching mode.
iRMC check items
Check the following iRMC settings for necessary for setting iRMC shutdown agent:
User to control iRMC
Password of the user to control iRMC
The passwords for controlling iRMC must be specified seven-bit ASCII characters are available.
> < " / \ = ! ? ; , &
PRIMEQUEST 3000 (except B model)
To create the user to control iRMC, use "set irmc user" command.
For instructions on using the command, refer to the following manual:
"PRIMEQUEST 3000 Series Tool Reference (MMB)"
PRIMEQUEST 3000 B model
To create a user to control iRMC, log in to iRMC Web Interface and create the user from "User Management" page of "Settings" menu.
For how to use iRMC Web Interface, refer to the following manual page:
"FUJITSU Server PRIMEQUEST 3000 Series Business Model iRMC S5 Web Interface"
MMB check items (except PRIMEQUEST 3000 B model)
Check the following settings for MMB blade necessary for setting iRMC shutdown agent:
User to control MMB with RMCP
Password of the user to control MMB with RMCP
Also make sure that following settings are enabled for the user confirmed above:
The "Privilege" setting of the user is set to "Admin" so that the user can control MMB with RMCP.
The "Status" setting of the user is set to "Enabled" so that the user can control MMB with RMCP.
The passwords for controlling MMB with RMCP must be specified seven-bit ASCII characters are available.
> < " / \ = ! ? ; , &
To check the settings of the user who uses RMCP to control MMB, log in to MMB Web-UI, and check the settings from "Remote Server Management" window of "Network Configuration" menu.
If the above settings have not been set, set up MMB so that the above settings are set.
Note
The MMB units have two types of users:
User who uses RMCP to control the MMB
User who controls all MMB units
The user to be checked here is the user who uses RMCP to control the MMB.
See
For how to set up and check MMB, refer to the following manual:
"PRIMEQUEST 3000 Series Tool Reference"
Checking the time to wait until I/O to the shared disk is completed (when using other than the ETERNUS disk array as the shared disk)
When using any disks other than the ETERNUS disk array as the shared disk, to prevent the data error when the node is down due to a panic or other causes, set the time until I/O to the shared disk is completed.
To set the wait time described in "5.1.2.4.5 Setting I/O Completion Wait Time", panic the node during I/O to the shared disk. After that, check the time until I/O to the shared disk is completed.
Set up the iRMC shutdown agent according to the procedure described below.
Take this procedure after taking the procedure described in "5.1.1 Setting Up CF and CIP."
Note
PRIMERGY is compatible with iRMC device, however, the IRMC shutdown agent cannot be used.
Starting the IPMI service
Execute the following command on all the nodes to check the startup status of the IPMI service.
# /usr/bin/systemctl status ipmi.service
ipmi.service - IPMI Driver
   Loaded: loaded (/usr/lib/systemd/system/ipmi.service; disabled)
   Active: inactive (dead)
If "inactive" is displayed in "Active:" field, execute the following command.
If "active" is displayed in "Active:" field, it is not necessary to execute the following command.
# /usr/bin/systemctl start ipmi.serviceEnabling the IPMI service
Make sure that the current IPMI service is enabled on all the nodes.
# /usr/bin/systemctl list-unit-files --type=service | grep ipmi.service
ipmi.service disabled
If "disabled" is displayed in "ipmi.service" field, execute the following command.
If "enabled" is displayed in "ipmi.service" field, it is not necessary to execute the following command.
# /usr/bin/systemctl enable ipmi.serviceExecute clirmcsetup -a command on all the nodes, and register the iRMC information.
For instructions on using clirmcsetup command, see the clirmcsetup manual page.
# /etc/opt/FJSVcluster/bin/clirmcsetup -a irmc irmc-user
Enter User's Password:
Re-enter User's Password:
For irmc-user and User's Password, enter the following values that were checked in "5.1.2.4.1 Checking the Shutdown Agent Information."
User to control iRMC
Password of the user to control iRMC
Note
For the passwords specified when setting iRMC, seven-bit ASCII characters are available.
Among them, do not use the following characters as they may cause a problem.
> < " / \ = ! ? ; , &
If using the PRIMEQUEST 3000 B model, skip to step 5.
If using PRIMEQUEST 3000 (except B model), take the following procedure.
Execute clirmcsetup -a mmb command on all the nodes, and register the MMB information.
For instructions on using clirmcsetup command, see the manual page of clirmcsetup.
# /etc/opt/FJSVcluster/bin/clirmcsetup -a mmb mmb-user
Enter User's Password:
Re-enter User's Password:
For mmb-user and User's Password, enter the following values that were checked in "5.1.2.4.1 Checking the Shutdown Agent Information."
User to control MMB with RMCP
Password of the user to control MMB with RMCP
Note
For the passwords specified when setting MMB, seven-bit ASCII characters are available.
Among them, do not use the following characters as they may cause a problem.
> < " / \ = ! ? ; , &
Execute clirmcsetup -l command on all the nodes, and check the registered MMB/iRMC information.
If the MMB/iRMC information registered in step 3 and 4 is not output on all the nodes, retry from step 1.
- PRIMEQUEST 3000 B model
# /etc/opt/FJSVcluster/bin/clirmcsetup -l
cluster-host-name  irmc-user    mmb-user
------------------------------------------------
node1               irmc-user    *none*
node2               irmc-user    *none*
- PRIMEQUEST 3000 (except B model)
# /etc/opt/FJSVcluster/bin/clirmcsetup -l
cluster-host-name  irmc-user    mmb-user
------------------------------------------------
node1               irmc-user    mmb-user
node2               irmc-user    mmb-user
On all the nodes, create /etc/opt/SMAW/SMAWsf/rcsd.cfg with the following information.
Create the rcsd.cfg file using root user access privileges and change the permission of the file to 600.
<CFNameX>,weight=<weight>,admIP=<myadmIP>:agent=SA_irmcp,timeout=<timeout>:agent=SA_irmcr,timeout=<timeout>:agent=SA_irmcf,timeout=<timeout>
<CFNameX>,weight=<weight>,admIP=<myadmIP>:agent=SA_irmcp,timeout=<timeout>:agent=SA_irmcr,timeout=<timeout>:agent=SA_irmcf,timeout=<timeout>
CFNameX        :  Specify the CF node name of the cluster host.
weight         :  Specify the weight of the SF node.
myadmIP        :  Specify the IP address of the administrative LAN that is used
                  by the shutdown facility of the cluster host.
                  It is not the IP address of iRMC.
                  Available IP addresses are IPv4 and IPv6 addresses.
                  IPv6 link local addresses are not available.
                  When specifying the IPv6 address, enclose it in brackets "[ ]".
                  (Example: [1080:2090:30a0:40b0:50c0:60d0:70e0:80f0])
                  If you specify a host name, please make sure it is listed in /etc/hosts.
SA_irmcp       :  Make sure to specify this shutdown agent that panics the node via iRMC.
SA_irmcr       :  Make sure to specify this shutdown agent that resets the node via iRMC.
SA_irmcf       :  Shutdown agent to power off the node via MMB.
                  Do not specify it for PRIMEQUEST 3000 B model.
                  However, make sure to specify this shutdown agent for PRIMEQUEST 3000 except
                  B model.
timeout        :  Specify the timeout duration (seconds) of the shutdown agent.
                  Specify 20 seconds for "SA_irmcp", "SA_irmcr", and "SA_irmcf".
Example (PRIMEQUEST 3000 B model):
node1,weight=2,admIP=fuji2:agent=SA_irmcp,timeout=20:agent=SA_irmcr,timeout=20
node2,weight=2,admIP=fuji3:agent=SA_irmcp,timeout=20:agent=SA_irmcr,timeout=20
Example (PRIMEQUEST 3000 except B model):
node1,weight=2,admIP=fuji2:agent=SA_irmcp,timeout=20:agent=SA_irmcr,timeout=20:agent=SA_irmcf,timeout=20
node2,weight=2,admIP=fuji3:agent=SA_irmcp,timeout=20:agent=SA_irmcr,timeout=20:agent=SA_irmcf,timeout=20
Note
For the shutdown agents to be specified in the rcsd.cfg file, set all of SA_irmcp, SA_irmcr, and SA_irmcf shutdown agents in that order.
Set the same contents in the rcsd.cfg file on all the nodes. Otherwise, a malfunction may occur.
Information
When creating the /etc/opt/SMAW/SMAWsf/rcsd.cfg file, you can use the /etc/opt/SMAW/SMAWsf/rcsd.cfg.irmc.template file as a template.
Start the iRMC asynchronous monitoring daemon.
Make sure that the iRMC asynchronous monitoring daemon has been started on all the nodes.
# /etc/opt/FJSVcluster/bin/clirmcmonctlIf "The devirmcd daemon exists." is displayed, the iRMC asynchronous monitoring daemon has been started.
If "The devirmcd daemon does not exist." is displayed, the iRMC asynchronous monitoring daemon has not been started. Execute the following command to start the iRMC asynchronous monitoring daemon:
# /etc/opt/FJSVcluster/bin/clirmcmonctl startWhen using any disks other than the ETERNUS disk array as the shared disk, to prevent the data error when the node is down due to a panic or other causes, set the time until I/O to the shared disk is completed.
Execute the command in any node that is part of the cluster system, and set the wait time until I/O completion (WaitForIOComp) during failover triggered by a node failure (panic, etc.).
For details about cldevparam command, see the cldevparam manual page.
# /etc/opt/FJSVcluster/bin/cldevparam -p WaitForIOComp value
value        :  Specify the wait time until I/O completion.
                Specify the time checked by the procedure described in
                "5.1.2.4.1 Checking the Shutdown Agent Information."
After setting the wait time, execute the following command to make sure that the specified value is set.
# /etc/opt/FJSVcluster/bin/cldevparam -p WaitForIOComp
value
Note
When specifying the longer I/O completion wait time than the time to detect CF heartbeat timeout (default 10 seconds), the time to detect CF heartbeat timeout must be changed as long as the current set time + I/O completion wait time + 3 seconds or more. This prevents timeout of the CF heartbeat during the I/O completion wait time.
For how to change the time to detect CF heartbeat timeout, refer to "11.3.1 Changing Time to Detect CF Heartbeat Timeout."
If an I/O completion wait time is set, the failover time when a node failure (panic, etc.) occurs increases by that amount of time.
Start or restart the shutdown facility on all the nodes.
Starting the shutdown facility
Check if the shutdown facility has been started on all the nodes.
# sdtool -s
On a node where the shutdown facility has already been started, execute the following commands to restart the shutdown facility.
# sdtool -e
# sdtool -b
After about 30 seconds from the stop operation (sdtool -e), Perform the start operation (sdtool -b). If the command is executed continuously for a short period of time, the following message may be output to the system log, but no action is required.
rcsd died abnormally. Restart it.
On a node where the shutdown facility has not been started, execute the following command to start the shutdown facility.
# sdtool -b
Checking the status of the shutdown facility
Check the status of the shutdown facility on all the nodes.
# sdtool -s
Information
If InitFailed is displayed in Init State, it means that a problem occurred during initialization of that shutdown agent.
If TestFailed is displayed in Test State, it means that a problem occurred while the agent was testing whether or not the node displayed in the Cluster Host field could be stopped. Some sort of problem probably occurred in the software, hardware, or network resources being used by that agent.
If Unknown is displayed in Shut State, it means that SF has not yet stopped the node.
If Unknown is displayed in Init State, it means that SF has not yet initialized SA or tested the route.
Unknown is displayed temporarily in Test State or Init State until the actual status can be confirmed.
If TestFailed or InitFailed is displayed, check /var/log/messages. After the failure-causing problem is resolved and SF is restarted, the status display changes to InitWorked or TestWorked.
After setting up the shutdown facility, conduct a test for forced shutdown of cluster nodes to check that the correct nodes can be forcibly stopped.
For the detail of the test for forced shutdown of cluster nodes, refer to "1.4 Test."
After the forced shutdown, check if the following message is displayed on the syslog of the survival node.
INFO: 3124 The node status is received. (node: nodename from: irmc/mmb_ipaddress)
If the message is not displayed, the firewall settings of the node may be incorrect. Check again the settings.
This section describes the setup procedure of the shutdown facility in the virtual machine environment.
Note
When creating a redundant administrative LAN used in the shutdown facility by using GLS, set as below.
For taking over the IP address between nodes
Configure GLS by using the logical IP address takeover function of the NIC switching mode.
For the shutdown facility, specify a physical IP address instead of a logical IP address.
For not taking over the IP address between nodes
Configure GLS by using the physical IP address takeover function of the NIC switching mode.
To forcibly stop the domain in the guest OS by using the shutdown facility in KVM environment, log in to the host OS via SSH.
Check in advance the following settings that are necessary for setting the shutdown facility.
IP address for the host OS
User for logging in to the host OS
User password for logging in to the host OS
Domain name for the gust OS
For information on the user and password for logging in to the host OS, check the following information set up by the procedures described in the following sections:
When building a cluster system between guest OSes on one host OS, see "3.2.1.2 Host OS setup (after installing the operating system on guest OS)."
When building a cluster system between guest OSes on multiple host OSes without using the host OS failover function, see "3.2.2.2 Host OS setup (after installing the operating system on guest OS)."
When building a cluster system between guest OSes on multiple host OSes using host the OS failover function, see "3.2.3.1.4 Host OS setup (after installing the operating system on guest OS)."
Also take the following steps to check that the setting of the sudo command is already completed.
This is necessary for the confirmed user to execute the command as the root user.
Execute the visudo command on all the nodes.
Check that the following setting is described in the setting file displayed by executing the visudo command.
<User ID> ALL=(root) NOPASSWD: ALLIf this setting information is missing, describe it to the file.
Set up the libvirt shutdown agent.
Take the following steps.
Note
Be sure to perform the following operations from 1. to 3. on all guest OSes (nodes).
Encrypt the password.
Execute the sfcipher command to encrypt the password that was checked in "5.1.2.5.1 Checking the Shutdown Agent Information."
For details on how to use the sfcipher command, see the manual page of "sfcipher."
# sfcipher -c
Enter User's Password:
Re-enter User's Password:
D0860AB04E1B8FA3
Set up the panicky shutdown agent (SA_libvirtgp) and reset shutdown agent (SA_libvirtgr).
Set up the panicky shutdown agent (SA_libvirtgp) and reset shutdown agent (SA_libvirtgr).
Create the /etc/opt/SMAW/SMAWsf/SA_libvirtgp.cfg and the /etc/opt/SMAW/SMAWsf/SA_libvirtgr.cfg as below.
Create the /etc/opt/SMAW/SMAWsf/SA_libvirtgp.cfg and the /etc/opt/SMAW/SMAWsf/SA_libvirtgr.cfg by using the root user privilege, and change the permission of the file to 600.
CFNameX domainX ip-address user passwd
CFNameX domainX ip-address user passwd
CFNameX    : Specify the CF node name of the cluster host.
domainX    : Specify the guest OS domain name.
             Specify the domain name checked in
             "5.1.2.5.1 Checking the Shutdown Agent Information."
ip-address : Specify the IP address of the host OS.
             Specify the IP address of the host OS checked in
             "5.1.2.5.1 Checking the Shutdown Agent Information."
             Available IP addresses are IPv4 and IPv6 addresses.
             IPv6 link local addresses are not available.
user       : User to log in to the host OS.
             Specify the user checked in
             "5.1.2.5.1 Checking the Shutdown Agent Information."
passwd     : Password of the user specified by "user".
             Specify the encrypted password that you have checked in 1.
Example:
When the guest OS domain name of node1 is domain1, and the IP address of the host OS on which node1 operates is 10.20.30.50.
Moreover, when the guest OS domain name of node2 is domain2, and the IP address of the host OS on which node2 operates is 10.20.30.51.
/etc/opt/SMAW/SMAWsf/SA_libvirtgp.cfg
node1 domain1 10.20.30.50 user D0860AB04E1B8FA3
node2 domain2 10.20.30.51 user D0860AB04E1B8FA3
/etc/opt/SMAW/SMAWsf/SA_libvirtgr.cfg
node1 domain1 10.20.30.50 user D0860AB04E1B8FA3
node2 domain2 10.20.30.51 user D0860AB04E1B8FA3
Note
Check if the setting contents of the /etc/opt/SMAW/SMAWsf/SA_libvirtgp.cfg file and the /etc/opt/SMAW/SMAWsf/SA_libvirtgr.cfg file are correct. If there is an error in the setting contents, the shutdown facility cannot be performed normally.
Check if the domain name (domainX) of the guest OS and the IP address (ip-address) of the host OS corresponding to the cluster host's CF node name (CFNameX) of the /etc/opt/SMAW/SMAWsf/SA_libvirtgp.cfg file and the /etc/opt/SMAW/SMAWsf/SA_libvirtgr.cfg file are set. If there is an error in the setting, a different node may be forcibly stopped.
The contents of the SA_libvirtgp.cfg, SA_libvirtgr.cfg, and rcsd.cfg files of all guest OSes (nodes) should be identical. If not, a malfunction will occur.
Log in to the host OS
The shutdown facility accesses the host OS with SSH. Therefore, you need to authenticate yourself (create the RSA key) in advance, which is required when using SSH for the first time.
On all guest OSes (nodes), log in to each host OS IP address (ip-address) set in Step 2 using each set user.
Execute the command as the root user access privilege.
# ssh -l user XXX.XXX.XXX.XXX
The authenticity of host 'XXX.XXX.XXX.XXX (XXX.XXX.XXX.XXX)' can't be established.
RSA key fingerprint is xx:xx:xx:xx:xx:xx:xx:xx:xx:xx:xx:xx:xx:xx:xx:xx.
Are you sure you want to continue connecting (yes/no)? yes <- "Enter yes."
#
When using the host OS failover function, set up the vmchkhost shutdown agent.
Perform this setting after setting up the libvirt shutdown agent.
Note
Be sure to perform the following operations from 2. to 3. on all guest OSes (nodes).
Set up the libvirt shutdown agent and check the information of the host OS.
Check the following information that are set in the libvirt shutdown agent:
IP address for the host OS
User for logging in to the host OS
Encrypted user password for logging in to the host OS
Also check that the following information for the host OS.
CF node name
Set up the vmchkhost shutdown agent.
Create /etc/opt/SMAW/SMAWsf/SA_vmchkhost.cfg as described in the following.
Create the SA_vmchkhost.cfg using the root user access privilege and change the permission of the file to 600.
guest-cfnameX host-cfnameX ip-address user password
guest-cfnameX host-cfnameX ip-address user password
guest-cfnameX      : CF node name of the guest OS (cluster node).
host-cfnameX       : CF node name of the host OS.
                     Specify the CF node name checked in step 1.
ip-address         : An IP address of the host OS.
                     Specify the IP address checked in step 1.
user               : User to log in to the host OS.
                     Specify the user checked in step 1.
password           : Password of the user specified by "user".
                     Specify the encrypted password checked in 1.
Example:
When the CF node name of the host OS on which node1 (CF node name of the guest OS) operates is hostos1, the IP address of the host OS is 10.20.30.50, the CF node name of the host OS on which node2 (CF node name of the guest OS) operates is hostos2, and the IP address of the host OS is 10.20.30.51.
node1 hostos1 10.20.30.50 user D0860AB04E1B8FA3
node2 hostos2 10.20.30.51 user D0860AB04E1B8FA3
Note
Check if the setting contents of the /etc/opt/SMAW/SMAWsf/SA_vmchkhost.cfg file are correct. If there is an error in the setting contents, the shutdown facility cannot be performed normally.
Check if the CF node name of the host OS (host-cfnameX) and the IP address of the host OS (ip-address) corresponding to the CF node name (guest-cfnameX) of the guest OS (clutser host) of the /etc/opt/SMAW/SMAWsf/SA_vmchkhost.cfg file are set. If there is an error in the setting, the shutdown facility cannot be performed normally.
The contents of the SA_vmchkhost.cfg file of all guest OSes (nodes) should be identical. If not, a malfunction will occur.
Log in to the host OS
The shutdown facility accesses the host OS with SSH. Therefore, you need to authenticate yourself (create the RSA key) in advance, which is required when using SSH for the first time.
Check that you have already authenticated yourself (created the RSA key) when setting up the libvirt shutdown agent.
On all the nodes, create /etc/opt/SMAW/SMAWsf/rcsd.cfg with the following information.
Create the rcsd.cfg file using root user access privileges and change the permission of the file to 600.
When using the host OS failover function
CFNameX,weight=weight,admIP=myadmIP:agent=SA_libvirtgp,timeout=timeout:agent=SA_libvirtgr,timeout=timeout:agent=SA_vmchkhost,timeout=timeout
CFNameX,weight=weight,admIP=myadmIP:agent=SA_libvirtgp,timeout=timeout:agent=SA_libvirtgr,timeout=timeout:agent=SA_vmchkhost,timeout=timeout
When not using the host OS failover function
CFNameX,weight=weight,admIP=myadmIP:agent=SA_libvirtgp,timeout=timeout:agent=SA_libvirtgr,timeout=timeout
CFNameX,weight=weight,admIP=myadmIP:agent=SA_libvirtgp,timeout=timeout:agent=SA_libvirtgr,timeout=timeout
CFNameX        :  Specify the CF node name of the cluster host.
weight         :  Specify the weight of the SF node.
myadmIP        :  Specify the IP address of the administrative LAN that used by the Shutdown
                  Facility of the cluster host.
                  It is not the IP address of iRMC or the management blade.
                  Available IP addresses are IPv4 and IPv6 addresses.
                  IPv6 link local addresses are not available.
                  When specifying the IPv6 address, enclose it in brackets "[ ]".
                  (Example: [1080:2090:30a0:40b0:50c0:60d0:70e0:80f0])
                  If you specify a host name, please make sure it is listed in /etc/hosts.
SA_libvirtgp   :  Make sure to set this shutdown agent that panics the guest OS.
SA_mmbr        :  Make sure to set this shutdown agent that resets the guest OS.
SA_vmchkhost   :  Shutdown agent for the host OS failover function.
timeout        :  Specify the timeout duration (seconds) of the shutdown agent.
                  Specify 35 seconds for SA_libvirtgp, SA_libvirtgr, and SA_vmchkhost.
Example1: When using the host OS failover function
node1,weight=2,admIP=fuji2:agent=SA_libvirtgp,timeout=35:agent=SA_libvirtgr,timeout=35:agent=SA_vmchkhost,timeout=35
node2,weight=1,admIP=fuji3:agent=SA_libvirtgp,timeout=35:agent=SA_libvirtgr,timeout=35:agent=SA_vmchkhost,timeout=35
Example 2: When not using the host OS failover function
node1,weight=2,admIP=fuji2:agent=SA_libvirtgp,timeout=35:agent=SA_libvirtgr,timeout=35
node2,weight=1,admIP=fuji3:agent=SA_libvirtgp,timeout=35:agent=SA_libvirtgr,timeout=35
Note
SA_libvirtgp shutdown agent must be set first followed by SA_libvirtgr, and then set SA_vmchkhost as the last of all in the rcsd.cfg file.
Set the same contents in the rcsd.cfg file on all the nodes. Otherwise, a malfunction may occur.
Information
When creating the /etc/opt/SMAW/SMAWsf/rcsd.cfg file, you can use the /etc/opt/SMAW/SMAWsf/rcsd.cfg.mmb.template file as a template.
Start or restart the shutdown facility on all the nodes.
Starting the shutdown facility
Check if the shutdown facility has been started on all the nodes.
# sdtool -sOn a node where the shutdown facility has already been started, execute the following commands to restart the shutdown facility.
# sdtool -e
# sdtool -b
After about 30 seconds from the stop operation (sdtool -e), Perform the start operation (sdtool -b). If the command is executed continuously for a short period of time, the following message may be output to the system log, but no action is required.
rcsd died abnormally. Restart it.
On a node where the shutdown facility has not been started, execute the following command to start the shutdown facility.
# sdtool -bChecking the status of the shutdown facility
Check the status of the shutdown facility on all the nodes.
# sdtool -sInformation
If InitFailed is displayed in Init State, it means that a problem occurred during initialization of that shutdown agent.
If TestFailed is displayed in Test State, it means that a problem occurred while the agent was testing whether or not the node displayed in the Cluster Host field could be stopped. Some sort of problem probably occurred in the software, hardware, or network resources being used by that agent.
If Unknown is displayed in Shut State, it means that SF has not yet stopped the node.
If Unknown is displayed in Init State, it means that SF has not yet initialized SA or tested the route.
Unknown is displayed temporarily in Test State or Init State until the actual status can be confirmed.
If TestFailed or InitFailed is displayed, check the following files:
/var/log/messages
/etc/sysconfig/libvirt-guests
For /etc/sysconfig/libvirt-guests, check whether the following settings are made:
When building a cluster system between guest OSes on one host OS, see "3.2.1.2 Host OS setup (after installing the operating system on guest OS)."
When building a cluster system between guest OSes on multiple host OSes without using the host OS failover function, see "3.2.2.2 Host OS setup (after installing the operating system on guest OS)."
When building a cluster system between guest OSes on multiple host OSes using the host OS failover function, see "3.2.3.1.4 Host OS setup (after installing the operating system on guest OS)."
After the failure-causing problem is resolved and SF is restarted, the status display changes to InitWorked or TestWorked.
When using the host OS failover function in PRIMEQUEST, for linking with iRMC asynchronous monitoring function, configure the host OS failover function to the host OS.
Set up this setting after setting libvirt shutdown agent and vmchkhost shutdown agent.
Note
Be sure to perform the following operations from 3 to 7 on all the host OSes (nodes).
Check the setting information.
The host OS failover function in PRIMEQUEST, when detecting a host OS error by iRMC asynchronous monitoring function, logs in to a guest OS (a cluster node) using SSH and then notifies the shutdown facility of the host OS error.
For setting the host OS failover function, confirm the following necessary information previously.
IP address of the guest OS
Domain name of the guest OS
Cluster name of the guest OS
CF node name of the guest OS
Create the user (when logging in to the guest OS not as a root user).
When the host OS failover function logs in to the guest OS not as a root user, a user for logging in is created. Perform the following procedure on all the guest OS.
(1) Create the login user.
Set the user password with seven-bit ASCII characters except the following characters.
> < " / \ = ! ? ; , &
(2) Set the sudo command so that the created user can execute the command as a root user.
Execute the visudo command by using the root command. Describe the following setting in the displayed setting file.
<User created in (1)> ALL=(root) NOPASSWD: ALL
Encrypt the password.
Execute the sfcpher command to encrypt passwords for login to the guest OS as a root user.
For details on how to use the sfcipher command, see the manual page of "sfcipher."
# sfcipher -c
Enter User's Password:
Re-enter User's Password:
D0860AB04E1B8FA3
Create /etc/opt/FJSVcluster/etc/kvmguests.conf.
Create /etc/opt/FJSVcluster/etc/kvmguests.conf with the following contents.
Create the kvmguests.conf file using the root user access privilege and change the permission of the file to 600.
When multiple guest OSes (the cluster nodes) are operating on a host OS that configures the cluster, describe all the guest OSes configured the host OS failover function in this file.
guest-name host-cfname guest-clustername guest-cfname guest_IP guest_user guest_passwd
          :
Enter the information of one node in one line.
Delimit each item with a single space.
The kvmguests.conf file must be the same on all cluster nodes.
guest-name         :Specify the domain name of the guest OS.
host-cfname        :Specify the CF node name of the host OS in which "guest-name" is running.
                    If you execute "cftool -l" on the host OS in which "guest-name" is running,
                    you can confirm the CF node name of the node.
guest-clustername  :Specify the cluster name of the guest OS.
                    If you execute "cftool -c" on the guest OS, you can confirm the cluster
                    name of the node.
guest-cfname       :Specify the CF node name of the guest OS.
                    If you execute "cftool -l" on the guest OS, you can confirm the CF node
                    name of the node.
guest_IP           :Specify the IP address of the guest OS.
                    Available IP address formats are IPv4 and IPv6 addresses.
                    IPv6 link local addresses are not available.
guest_user         :Specify the user for logging in to the guest OS using SSH.
                    Specify the fixed root or the user created in step 2.
guest_passwd       :Specify the user password for logging in to the guest OS.
                    Specify the password encrypted in step 3.
Example: In a two-node configuration between guest OSes, two cluster systems are configured
guest11 cfhost1 cluster1 cfguest11  10.20.30.50 root D0860AB04E1B8FA3
guest12 cfhost2 cluster1 cfguest12  10.20.30.51 root D0860AB04E1B8FA3
guest21 cfhost1 cluster2 cfguest21  10.20.30.60 root D0860AB04E1B8FA3
guest22 cfhost2 cluster2 cfguest12  10.20.30.61 root D0860AB04E1B8FA3
Confirm the login to the guest OS.
The host OS failover function in PRIMEQUEST accesses the guest OS with SSH. Therefore, you need to authenticate yourself (create the RSA key) in advance, which is required when using SSH for the first time.
Check that you can connect to all the guest OSes (nodes) which are specified to /etc/opt/FJSVcluster/etc/kvmguests.conf via SSH as a root user.
# ssh -l user1 XXX.XXX.XXX.XXX
The authenticity of host 'XXX.XXX.XXX.XXX (XXX.XXX.XXX.XXX)' can't be established.
RSA key fingerprint is xx:xx:xx:xx:xx:xx:xx:xx:xx:xx:xx:xx:xx:xx:xx:xx.
Are you sure you want to continue connecting (yes/no)? yes <- Enter "yes."
Check the setting in /etc/opt/FJSVcluster/etc/kvmguests.conf.
Execute the sfkvmtool command on all the host OSes to make sure that the settings in /etc/opt/FJSVcluster/etc/kvmguests.conf are correct.
If the settings are correct, the following message is output.
# /opt/SMAW/SMAWsf/bin/sfkvmtool -c
NOTICE: The check of configuration file succeeded.
If a message other than above is output, review the setting in /etc/opt/FJSVcluster/etc/kvmguests.conf.
Start the shutdown facility.
Check if the shutdown facility has been started on all the nodes.
# sdtool -sOn a node where the shutdown facility has already been started, execute the following commands to restart the shutdown facility.
# sdtool -e
# sdtool -b
On a node where the shutdown facility has not been started, execute the following command to start the shutdown facility.
# sdtool -bAfter setting up the shutdown facility, conduct a test for forced shutdown of cluster nodes to check that the correct nodes can be forcibly stopped.
For the detail of the test for forced shutdown of cluster nodes, refer to "1.4 Test."
Note
After shutting down a node (a guest OS) forcibly by SA_libvirtgp, the guest OS may be a temporary stopped state. (For example, when there is no space in /var/crash on the host OS.) In the case, take the following steps.
Log in to the management OS on which the suspended guest OS resides.
Forcibly stops the guest OS in the suspended state.
# virsh destroy <Guest Domain Name>
Verify that the guest domain that you forcibly stopped in 2 is in a stopped state "shut off".
# virsh domstate <Guest Domain Name>
Start the guest OS that was forcibly stopped in 2.
# virsh start <Guest Domain Name>