Note
Disk in DISABLE status
When taking this procedure to restore the system disk, check before taking this procedure or check in the procedure 8-2) that no DISABLE disks exist.
If a disk in DISABLE status exists, follow "(1) Disk is in DISABLE status." in "D.1.2 Disk Status Abnormality" to restore the disk in DISABLE status first, and then take the following procedure.
However, when the condition to forcibly remove a class that is described in "(1) Disk is in DISABLE status." in "D.1.2 Disk Status Abnormality" is satisfied, the disk cannot be restored by the following procedure. In this case, follow "(4) System cannot be booted. (Failure of all boot disks)"in "D.1.5 System Disk Abnormality [EFI]" to restore the disk.
8) Switching to the alternative boot environment
If the system cannot be booted due to a failed system disk or damaged data, switch the environment to the alternative boot environment created in the proxy volume to allow the system to continue operating.
8-1) Boot in the alternative boot environment.
From boot devices displayed in the EFI boot manager's boot option selection screen, select one of the devices in the alternative boot environment output in the message as shown in step 5-3).
Root1 Root2 Proot1 <- Select Proot2 |
8-2) When the system is started in single user mode, restart it in multi-user mode.
If the system was started in single user mode in a. of step 4-1) at "7.5.6 Backing Up" and step 6) was not executed, the alternative boot environment is started in single user mode. In this case, after changing the settings to start the alternative boot environment in multi-user mode, stop the system. Then, execute step 6-1) again. For the settings to start in multi-user mode, see "A.10 Changing system run level."
8-3) Confirm that it was booted normally.
Using the mount(8) command or the sdxinfo command, make sure that it was booted normally in the alternative boot environment and that GDS objects do not contain errors. Additionally, according to need, you should confirm that file system contents in the alternative boot environment are correct and that applications can normally run.
8-4) Break up the former boot environment according to need.
To break up the former boot environment, break the master and proxy relationships, remove the master volumes, and remove groups and disks from the master groups as follows. You may not perform this procedure when restoring system disks in step 9).
# sdxproxy Break -c System -p Proxy1 # sdxproxy Break -c System -p Proxy2 # sdxvolume -F -c System -v root,boot,efi,swap,var,usr # sdxvolume -R -c System -v root # sdxvolume -R -c System -v boot # sdxvolume -R -c System -v efi # sdxvolume -R -c System -v swap # sdxvolume -R -c System -v var # sdxvolume -R -c System -v usr # sdxgroup -R -c System -g Group1 # sdxgroup -R -c System -g Group2 # sdxdisk -R -c System -d Root1 # sdxdisk -R -c System -d Root2 # sdxdisk -R -c System -d Var1 # sdxdisk -R -c System -d Var2 |
See
When using GDS Management View, see "9.1 Breaking Proxy," "9.3.1.2 Removing Volume," "9.3.1.3 Removing Group," and "8.2.1.2 Class Configuration."
9) Restoring system disks
After rebooting the system in the alternative boot environment, restore backup disk data back to the original system disks.
9-1) Cancel the master and proxy relationship.
# sdxproxy Break -c System -p Proxy1 # sdxproxy Break -c System -p Proxy2 |
See
When using GDS Management View, see "9.1 Breaking Proxy."
9-2) Remove the master volumes.
# sdxvolume -F -c System -v root,boot,efi,swap,var,usr # sdxvolume -R -c System -v root # sdxvolume -R -c System -v boot # sdxvolume -R -c System -v efi # sdxvolume -R -c System -v swap # sdxvolume -R -c System -v var # sdxvolume -R -c System -v usr |
See
When using GDS Management View, see "9.3.1.2 Removing Volume."
9-3) If an original system disk crashed, swap the failed disk.
The following is an example of swapping disk Root1 (physical disk sda).
See
When using GDS Management View, see "7.3.1 Setting with GDS Management View."
9-3-1) Exclude the disk to be swapped from the GDS management to make it exchangeable.
# sdxswap -O -c System -d Root1 |
9-3-2) Swap physical disk sda.
9-3-3) Include the swapped disk into the GDS management.
# sdxswap -I -c System -d Root1 |
9-4) Join a group of the backup disks as the master and a group of the original system disks as the proxy.
# sdxproxy Join -c System -m Proxy1 -p Group1 -a Proot=root:on,Pboot=boot:on,Pefi=efi:on # sdxproxy Join -c System -m Proxy2 -p Group2 -a Pswap=swap:on,Pvar=var:on,Pusr=usr:on |
See
When using GDS Management View, see "6.10.1.1 Join."
9-5) Confirm that synchronization copying is complete.
# sdxinfo -S -c System
OBJ    CLASS   GROUP   DISK    VOLUME  STATUS
------ ------- ------- ------- ------- --------
slice  System  Group1  Root1   root    STOP
slice  System  Group1  Root2   root    STOP
slice  System  Group1  Root1   boot    STOP
slice  System  Group1  Root2   boot    STOP
slice  System  Group1  Root1   efi     COPY
slice  System  Group1  Root2   efi     COPY
slice  System  Group2  Var1    swap    STOP
slice  System  Group2  Var2    swap    STOP
slice  System  Group2  Var1    var     COPY
slice  System  Group2  Var2    var     COPY
slice  System  Group2  Var1    usr     COPY
slice  System  Group2  Var2    usr     COPY
slice  System  Proxy1  Proot1  Proot   ACTIVE
slice  System  Proxy1  Proot2  Proot   ACTIVE
slice  System  Proxy1  Proot1  Pboot   ACTIVE
slice  System  Proxy1  Proot2  Pboot   ACTIVE
slice  System  Proxy1  Proot1  Pefi    ACTIVE
slice  System  Proxy1  Proot2  Pefi    ACTIVE
slice  System  Proxy2  Pvar1   Pswap   ACTIVE
slice  System  Proxy2  Pvar2   Pswap   ACTIVE
slice  System  Proxy2  Pvar1   Pvar    ACTIVE
slice  System  Proxy2  Pvar2   Pvar    ACTIVE
slice  System  Proxy2  Pvar1   Pusr    ACTIVE
slice System Proxy2 Pvar2 Pusr ACTIVE |
If synchronization copying is in process, COPY is displayed in the STATUS field for slices of the copy destination proxy group. If the STATUS of every slice in the proxy group is STOP, the synchronization copying is completed.
Information
On the GDS Management View main screen, slices composing copy destination volumes are indicated as below.
If synchronization copying is in process, the status is "copy" and the icon color is blue.
After synchronization copying is completed, the status is "stop" and the icon color is black.
9-6) Through similar steps as 4) and 5) in "7.5.6 Backing Up" and 8) in this sub-section, part the proxy groups, create an alternative boot environment, and switch to the alternative boot environment.
Information
Canceling system disk mirroring in an alternative boot environment
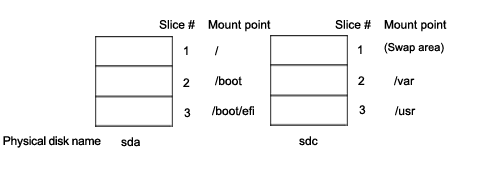
To cancel system disk mirroring after switching to the alternative boot environment in step 8), perform the following procedure. The following describes the procedure concerning the configuration as below.
10) Breaking up the former boot environment
Break up the former boot environment according to need. Break the master and proxy relationships, remove the master volumes, and remove groups and disks from the master groups as follows.
# sdxproxy Break -c System -p Proxy1 # sdxproxy Break -c System -p Proxy2 # sdxvolume -F -c System -v root, boot, efi, swap,var,usr # sdxvolume -R -c System -v root |
See
When using GDS Management View, see "9.1 Breaking Proxy," "9.3.1.2 Removing Volume," "9.3.1.3 Removing Group," and "8.2.1.2 Class Configuration."
11) Unmirroring system disks in an alternative boot environment
See
When using GDS Management View, see "9.4.1 Unmirroring System Disk with GDS Management View."
11-1) Exit all active application programs.
To ensure safe mirroring cancellation, exit all running application programs. If higher security is required, you should make backups of system disks.
11-2) Remove those disks not used as system disks after canceling the mirroring.
# sdxdisk -D -c System -g Proxy1 -d Proot2 # sdxdisk -D -c System -g Proxy2 -d Pvar2 |
11-3) Confirm that cancellation of the mirroring is complete.
# sdxroot -R -c System -d Proot1,Pvar1 |
11-4) Reboot the system.
# shutdown -r now |
11-5) Verify that the mirroring was canceled normally.
Using the mount(8) command or the sdxinfo command, verify that the system disk mirroring was canceled properly.
11-6) Cancel the system disk management.
# sdxvolume -F -c System -v Proot,Pboot,Pefi,Pswap,Pvar,Pusr # sdxvolume -R -c System -v Proot # sdxvolume -R -c System -v Pboot # sdxvolume -R -c System -v Pefi # sdxvolume -R -c System -v Pswap # sdxvolume -R -c System -v Pvar |