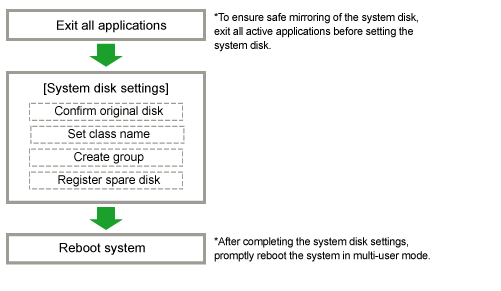
The operation outline of the setting of the system disk mirroring is shown below.
Figure 6.2 System Disk Settings Operation
Note
The hot spare function cannot be used for the system disk in this version.
This subsection explains how to mirror a system disk.
Note
Disk that will be mirrored by system disk settings
For system disk settings from the GDS Management View, disks with /, /var, /usr, /boot, /boot/efi, and a swap area are recognized as system disks.
Disks that are recognized as system disks will automatically be the original disks for mirroring. Among /, /var, /usr, /boot, /boot/efi, and a swap area, disks with only swap areas can be excluded from mirroring, but disks with /, /var, /usr, /boot, and /boot/efi are always to be mirrored.
Also, physical disks that are not recognized as system disks cannot be mirrored using the [System Disk Settings].
Note
For Safe System Disk Mirroring
To safely mirror the system disk, exit all active applications before proceeding to system disk settings.
During the mirroring process, there may be a considerable degradation of application response time. After completing the system disk settings, promptly reboot the system.
In the [Settings] menu, select [System Disk Settings].
Confirming original disks
Figure 6.3 Mirroring Disk Target List
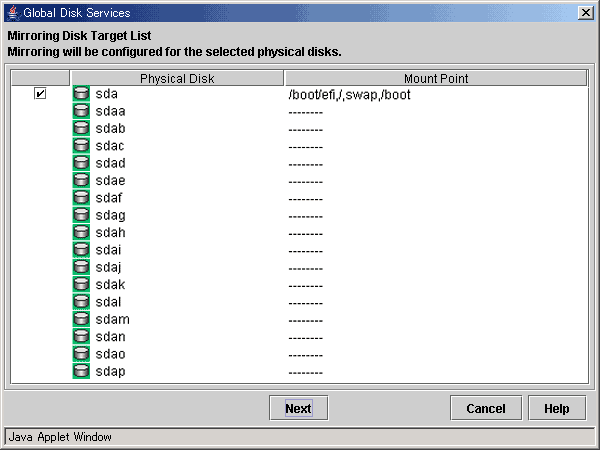
In the [Physical Disk] field, system disks that will be used as original disks will be displayed with a check mark.
For disks with mount information in /etc/fstab, the [Mount Point] field displays their mount points.
Original disks for mirroring with check marks in the [Physical Disk] field are registered as keep disks with the root class and mirrored.
Uncheck system disks not to be registered with the root class.
It is possible to uncheck system disks for which only swap among /, /var, /usr, /boot, /boot/efi and swap is displayed in the [Mount Point] field.
It is impossible to uncheck system disks for which /, /var, /usr, /boot, and /boot/efi are displayed in the [Mount Point] field.
If not mirroring, click <Cancel>.
If mirroring, click <Next>.
Creating root class
Figure 6.4 Class Name Setting
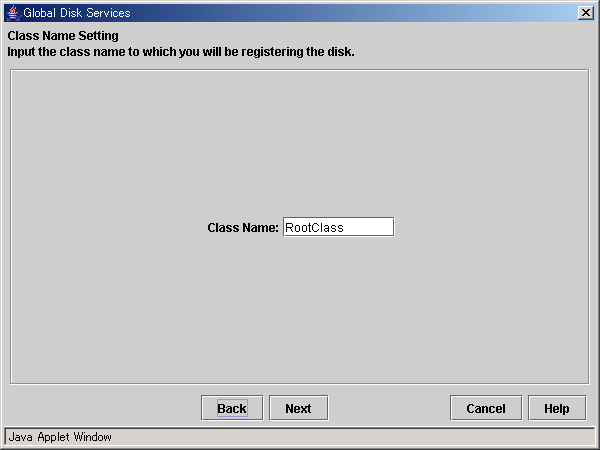
Type the class name of the root class.
If the root class is present, the class name cannot be set.
Information
Inputting the Class Name
The class name will be used for the device path name.
/dev/sfdsk/class_name/dsk/volume_name
You must be careful when inputting the class name, as once the volume is created, it cannot be changed.
Note
When Setting the System Disk in Cluster System
When setting the system disk in cluster systems, the class name of the root class should be different for each node.
See
For information on assigning a class name, see "2.3.1 Object Name."
Click <Next> to continue.
Creating group
Note
Only one disk can be added as the mirror disk in this version.
Create the group by selecting the mirror disks.
When multiple system disks that will be used as original disks exist, perform group creation for every original disk.
Figure 6.5 Group Disk Selection: rootGroup
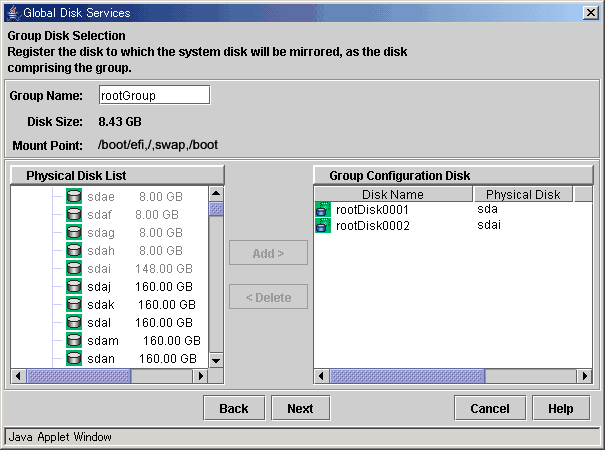
Group name, size and mount point will be displayed.
In the [Group Name], an automatically created group name appears as a default.
Change the [Group Name] if necessary.
In the [Group Configuration Disk] field, the original disk you selected will be displayed.
You cannot remove the original disk from the [Group Configuration Disk] field.
From the [Physical Disk List] field, select the mirror disk (i.e. the disk you want to mirror to) and click <Add>. The disk will be added to the [Group Configuration Disk] field.
You can select more than one physical disk at a time.
For mirroring disks, add one or more mirror disks. If no mirror disk is added, the original disk is registered with the root class and managed with GDS but will not be mirrored.
Double-click the [Disk Name] field in the [Group Configuration Disk] field, and change the name.
After adding all disks, click <Next> and create the next group.
Once you finish creating all groups, proceed to register the spare disks.
Note
Physical disks that can be registered as the Group Configuration Disk
GDS Management's system disk settings do not allow you to add a physical disk capacity that is smaller than the original disk. Users should always add a physical disk that is larger than the original disk.
Registering spare disk
Note
The hot spare function cannot be used for the system disk in this version.
Figure 6.6 Spare Disk Selection
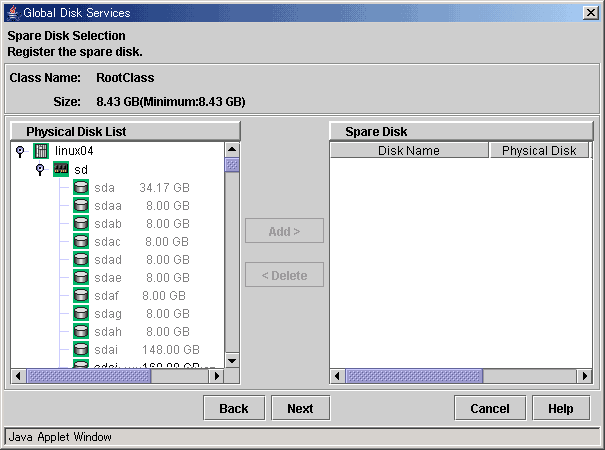
To register a spare disk, select the physical disk you want to set as a spare disk from the [Physical Disk List], and click <Add>.
Existing spare disks in the root class cannot be removed from the [Spare Disk] field.
After finishing the registration, click <Next>.
When you do not need to register a spare disk, no setting is necessary. Just click <Next>.
Point
Spare Disk Size
The hot spare function will not operate when there is not sufficient space on a spare disk to copy the configuration of volume in mirror group. Define the largest disk within the class as the spare disk.
Confirming system disk configuration
Figure 6.7 System Disk Configuration Confirmation
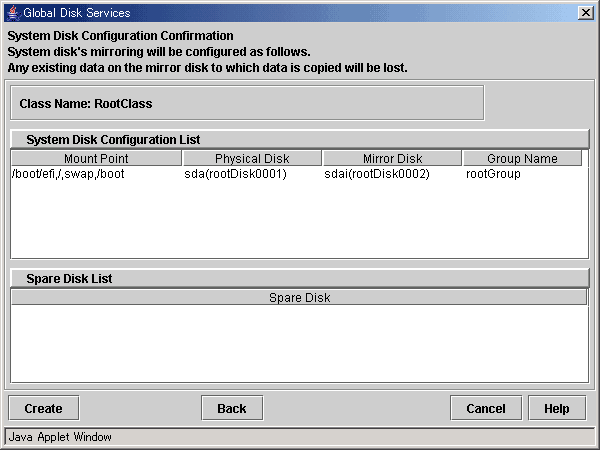
Confirm the system disk configuration.
In the [Physical Disk] field, the original disk will be displayed, and in the [Mirror Disk] field, the mirror disk will be displayed.
When mount information of a slice contained in physical disk is set for /etc/fstab, mount point will be displayed in the [Mount Point] field.
Click <Create> to continue. It may take a few minutes for processing.
Note
If the grub2-efi-x64-modules package of OS is not installed, the following error message will be displayed and the system disk settings may fail.
5000
Command line output: SDX:sdxroot:ERROR: internal error, sdxfunc=update_initrd_grub
At this time, the following message is output to the log information of the console and main screen.
node_name: ERROR: update_initrd_grub: internal error: cmd = '/etc/opt/FJSVsdx/bin/sdxmkinitrd -c RootClass' status = 1
node_name: ERROR: internal error, sdxfunc=update_initrd_grub
In this situation, install the grub2-efi-x64-modules package from the OS CD-ROM (DVD), and then re-execute the system disk settings.
Information
Automatically Generated Volume Names
The following volume names are automatically generated when setting the system disk.
When mount information is set for /etc/fstab, the name will be mount point + "Volume." (e.g. usrVolume) However, root partition will be rootVolume.
When mount information is not set for /etc/fstab, the name will be "Volume" + number. (e.g. Volume0001)
Completing system disk configuration
Figure 6.8 Setting System Disk Mirroring Complete

*The file path displayed in the message varies depending on the version of OS.
Confirm that the system disk configuration is complete, and click <OK>.
Figure 6.9 System Reboot Message

These system disk settings will be in effect after the system is rebooted. Click <OK> and reboot the system immediately.
Note
Rebooting the System after System Disk Settings are Completed
After the system disk settings are completed, if you change the system volume names before rebooting the system, the system may not be started. After the system disk settings are completed, reboot the system immediately without performing GDS setup, and so on.
Note
JRM and System Disk Settings
JRM (Just Resynchronization Mechanism) for a volume created by system disk settings will be set as "Yes."
To disable the JRM feature, select the volume in the Main screen and change the attribute by clicking [Change Attributes] in the [Operation] menu.
Assuming the disk on which / (root), /usr, /var, /boot, and /boot/efi are installed and the disk allocated as a swap area are different, examples of the procedures for system disk mirroring and system disk mirroring cancellation are given below.
Note
In this version, to mirror / (root), /usr, /var, /boot, /boot/efi, or swap areas, these areas should be located in the same disk.
In this version, set the system disk mirroring from the GDS Management View, not by using the command. For details, see "6.5.2.1 Setting with GDS Management View."
Stop the running application programs.
In order to ensure mirroring definition, all the running application programs must be stopped. For the mirroring definition to be in effect, the system must be rebooted after going through this procedure.
When higher safety is required, create system disk backups.
Register the system disks with the root class.
In this example, the installation disk of / (root), /usr, /var, /boot, and /boot/efi is "sda", and the disk allocated as a swap area is "sdb."
# sdxdisk -M -c System -a type=root -d sda=Root1:keep, |
Connect the system disks to a group.
# sdxdisk -C -c System -g Group1 -d Root1,Root2 -v 1=root:on,2=usr:on,3=var:on,4=home:on,5=boot:on,6=efi:on # sdxdisk -C -c System -g Group2 -d Swap1,Swap2 -v 1=swap:on |
Information
When System Disks Have Unopen Physical Slices
After returning from the sdxdisk -C command, volumes created for unopen physical slices are started, and synchronization copying is performed. In this event, cancel the synchronization copying using the sdxcopy -C command, or after the synchronization copying is completed move to step 4. Physical slices on which file systems are mounted and those accessed as raw devices are considered to be open. Physical slices not displayed with the mount(8) command may not be open.
Check that mirroring definition is completed.
# sdxroot -M -c System -d Root1,Swap1 |
Reboot the system.
# shutdown -r now |
Check that mirroring is in effect.
Using the mount command and the sdxinfo command, make sure that the system disks have been mirrored properly.