To start or change the operation of the Storage Cluster function, perform the following steps.
When performing the procedure from a new volume creation for both the Primary Storage and the Secondary Storage
Point
Steps 1 and 2 can easily be performed through Web Console.
When performing procedures other than those listed above
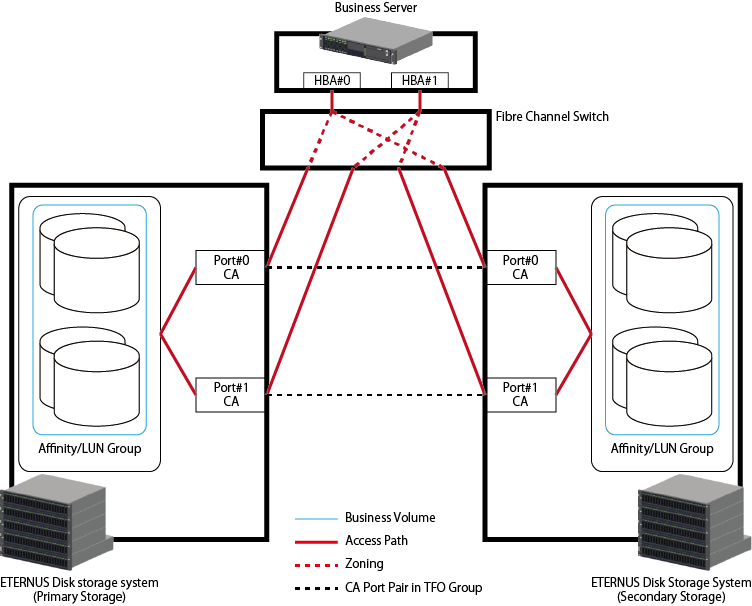
For FC configurations, the example of structure regarding allocation of business volumes is shown in "Figure 9.15 Storage Cluster Function: Structure Example of Allocating Business Volume (for FC Configurations)".
For iSCSI configurations, the FC switch in the following figure serves as a network switch and no zoning setting exists.
Figure 9.15 Storage Cluster Function: Structure Example of Allocating Business Volume (for FC Configurations)
Preparing Business Volume
Prepare volumes to be switched in the Storage Cluster function on Primary and Secondary ETERNUS Disk storage systems respectively. The volumes to be switched by Storage Cluster must meet all of the following requirements.
There should be volumes of the same size in respective Primary and Secondary ETERNUS Disk storage systems.
They are not the volumes used for the Non-disruptive Storage Migration.
The External LU Information of those volumes is not "Inherited".
"Veeam" is not displayed in the Usage column in the screen of Web Console for the volumes.
Volume type is any of "Standard", "WSV", "TPV" or "FTV".
And the volume type of corresponding volumes on the Primary Storage and the Secondary Storage should be the same.
"SDV" and "SDPV" are not supported.
For "FTV", synchronizing the access status data can inherit the performance information and the relocation status of Automated Storage Tiering even after failover/failback. Refer to "Access Status Data Synchronization" in the Storage Cruiser Operation Guide for Optimization Function for the method to synchronize access status data.
Advanced Copy should not be in operation.
The total capacity of business volumes per storage device should not exceed the total capacity of TFOVs.
Note
The volume that belongs to the pair of CA ports cannot be shared from the unused port by the Storage Cluster function.
Point
If the type of volume using Storage Cluster is "Standard", "TPV", or "FTV", the volume capacity can be expanded. Refer to "9.4.2.4 Expanding Business Volume Capacity" for information on how to expand the volume capacity.
If the volume type is "WSV", the volume capacity cannot be expanded.
If the total capacity of business volumes exceeds the total capacity of TFOVs per storage device, expand the total capacity of TFOVs. Refer to "Expanding Total Capacity of TFOVs" for the procedure to expand the total capacity of TFOVs.
If there is no space in RAID group, Thin Provisioning pool or Tier pool, refer to "Operations for RAID Group", "Operations for Thin Provisioning" or "Operations for Automated Storage Tiering" in the Web Console Guide to secure areas.
When starting from a new volume creation for both the Primary Storage and the Secondary Storage, a volume that satisfies the conditions described in "Required Conditions for the Switchover Target Volume" can be created easily with Web Console.
The operation procedure using Web Console is shown below.
Click Storage on the global navigation tab.
Registered ETERNUS Disk storage systems are displayed on the Main pane.
On the Main pane, click the Name of a target ETERNUS Disk storage system that is specified as the Primary Storage.
On the Category pane, click Storage Cluster.
Created TFO groups are displayed on the Main pane.
Create a volume.
When creating a volume with a volume type of "Standard" or "TPV"
On the Action pane, click Create Volume under Allocating Business Volume.
From the TFO Group drop-down list, select the TFO group to be used by the Storage Cluster function.
On the left side of the screen, the information input screen of the volume to be created in the Primary Storage is displayed.
On the right side of the screen, the information input screen of the volume to be created in the Secondary Storage is displayed.
Enter the required information for the Primary Storage portion on the left side of the screen.
Make sure that the Create the same Volume as the Primary Storage checkbox in the Secondary Storage portion on the right side of the screen is checked.
Point
If the Create the same Volume as the Primary Storage checkbox is checked, the following items can be omitted since they will have the same setting value as the Primary Storage.
- Name
- Capacity
- Type
- Encryption
- Deduplication
- Compression
- Deduplication/Compression
- Allocation
Note that a value must be entered for "Number of Volumes" regardless of the checkbox selection state.
Enter the required information for the Secondary Storage portion on the right side of the screen.
Click Next.
The information confirmation screen is displayed.
Confirm the information, and then click Create.
When creating a volume with a volume type of "FTV"
On the Action pane, click Create FTV under Allocating Business Volume.
From the TFO Group drop-down list, select the TFO group to be used by the Storage Cluster function.
On the left side of the screen, the information input screen of the volume to be created in the Primary Storage is displayed.
On the right side of the screen, the information input screen of the volume to be created in the Secondary Storage is displayed.
Enter the required information for the Primary Storage portion on the left side of the screen.
Make sure that the Create the same Volume as the Primary Storage checkbox in the Secondary Storage portion on the right side of the screen is checked.
Point
If the Create the same Volume as the Primary Storage checkbox is checked, the following items can be omitted since they will have the same setting value as the Primary Storage.
- FTV Name
- Total Capacity
- Number of Volumes
- Allocation
- Caution Threshold of FTV
- Automated QoS Enable/Disable
- Automated QoS:Priority
- Target Response Time
Note that a value must be entered for the following items regardless of the checkbox selection state.
- Tier Pool Name
- Priority FTSP
- Low Quota Share
- Middle Quota Share
- High Quota Share
- Tune by Quota Share
Enter the required information for the Secondary Storage portion on the right side of the screen.
Click Next.
The information confirmation screen is displayed.
Confirm the information, and then click Create.
For the information how to create a new volume in cases other than those listed above, refer to "Create Volume" or "Create FTV" in the Web Console Guide to create a new volume.
When using the volumes already allocated to servers for the Storage Cluster function, create volumes in an ETERNUS Disk storage system as the Secondary Storage so that the conditions described in "Required Conditions for the Switchover Target Volume" are satisfied.
In addition, if Advanced Copy is in operation, stop it.
See
To stop Advanced Copy, refer to either of the following sites in accordance with the function in use:
When the Copy Control Module function of AdvancedCopy Manager is in use:
Refer to "Operations Started from Storage Tab" in the Web Console Guide.
When the backup operation or replication operation of AdvancedCopy Manager is in use:
Refer to "Operations Started from Server Tab" - "Operations for Advanced Copy" in the Web Console Guide.
When the operations up to this point are completed, proceed to the following sections:
When performing the procedure from a new volume creation for both the Primary Storage and the Secondary Storage
When performing procedures other than those listed above
Configuring Access Path (When Performing the Procedure from a New Volume Creation with the Primary/Secondary Storage)
Connect the volumes to be switched by Storage Cluster function to servers.
The following operations are required to configure access paths:
Adding a host
Creating Affinity / LUN group
Configuring Host Affinity (Associate server HBA, port on disk storage system, and Affinity/LUN group)
Point
The host affinity which Affinity/LUN groups that have 513 or more volumes is associated can be set in a BS2000 environment.
Configure access path in the following steps:
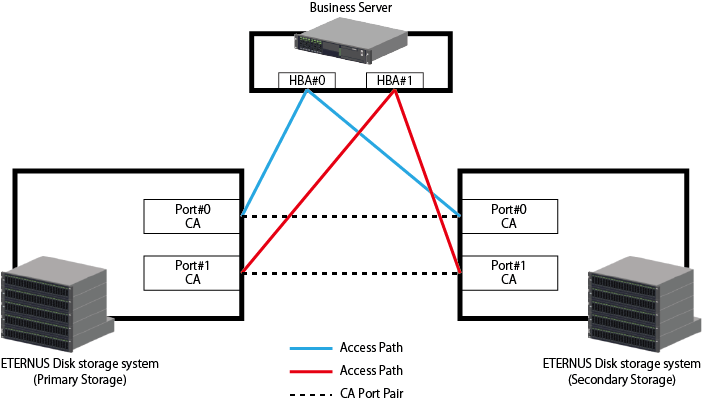
About selection of server HBA and port on ETERNUS Disk storage system
Associate the two ports specified as a pair in TFO groups with the same HBA.
For example, if HBA and ports are selected as shown in "Figure 9.16 Storage Cluster Function: Example of Correct Access Path Configuration", the Storage Cluster function is available.
Figure 9.16 Storage Cluster Function: Example of Correct Access Path Configuration
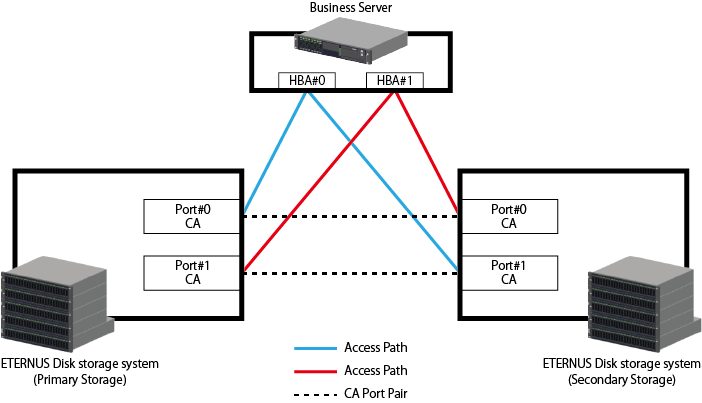
If HBA and ports are selected as shown in "Figure 9.17 Storage Cluster Function: Example of Incorrect Access Path Configuration", the Storage Cluster function is not available.
Figure 9.17 Storage Cluster Function: Example of Incorrect Access Path Configuration
The procedure for adding a host in Web Console is shown below.
Point
By following this procedure, the Primary Storage port and Secondary Storage port that are specified for the port pair can be associated to the same HBA without being aware of the WWPN/iSCSI name.
Click Storage on the global navigation tab.
Registered ETERNUS Disk storage systems are displayed on the Main pane.
On the Main pane, click the Name of a target ETERNUS Disk storage system that is specified as the Primary Storage.
On the Category pane, click Storage Cluster.
Created TFO groups are displayed on the Main pane.
Add a host.
When adding an FC host
On the Action pane, click Add FC Host under Allocating Business Volume.
The information input screen is displayed.
From the TFO Group drop-down list, select the TFO group to be used by the Storage Cluster function.
From the Port drop-down list on the left side of the screen, a Primary side port in the TFO group can be selected.
From the Port drop-down list, select a Primary side port that is assigned to the host.
The two ports (Primary Storage port and Secondary Storage port) that are specified for the pair in the TFO group are displayed.
In the host list, only the hosts that are connected to the Primary Storage port are displayed. Check the WWPN and select the host that is assigned to the port.
Enter the necessary information, and then click Next.
Confirm the information, and then click Add.
When adding an iSCSI host
On the Action pane, click Add iSCSI Host under Allocating Business Volume.
The information input screen is displayed.
From the TFO Group drop-down list, select the TFO group to be used by the Storage Cluster function.
From the Port drop-down list on the left side of the screen, a Primary side port in the TFO group can be selected.
From the Port drop-down list, select a Primary side port that is assigned to the host.
The two ports (Primary Storage port and Secondary Storage port) that are specified for the pair in the TFO group are displayed.
In the host list, only the hosts that are connected to the Primary Storage port are displayed. Check the iSCSI name and select the host that is assigned to the port.
Enter the necessary information, and then click Next.
Confirm the information, and then click Add.
The procedure for creating an Affinity/LUN Group in Web Console is shown below.
Point
By following this procedure, the required conditions for the Storage Cluster switchover volume of the Primary/Secondary Storage in the Affinity/LUN Group can be satisfied. For the required conditions, refer to "Required Conditions for the Switchover Target Volume".
Note
When setting the Primary/Secondary Storage LUN mapping, set the same number for the host LUN. Of the volumes for which host affinity is set for the two ports of CA port pair, volumes for which host LUN No.(HLU) and volume capacity match are the target for synchronization.
Click Storage on the global navigation tab.
Registered ETERNUS Disk storage systems are displayed on the Main pane.
On the Main pane, click the Name of a target ETERNUS Disk storage system that is specified as the Primary Storage.
On the Category pane, click Storage Cluster.
Created TFO groups are displayed on the Main pane.
On the Action pane, click Create Affinity /LUN Group under Allocating Business Volume.
The information input screen is displayed.
From the TFO Group drop-down list, select the TFO group to be used by the Storage Cluster function.
On the left side of the screen, the information input screen for the Affinity/LUN Group that is created in the Primary Storage specified for the selected TFO group is displayed.
On the right side of the screen, the information input screen for the Affinity/LUN Group that is created in the Secondary Storage specified for the selected TFO group is displayed.
Input the Affinity/LUN group name in the Name field.
Input the host LUN starting number in the Start Host LUN Number field.
Select the volume assigned to the Affinity/LUN Group and click Add.
In the assigned volume list, make sure the selected volume is displayed.
Make sure that the Create the same Affinity/LUN Group as the Primary Storage checkbox in the Secondary Storage portion on the right side of the screen is checked.
Click Next.
The information confirmation screen is displayed.
Confirm the information, and then click Create.
The procedure for setting the host affinity in Web Console is shown below.
Point
By following this procedure, the host affinity between each port of the selected port pair and the selected host can be set.
Click Storage on the global navigation tab.
Registered ETERNUS Disk storage systems are displayed on the Main pane.
On the Main pane, click the Name of a target ETERNUS Disk storage system that is specified as the Primary Storage.
On the Category pane, click Storage Cluster.
Created TFO groups are displayed on the Main pane.
On the Action pane, click Create Host Affinity under Allocating Business Volume.
The information input screen is displayed.
From the TFO Group drop-down list, select the TFO group to be used by the Storage Cluster function.
On the left side of the screen, the information input screen for the host affinity that is created in the Primary Storage specified for the selected TFO group is displayed.
On the right side of the screen, the information input screen for the host affinity that is created in the Secondary Storage specified for the selected TFO group is displayed.
For the Primary Storage and the Secondary Storage, select a host to be set in the host affinity.
Select a TFO group port pair to be set in the host affinity.
For the Primary Storage and the Secondary Storage, select an Affinity/LUN Group to be set in the host affinity from the Affinity/LUN Group drop-down list.
Click Create.
When the operations up to this point are completed, proceed to "Confirming Configuration".
Configuring Access Path (When Allocating Volumes to Each Storage or When Adding the Secondary Storage Where Only the Primary Storage Is Used)
When starting from a new volume creation for both the Primary Storage and the Secondary Storage, refer to "Configuring Access Path (When Performing the Procedure from a New Volume Creation with the Primary/Secondary Storage)" for information on how to configure the access path.
When performing procedures other than those listed above, connect the volumes to be switched with the Storage Cluster function to the servers by performing the operations in this section on the Primary and Secondary ETERNUS Disk storage systems. However, if the configuration is already completed for the Primary Storage, perform the operations only for the Secondary Storage.
The following operations are required to configure access paths in the Storage Cluster structure:
Creating Affinity / LUN group
Configuring Host Affinity (Associate server HBA, port on disk storage system, and Affinity/LUN group)
Configuring FC switch zoning (for FC configurations only)
Configuring TFO port pair
It is recommended to use the volume allocation function to configure access paths that can perform the above operations all at one time and configure multiple access paths between a certain server and a certain ETERNUS Disk storage system at the same time.
If you configure access paths to the Primary Storage and the Secondary Storage with Web Console or the storageadm zone command, after the access path setting for the Secondary Storage is executed, the TFO port pair is configured and a volume synchronization with the Storage Cluster function is started.
Note
With the volume allocation function, multiple access paths cannot be set to the same ETERNUS Disk storage system from one HBA. When setting multiple access paths, add the access paths one by one using the procedure for adding access paths.
Point
The host affinity which Affinity/LUN groups that have 513 or more volumes is associated can be set in a BS2000 environment.
See
Refer to "Assign ETERNUS Disk Storage System Volumes to Server" in the Web Console Guide for the procedure for allocating volumes.
Refer to "Add Access Path to ETERNUS Disk Storage System" in the Web Console Guide for the procedure for adding access paths.
Configure access path in the following steps:
About selection of server HBA and port on ETERNUS Disk storage system
Associate the two ports specified as a pair in TFO groups with the same HBA.
For example, if HBA and ports are selected as shown in "Figure 9.16 Storage Cluster Function: Example of Correct Access Path Configuration", the Storage Cluster function is available.
If HBA and ports are selected as shown in "Figure 9.17 Storage Cluster Function: Example of Incorrect Access Path Configuration", the Storage Cluster function is not available.
About creation of Affinity/LUN group
The volumes enabled with the Storage Cluster function must be defined to Affinity/LUN group based on the following rules:
The Primary/Secondary Storage hosts LUN No.(HLU) are the same.
The volume capacities for the Primary/Secondary Storage are the same.
The volume type is either "Standard", "WSV", "TPV" or "FTV". And the volume type for corresponding volumes on the Primary Storage and the Secondary Storage is the same.
About the host affinity setting when Veeam Storage Integration is used
For the LUN group that is to be the target of the Storage Cluster function, use a LUN group that has a hyphen (-) as the value in the Veeam Storage Integration column.
Note
If access path configuration does not meet the requirements, error occurs on the device side and the operation log is displayed. Refer to the Messages for corrective actions.
When setting the Primary/Secondary Storage LUN mapping, set the same number for the host LUN. Of the volumes for which host affinity is set for the two ports of CA port pair, volumes for which host LUN No.(HLU) and volume capacity match are the target for synchronization.
When the operations up to this point are completed, proceed to "Confirming Configuration" below.
Confirming Configuration
Confirm that the Storage Cluster function is configured correctly.
Confirm the access paths to the pair port in the TFO groups
Confirm that each of the two ports paired across the TFO groups (one port in the Primary Storage and the other in the Secondary Storage) has an access path to the same HBA in the business server.
Confirm the target volumes for the Storage Cluster function
When access paths are configured to Primary and Secondary ETERNUS Disk storage systems, the volumes start to be synchronized by the Storage Cluster function.
Take the following steps with Web Console to check whether specified volumes are properly configured as volumes enabled with the Storage Cluster function:
Click Storage on the global navigation tab.
Registered ETERNUS Disk storage systems are displayed on the Main pane.
On the Main pane, click the Name of a target ETERNUS Disk storage system.
On the Category pane, click Volume.
Created volumes are displayed on the Main pane. If a string of "/TFOV" is included in the value displayed in the Usage column, the volume is properly configured as a volume enabled with the Storage Cluster function.
It takes a certain period of time for access paths to be configured and volumes to be synchronized so that failover is enabled. Check the progress rate of the synchronization processing from the TFO group details screen. To see whether synchronization is complete and failover is executable, continue to perform Step 4.
On the Category pane, click Storage Cluster.
Created TFO groups are displayed on the Main pane.
Check the value in the Phase column of the TFO group:
"Normal"
Volume synchronization within the TFO group is all complete, and it is in a state that Failover is made possible.
When using Automatic Failover, check that Failover Mode of TFO group is to be "Auto" and Status of TFO group is to be "Normal".
"Copying"
Volume has been synchronizing from the Primary Storage to the Secondary Storage. Wait until synchronization is completed.
In cases other than those listed above
Refer to "9.4.2.9 Confirming the Status on the Storage Cluster Overview Screen".
Point
When all the following requirements are met, the access state data between the Primary/Secondary Storage can be synchronized.
It is configured that the synchronization of the volume by the Storage Cluster function can begin between FTV.
Automated Storage Tiering control function on ETERNUS Disk storage system is used.
Refer to "Access Status Data Synchronization" in the Storage Cruiser Operation Guide for Optimization Function for the synchronization procedure of the access state data.
Note
In host affinity groups under a pair of CA ports, the volumes that have the same HLU number and capacity can be a synchronized pair. Match those volumes with the same HLU number and capacity.
In volume synchronization, an initial copy is done between paired volumes. The time required for initial copy is affected by line speed of transfer, quality, data compression ratio (depending on data contents), being greatly varied.
An indication of time required is as follows:
Requirements for Initial Copy | Time needed |
|---|---|
FC-RA port and IP network: one line (1 Gbit/sec) connection, Typical throughput of FC switch: 114 MB/sec (=114,000,000 byte/sec) (data compression ratio 50%, no delay) | 1.5 hrs |
FC-RA port and IP network: one line (100 Mbit/sec) connection, Typical throughput of FC switch: 12 MB/sec(12,000,000 byte/sec) (data compression ratio 50%, no delay) | 13 hrs |
iSCSI-RA port and IP network: one line (1 Gbit/sec) connection, Typical throughput of iSCSI-RA port: 26 MB/sec (no data compression, 30 msec delayed) | 12 hrs |
Figure 9.18 Storage Cluster Function: Example of Synchronized Volumes
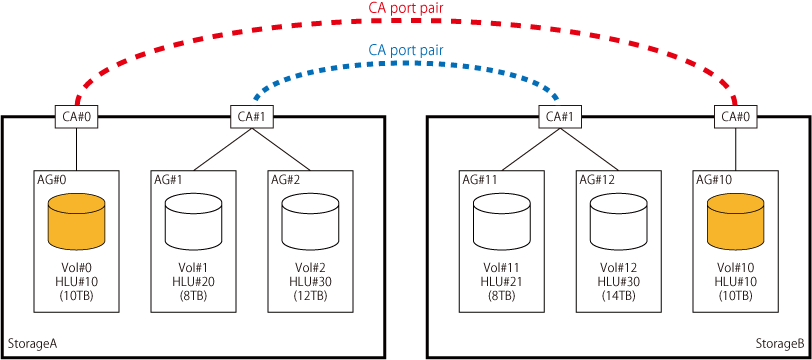
The above figure represents the following matters:
A pair of Vol#0 of Storage A and Vol#10 of Storage B is the same in HLU number and size, so that they are synchronized (failover enabled) volumes.
A pair of Vol#1 of Storage A and Vol#11 of Storage B is different in HLU number, so that they cannot be synchronized.
A pair of Vol#2 of Storage A and Vol#12 of Storage B is different in size, so that they cannot be synchronized.
Trying to make a pair of CA ports correlated to the volumes that are the same in HLU number but different in size terminates the processing abnormally.
Refer to "9.4.2.9 Confirming the Status on the Storage Cluster Overview Screen" for the status of TFO group.
When the operations up to this point are completed, proceed to "Recognition of iSCSI IP Address to Business Server due to Manual Failover and Manual Failback" below.
Recognition of iSCSI IP Address to Business Server due to Manual Failover and Manual Failback
Use this procedure for iSCSI configurations and when using Storage Cluster with a different iSCSI IP address.
The following procedure describes how to recognize the iSCSI IP address of the Secondary Storage in the business server.
Recognize the iSCSI IP address of the Primary Storage in the business server.
If the business server has already recognized it, this procedure is not required.
Click Storage on the global navigation tab.
Registered ETERNUS Disk storage systems are displayed on the Main pane.
On the Main pane, click the Name of a target ETERNUS Disk storage system.
On the Category pane, click Storage Cluster.
Created TFO groups are displayed on the Main pane.
On the Main pane, select a TFO group created with a different iSCSI IP address. After it, click Failover on the Action pane.
The warning dialog box is displayed.
Click OK.
Recognize the iSCSI IP address of the Secondary Storage in the business server.
On the Main pane, select a TFO group created with a different iSCSI IP address. After it, click Failback on the Action pane.
The warning dialog box is displayed.
Click OK.
The TFO group status is automatically updated.
Perform the following procedure when you need to update it to its most recent state right away.
Click Storage on the global navigation tab.
Registered ETERNUS Disk storage systems are displayed on the Main pane.
On the Main pane, click the Name of a target ETERNUS Disk storage system.
On the Category pane, click Storage Cluster.
Created TFO groups are displayed on the Main pane.
On the Action pane, click Update under TFO Group Status.
A dialog box is displayed. Click Done.
When this operation is performed, the TFO status of the other device paired with the selected device is also updated.
Note
If communication is disabled between paired devices, the operation terminates abnormally with error status. Even in this case, the TFO status of the selected device is updated.
See
Refer to "9.4.2.9 Confirming the Status on the Storage Cluster Overview Screen" for details of the TFO group status and its meaning.
To change a volume enabled with the Storage Cluster function, delete that volume, add a new volume, or do both by performing the following procedure.
Confirm that the volume is in a state in which an addition/deletion operation can be performed.
When adding a volume
For the TFO group where the volume is to be added, confirm that the TFO status of the Primary Storage is "Active" and the TFO status of the Secondary Storage is "Standby".
When deleting a volume
To continue using a volume that is not enabled with the Storage Cluster function and without using the Storage Cluster function, make sure all the following conditions are satisfied.
The TFO group phase is "Normal".
In the session information of the TFO pair related to the volume, the session status is "Active" and the session phase is "Equivalent".
See
For details of the TFO group status, refer to "9.4.2.9 Confirming the Status on the Storage Cluster Overview Screen" and for details of the TFO pair session information, refer to "9.4.2.10 Confirming the Status on the TFO Group Details Screen".
Change Affinity/LUN groups for Primary and Secondary ETERNUS Disk storage systems.
The procedure to see which Affinity/LUN group to change is as follows:
Click Storage on the global navigation tab.
Registered ETERNUS Disk storage systems are displayed on the Main pane.
On the Main pane, click the Name of a target ETERNUS Disk storage system.
On the Category pane, click Connectivity.
The items on the Category pane switch to those associated with Connectivity.
On the Category pane, click Host Affinity.
A list of host affinities is displayed on the Main pane.
Check in the Port column, host affinity including ports specified as pairs in TFO groups. The Affinity/LUN group configured to the host affinity must be changed.
See
Refer to "Change Affinity/LUN Group Settings" in the Web Console Guide for the procedure to change Affinity/LUN group.
If a volume of the Secondary Storage that is not enabled with the Storage Cluster function is continued to be used without using the Storage Cluster function, use ETERNUS CLI to revert the information of that volume to the state prior to the data synchronization.
Refer to the ETERNUS Disk storage system manuals for the command name and the format of ETERNUS CLI used.
Note
If this procedure is not performed, the volume information of the Secondary Storage may conflict with the volume information of the Primary Storage and data corruption may occur.
After changing a volume enabled with the Storage Cluster function, it takes a certain period of time for volumes to be synchronized and for failover to be enabled.
Refer to "Confirming Configuration" in "9.4.2.1 Allocating Business Volume" for the procedure to see if the volume synchronization is completed and failover can be executed.
Note
There is an upper limit to the number of volumes that can be defined to one Affinity/LUN group. Refer to the manual for the ETERNUS Disk storage system in use for the upper limit.
The format of a volume enabled with the Storage Cluster function is not supported.
The following volumes cannot be added:
The volume type is "SDV" or "SDPV".
Volumes that are used for the Non-disruptive Storage Migration.
Volumes whose External LU Information is "Inherited".
Volumes in which the Usage column in the screen of Web Console is "Veeam"
Volumes for which Advanced Copy is running.
To expand the capacity of volumes enabled with the Storage Cluster function, all the following conditions must be satisfied:
The target volumes for the capacity expansion are in pairs.
The session status of the TFO pair is "Active".
See
For details of the TFO pair session information, refer to "9.4.2.10.2 Session Information of TFO Pairs".
Point
If the session status of the TFO pair is not "Active", the following causes are possible:
Temporary session abortion caused by a failover or a failback
REC path close
Occurrence of a RAID failure, a RAID close, or a bad sector
Check the status of the ETERNUS Disk storage system, and then perform the steps in "9.4.3 Maintenance" as required.
Only one volume pair can be specified for a single capacity expansion operation.
To provide against the unexpected, it is recommended that you expand the volume capacity after backing up the data of the target volumes.
Note that when expanding the capacity, a synchronization between paired volumes is temporarily desynchronized until the capacity expansion is completed. Upon completion of the capacity expansion, a synchronization between the paired volumes is performed with the initial copy. Refer to "Table 9.6 Time Required for Initial Copy (Standard Value of 1 TB Physical Capacity Volume)" for the time required for an initial copy.
After the capacities of the business volumes have been expanded, you must recognize the expanded volume capacities to the business server.
If the volume type is "Standard", expand the capacity of the business volumes with LUN Concatenation. A volume capacity expansion using LUN Concatenation can realize the following:
Expanding the business volume capacity using free space in existing RAID groups
Concatenating free space of at least 1 GB
Creating business volumes of up to 128 TB
Concatenating across multiple RAID groups
All RAID levels are available for volumes concatenated to a concatenation source volume
(Even if the RAID level of the volume differs from the concatenation source volume, they can be concatenated.)
Concatenating up to 16 volumes to a concatenation source business volume
Note
To expand the capacity of a business volume whose volume type is "Standard", all the following conditions must be satisfied:
Conditions for specifiable business volumes
Current volume capacity is 1 GB or more.
The capacity of the concatenated volumes is less than 128 TB.
The number of concatenated volumes is less than 16.
The volume status is neither "Broken" nor "Data Lost" nor "Not Ready" nor "Readying".
RAID migration is not running.
No Advanced Copy session exists in which "Totally" is specified for the copy range.
The following are the cases where "Totally" is specified for the copy range:
- LUN to LUN copy of AdvancedCopy Manager CCM
- Copy using ETERNUS SF AdvancedCopy Manager SRA
- Copy using ETERNUS VSS Hardware Provider
- SnapOPC+ that is set from ETERNUS Web GUI or ETERNUS CLI
Conditions for specifiable RAID groups
The number of concatenated volumes after an expansion is 16 or less.
The status of a RAID group is not "Broken".
Standard, WSV, SDP, or SDPV is registered in the RAID group or there are no volumes registered in the RAID group.
The RAID group does not belong to a Thin Provisioning Pool or a Flexible Tier Pool.
The RAID group is not registered as an Extreme Cache Pool.
The number of volumes that are registered in the RAID group is less than 128.
There is a free space of 1 GB or more in the RAID group.
The type of drive that constitutes the RAID groups to which the source volume belongs and the type of drive that constitutes the destination RAID groups are the same.
A RAID close does not occur in the RAID group.
To expand the capacity of a business volume whose volume type is "TPV" or "FTV", all the following conditions must be satisfied:
Current capacity is less than 128 TB.
If the target volume is TPV, a Thin Provisioning Volume balancing is not running.
If the target volume is FTV, a Tier pool balancing is not running.
RAID migration is not running.
The total capacity of all TPVs and all FTVs in the storage device does not exceed the maximum pool capacity of the storage device.
The total capacity of all TPVs and FTVs that can be created in a storage device depends on the maximum pool capacity of the storage device. Refer to the ETERNUS Disk storage system manuals for the maximum pool capacity that can be created.
No Advanced Copy session exists in which "Totally" is specified for the copy range.
The following are the cases where "Totally" is specified for the copy range:
- LUN to LUN copy of AdvancedCopy Manager CCM
- Copy using ETERNUS SF AdvancedCopy Manager SRA
- Copy using ETERNUS VSS Hardware Provider
- SnapOPC+ that is set from ETERNUS Web GUI or ETERNUS CLI
If you perform a capacity expansion for the business volumes of either the Primary Storage or the Secondary Storage, the business volume capacity is expanded for both the Primary Storage and the Secondary Storage.
The procedure to expand the capacity of a business volume with Web Console is as follows:
Click Storage on the global navigation tab.
Registered ETERNUS Disk storage systems are displayed on the Main pane.
On the Main pane, click the Name of a target ETERNUS Disk storage system.
On the Category pane, click Storage Cluster.
Created TFO groups are displayed on the Main pane.
On the Main pane, click the Name of a target TFO group.
The TFO group details screen is displayed on the Main pane.
On the Main pane, click the Volume tab.
The information for a pair of local volume and remote volume is displayed.
After checking the target volume checkbox to be expanded the capacity, click Expand Capacity under TFOV on the Action pane.
The Expand TFOV wizard screen is displayed.
Perform the following procedures according to the volume type.
Enter the expanded capacity in the Post-Expansion Volume Capacity field in the Expand TFOV on Primary storage site page.
Point
The maximum number of characters that can be entered in the item field is 15 including a decimal point. If you select "MB" (megabytes) as the unit, the digits after the decimal point are rounded off. If you select "GB" (gigabytes) or "TB" (terabytes) as the unit, the digits after the decimal point of a value converted to megabytes are rounded off.
For the capacity, enter a value that is 2 GB or more, and less than the free space of the RAID group.
Also, the maximum volume size of 128 TB must not be exceeded.
Entering the same capacity as Maximum Free Space of the RAID group with the same format (same number of digits in gigabytes or terabytes) adds the corrected capacity so that all the free space in the RAID group is used. If you want to add the entered capacity without making a correction, enter it in megabytes.
Select a RAID group for which to secure capacity from a list of RAID groups in the Primary Storage.
Click Next.
The Expand TFOV on Secondary storage site page is displayed.
Select a RAID group for which to secure capacity from a list of RAID groups in the Secondary Storage.
Click Next.
The Confirm page is displayed.
After checking that the setting is correct, click Expand.
Enter the expanded capacity in the Post-Expansion Volume Capacity field in the Expand TFOV (TPV/FTV) page.
Point
The maximum number of characters that can be entered in the item field is 15 including a decimal point. If you select "MB" (megabytes) as the unit, the digits after the decimal point are rounded off. If you select "GB" (gigabytes) or "TB" (terabytes) as the unit, the digits after the decimal point of a value converted to megabytes are rounded off.
For the capacity, enter a value between 25 MB and 128 TB.
After checking that the setting is correct, click Expand.
The total capacity of TFOVs can be changed. Refer to "Expanding Total Capacity of TFOVs" for the procedure to change the total capacity of TFOVs.
Point
If any paired TFO group exists, the total capacity of TFOVs cannot be reduced. If you reduce the total capacity of TFOVs, perform the following actions:
Perform the procedure in "9.4.3.8 Releasing TFO Pair" to release all TFO pairs.
Perform the procedure in "9.4.2.3 Adding and Deleting Business Volume" to delete unnecessary business volumes. Set the total capacity of all TFOVs to a value below the total capacity of TFOVs to be set in Step 3.
Change the total capacity of TFOVs.
If you continue to use Storage Cluster, perform the procedure in "9.4.3.9 Recovering TFO Pair" to recover all the TFO pairs that were released in Step 1.
If Storage Cluster Controller is placed and Automated Failover is set when configuring TFO groups, any failure in ETERNUS Disk storage systems are detected and failover is automatically performed. In the case the Storage Cluster Controller is not placed or switchover is needed right now for switching test, failover can be done manually. When performing Failover manually, Normal mode and Forced mode can be selected. Refer to "9.4.2.7 Force-Failover" for Forced mode.
When setting automatic Failback with a TFO group setting, after the Primary Storage ETERNUS Disk storage system has recovered, failback is performed automatically after detecting that it has moved into a state where failback is possible. When it is recovered from RAID failure and you wish to switchover at an arbitrary time, it is possible to perform manual failback.
Point
When performing a manual failover/failback, make sure that the operation can be performed and the data integrity is consistent by checking the status of the TFO group to switch and the session information of the TFO pair.
For details of the TFO group status, refer to "9.4.2.9 Confirming the Status on the Storage Cluster Overview Screen" and for details of the TFO pair session information, refer to "9.4.2.10 Confirming the Status on the TFO Group Details Screen".
Note
If a manual failover/failback is performed when the TFO group phase is not normal or when the session status of the TFO pair is not normal, the integrity of the data may become inconsistent.
In an environment that uses the following storage devices, a failover/failback cannot be performed when the TFO group phase is "Maintenance". If an attempt is made, it results in an error.
ETERNUS DX S5 series, ETERNUS DX8900 S4, or ETERNUS AF S3 series that has firmware version V11L40-5000 or later
ETERNUS DX S4/S3 series (excluding the ETERNUS DX8900 S4), ETERNUS AF S2 series, AF series, or ETERNUS DX200F that has firmware version V10L90-1000 or later
The following is the procedure to perform a manual failover/failback. Failover/failback can be performed from either Primary/Secondary Storage.
Click Storage on the global navigation tab.
Registered ETERNUS Disk storage systems are displayed on the Main pane.
On the Main pane, click the Name of a target ETERNUS Disk storage system.
On the Category pane, click Storage Cluster.
Created TFO groups are displayed on the Main pane.
After confirming the status of the TFO group and the session information of the TFO pair, select a TFO group to enable failover or failback on the Main pane and click Failover or Failback on the Action pane.
A warning dialog box is displayed.
When enabling failover or failback, click OK.
Point
If the Primary ETERNUS Disk storage system is down or removed and communication is not enabled with that storage system, Manual Failover is not possible. Make sure that the Primary disk storage system is stopped to execute Force-Failover.
While a restore process from Veeam Storage Integration is running, a failover cannot be performed manually. After confirming that the restore process is completed, perform the failover manually.
Execute Force-Failover by performing the following procedure only when instructed by your maintenance engineer when the Primary ETERNUS Disk storage system is down or removed and becomes inaccessible from business servers:
Click Storage on the global navigation tab.
Registered ETERNUS Disk storage systems are displayed on the Main pane.
On the Main pane, click the Name of a target ETERNUS Disk storage system.
Select a Primary ETERNUS Disk storage system.
On the Category pane, click Storage Cluster.
Created TFO groups are displayed on the Main pane.
On the Main pane, select a TFO group for which you want to enable Force-Failover and click Force-Failover on the Action pane.
A warning dialog box is displayed.
When executing Force-Failover, click OK.
Note
If the ETERNUS Disk storage system as the Primary Storage is connected to business servers, do not execute this function.
If this function is executed, the Secondary ETERNUS Disk storage system is forced to be active. At this stage, if the Primary ETERNUS Disk storage system is connected to servers, both the Primary Storage and the Secondary Storage are caused to be active, possibly leading to data corruption due to access to both the Primary Storage and the Secondary Storage.
If a recovery can be performed with the procedure described in "9.4.3 Maintenance", do not execute this function.
Even if this function is executed, a normal mode failover may be executed depending on the state of the ETERNUS Disk storage system and the state of Primary Storage may become "Standby".
Follow the instructions of your maintenance engineer and perform a failover (Maintenance state only) or a failback (Maintenance state only) using the following procedure only if a manual failover/failback must be performed while the TFO group phase is "Maintenance".
Point
To perform the procedure in this section, the target storage device and the firmware version must satisfy the following conditions.
Storage Device | Firmware Version |
|---|---|
ETERNUS DX S5 series | V11L40-5000 or later |
ETERNUS DX S4/S3 series (excluding the ETERNUS DX8900 S4) | V10L90-1000 or later |
The procedure in this section can be performed for either the Primary Storage or the Secondary Storage.
Note
The procedure in this section has a risk of causing data corruption. Because of that, make sure to carefully follow the instructions of your maintenance engineer.
Click Storage on the global navigation tab.
Registered ETERNUS Disk storage systems are displayed on the Main pane.
On the Main pane, click the Name of a target ETERNUS Disk storage system.
On the Category pane, click Storage Cluster.
Created TFO groups are displayed on the Main pane.
On the Main pane, click the Name of a target TFO group for which you want to failover or failback.
Information of the selected TFO group is displayed on the Main pane.
On the Action pane, click Advanced Operations.
The Failover(Maintenance state only) and Failback(Maintenance state only) are displayed on the Action pane.
On the Action pane, click Failover(Maintenance state only) or Failback(Maintenance state only).
A warning dialog box is displayed. Check the contents displayed on the warning dialog box.
When enabling failover or failback, click OK.
The meaning and action plan of each status for TFO groups that are displayed on the Storage Cluster overview screen are as follows.
This displays the status of TFO group. The phase varies with the configuration of TFO groups, operation of failover/failback and state of volume synchronization.
Status | Meaning and Action Plan |
|---|---|
Initial | Indicates that TFO group is configured but no volume is allocated. |
Maintenance | Indicates that copy sessions between TFO port pairs and volumes are forcibly cleared. Perform the following actions:
If a failover/failback is performed when the TFO group phase is "Maintenance", note that the integrity of the data may become inconsistent. In an environment that uses the following storage devices, a failover/failback cannot be performed when the TFO group phase is "Maintenance". If an attempt is made, it results in an error. Take action to recover from the "Maintenance" state. If a failover/failback must be performed for maintenance while the TFO group phase is "Maintenance", contact your maintenance engineer in advance.
|
Copying | Indicates that volumes are being synchronized from the Primary Storage to the Secondary Storage. Wait until the synchronization process is completed. |
Normal | Indicates that volume synchronization is completed and failover is ready to be done. |
Failovered | Indicates the status immediately after failover is completed. Update after a while. |
Copying Back | Indicates that after recovery of the Primary Storage, volumes are being synchronized from the Secondary Storage to the Primary Storage. Wait until the synchronization process is completed. |
Failback Ready | Indicates that after recovery of the Primary Storage, the volume synchronization process is completed and failback is ready to be done. |
Failbacked | Indicates the status immediately after failback is completed. Update after a while. |
Failed | This state indicates that the ETERNUS Disk storage system is down or the REC route is disconnected. During the failover/failback sequence, if this phase is displayed, wait a while before updating. |
Attention | There is a phase inconsistency for the Primary TFO group and the Secondary TFO group. After confirming the Phase column value from the TFO group details screen for both the Primary Storage and the Secondary Storage, follow each direction on this table. |
Unknown | Trouble with network is causing status update to fail. A disk storage switched due to a failure becomes "Unknown" because status update is sure to fail. Refer to "9.4.2.2 Updating TFO Group Status" to update the status of TFO group. |
*1: This is only displayed on the Storage Cluster overview screen.
*2: For the "Unknown" status, because a common meaning is shown in all the columns, the meaning is omitted in the columns that follow.
This displays whether TFO group status is normal or error.
Status | Meaning and Action Plan |
|---|---|
Halt | Indicates that there is a fault in TFO group. Refer to "Halt Factor" in "9.4.2.10.1 TFO Group Information" to take action. |
Normal | Indicates that TFO group is in normal status. No action is required. |
Disruption | There is a phase inconsistency for the Primary TFO Group and the Secondary TFO Group. |
*1: This is only displayed on the Storage Cluster overview screen.
This displays whether the disk storage is connected to the server (active side) or not connected to the server (standby side).
Status | Meaning |
|---|---|
Active | Indicates that the disk storage is currently connected to a server (active side). |
Standby | Indicates that the disk storage is not connected to a server (standby side). |
The meaning and action plan of each status for the TFO group details screen are as follows.
The same statuses as the Active/Standby column of the Storage Cluster overview screen are displayed.
Refer to "Active/Standby" in "9.4.2.9 Confirming the Status on the Storage Cluster Overview Screen"
The same statuses as the Phase column of the Storage Cluster overview screen are displayed.
Refer to "Phase" in "9.4.2.9 Confirming the Status on the Storage Cluster Overview Screen"
The same statuses as the Status column of the Storage Cluster overview screen are displayed.
Refer to "Status" in "9.4.2.9 Confirming the Status on the Storage Cluster Overview Screen"
If there is any error in TFO group, its cause is displayed.
Status | Meaning and Action Plan |
|---|---|
None | Indicates that TFO group is in normal status. No action is required. |
TFO Group Disconnected | Indicates that the path to a destination device is blocked or the device is not started. Remove the factor of path blockage or start the destination device. |
Version Mismatch | Indicates that a destination device does not support Storage Cluster function or the firmware version does not support Storage Cluster. If the firmware is not up-to-date, update the firmware. |
TFO Group Setting Missing | TFO group settings of a destination device are not found. Refer to "9.4.1 Installation" and "9.4.2 Operation" to review the settings or reconfigure. |
TFO Group Setting Mismatch | Indicates that data transfer of Storage Cluster is disabled at all the RA ports of the Secondary Storage or there are some inconsistencies in TFO group settings at a destination device. Take either of the following actions:
|
Monitoring Server Disconnected | Indicates that the path to Storage Cluster Controller is blocked or Storage Cluster Controller is not started. This status is displayed only when Storage Cluster Controller is set up. Take either of the following actions:
|
Note
When any status other than those above is displayed, perform the following operations:
After a while, perform "9.4.2.2 Updating TFO Group Status".
Refer to "9.4.1 Installation" and "9.4.2 Operation" to review the settings or reconfigure.
If the problem is not solved, record the displayed status and contact Fujitsu Technical Support.
The session information of the TFO pair is displayed in the Volume tab of the TFO group details screen. The meaning and action plan of each status are as follows.
Status | Meaning and Action Plan |
|---|---|
Active | Volume synchronization is operating normally. No action is required. |
Error Suspend | Volume synchronization is suspended due to an error. Refer to "9.4.1 Installation" and "9.4.2 Operation" to review the settings or reconfigure, or take action according to the procedure that matches the applicable case described in "9.4.3 Maintenance". |
Suspend | Volume synchronization is suspended. The Standby side storage may be down. Check the state of the Standby side storage and perform the following actions.
|
Halt | Volume synchronization is in an abnormal state. Refer to "Halt Factor" in "9.4.2.10.1 TFO Group Information" to take action. |
Status | Meaning and Action Plan |
|---|---|
Copying | A volume is being synchronized from the Primary Storage to the Secondary Storage. Wait until the synchronization process is completed. |
Equivalent |
|