It is possible to set the print output items for the Gantt chart and print them.
Procedure
Acquiring the Gantt chart
Selecting Gantt Chart as the print type displays the Obtain Gantt Chart window. Specify conditions in the Obtain Gantt Chart window, then click OK.
Figure 9.3 Obtain Gantt Chart window
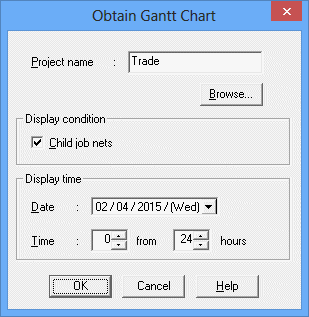
Specifies the project to output.
When omitted, all the projects will be output.
Displays the Browse Registration Info window. See Displaying the Browse Registration Info window below to confirm the registered information.
Switches between displaying and hiding the child or linked job nets. This cannot be specified when connected to the destination server with the Windows version of Systemwalker OperationMGR V10.0L21 or earlier or the UNIX version of Systemwalker OperationMGR 10.1 or earlier..
Specifies the date to display in the Gantt chart.
Specifies the time to display in the Gantt chart. Select the display starting time and display time.
Click Browse in the Obtain Gantt Chart window, and the Browse Registration Info window will appear. The available hierarchies are displayed in a tree structure.
Figure 9.4 Browse Registration Info window
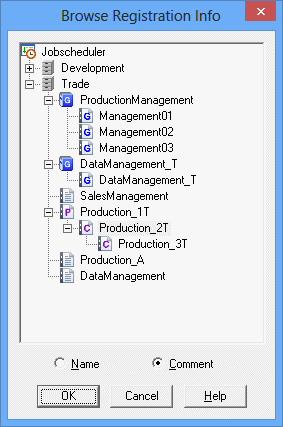
You can browse the projects, groups and job nets registered in the Jobscheduler.
Specifiable layers vary depending on the print type. For details, see the Systemwalker Operation Manager Online Help.
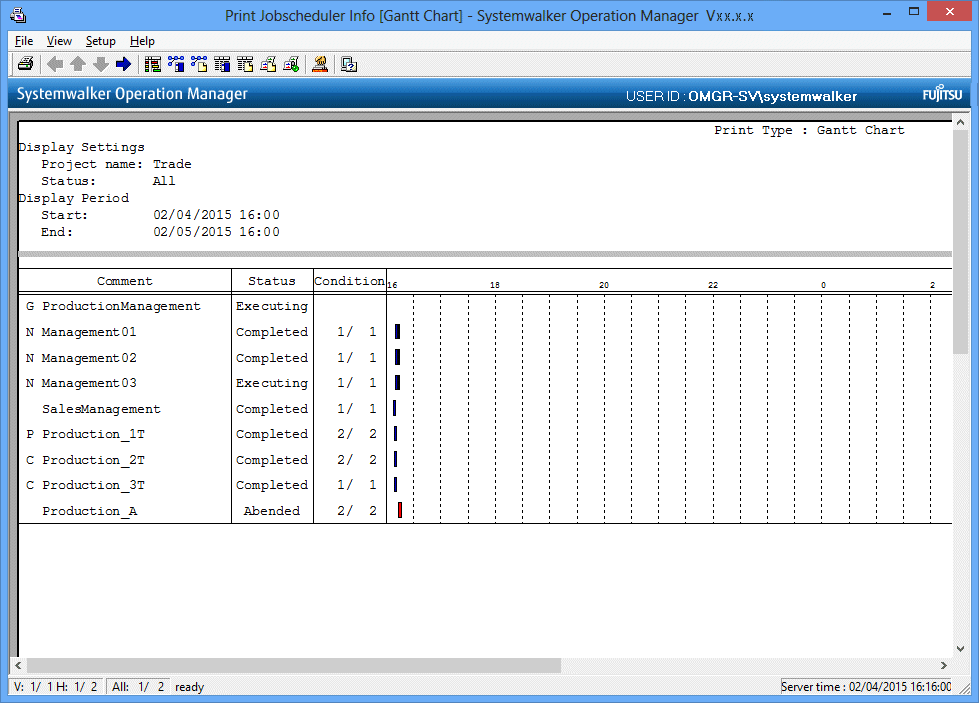
The Print Jobscheduler Info window displays a print image of the Gantt chart.
Figure 9.5 Print Jobscheduler Info window (Gantt chart)
Specifying filtering conditions
Set the filtering conditions as necessary. Select Filtering from the View menu of the Print Jobscheduler Info window (or, select Filtering on the toolbar).
Specify the filtering conditions in the Filtering Conditions Setup window, then click OK. The Gantt chart print image in the Print Jobscheduler Info window will be refreshed according to the specified filtering conditions.
Figure 9.6 Filtering Conditions Setup window
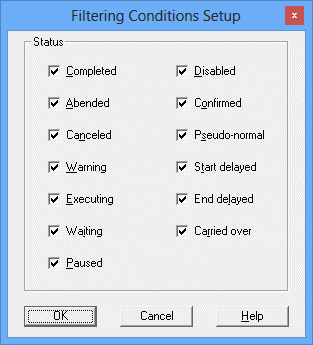
Filters the status of the group and job nets to output. Select one or more items.
Setting print items
Specify the print items as necessary. Select Print Items from the Setup menu in the Print Jobscheduler Info window.
Specify the output items in the Gantt chart sheet of the Specify Print Items window, then click OK. The Gantt chart print image in the Print Jobscheduler Info window will be refreshed according to the specified print items.
Figure 9.7 Specify Print Items window - Gantt chart sheet
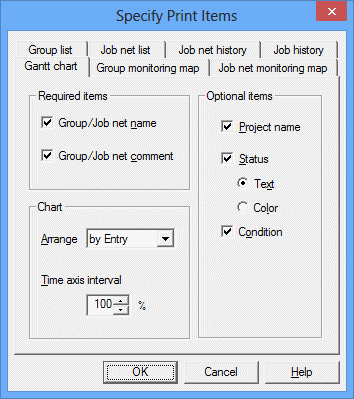
Selects whether the groups and job nets are displayed in their names, comments or in both. Be sure to select one or more items.
Selects the order in which the groups and job nets are displayed in the Preview area in the Print Jobscheduler Info window (in the order they are registered, in the order of their names, their starting times, or by status).
Specifies the interval of time axis on the Gantt chart.
Selects the items to include in the Gantt chart.
Project Name:
Displays the project name.
Status:
Displays the status of the group or job net. Whether to display with color coding or character strings can be selected.
Condition:
Displays the progress of the jobs making up a job net in the form of "number of jobs started/total number of jobs making up a job net". Not displayed for groups.
Printing
After setting up the print output contents, select Print from the File menu in the Print Jobscheduler Info window. The contents displayed in the Preview area will be printed by the printer connected to the client machine.