When you use the GUI, you can only start the most recently activated configuration. To start a different configuration, you must first use the Wizard Tools to activate that configuration.
By default, the GUI will start RMS on all the nodes in the cluster. Alternatively, you can start RMS only on a single node that you select.
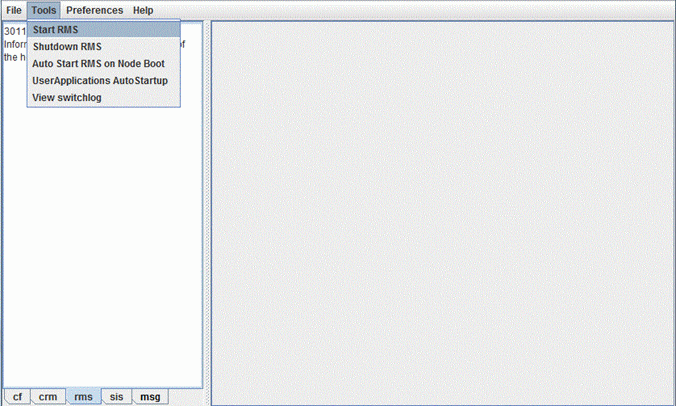
From the Cluster Admin rms tab, select Tools -> Start RMS.
Figure 7.1 Starting RMS from the main menu

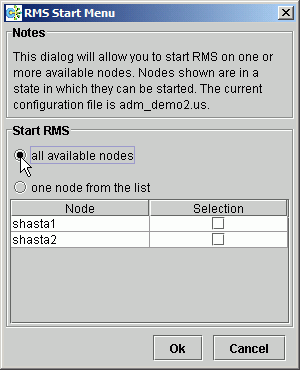
The RMS Start Menu window opens. To start RMS on all the nodes, click the all available nodes radio button and then click OK.
Figure 7.2 RMS Start Menu for all the nodes

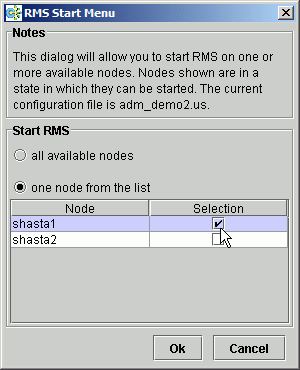
To start RMS only on a single node, click the one node from the list radio button, and then choose the node using a checkbox in the Selection column. After making your selections, click OK.
Figure 7.3 RMS Start Menu for individual nodes

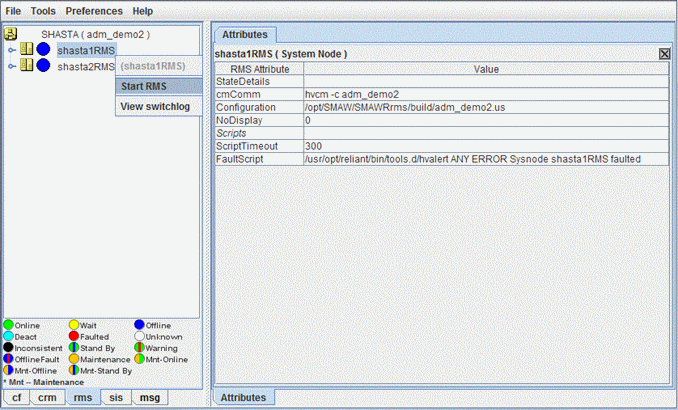
Alternatively, you can start RMS on individual nodes directly from the Cluster Admin window:
In the left pane, click the rms tab to view the cluster tree.
Right-click on the node and select Start RMS from the pop-up menu.
Figure 7.4 Starting RMS on individual nodes

CLI: hvcm
The hvcm command starts the base monitor and the detectors for all monitored resources. The CLI syntax for hvcm has two possible formats:
hvcm [-a | -s SysNode]hvcm -c config_name [-a | -s SysNode] [-h timeout] [-l loglevels]
The options valid for both formats are:
-a: Start RMS on all the nodes in the configuration
-s: Start RMS only on the specified node
If neither '-a' nor '-s' is specified, hvcm starts RMS only on the local node.
The options valid only for Format 2 are:
-c: Use the specified configuration file
-h: Use the specified heartbeat recovery timeout
-l: Activate diagnostic output according to the specified level(s)
Note
To start a configuration other than the one most recently activated, change the heartbeat recovery timeout, or set the diagnostic level, you must use the CLI. These parameters cannot be adjusted from the Cluster Admin GUI.
Notes for Format 1
When the 'c' option is not present, hvcm reads the default CONFIG.rms startup file. hvcm looks for the default startup file in <RELIANT_PATH>/etc/CONFIG.rms. If the default for the environment variable RELIANT_PATH has not been changed, this resolves to /opt/SMAW/SMAWRrms/etc/CONFIG.rms. Note that the search is always confined to the local node, even if you specify the '-a' or '-s' option to start RMS remotely.
The CONFIG.rms file contains either of the following:
A simple configuration name, optionally with a '.us' suffix.
An hvcm command compliant with Format 2 that starts the most recently activated configuration.
You cannot specify the '-h' or '-l' options in Format 1. You can, however, edit the CONFIG.rms file and insert the options to comply with Format 2.
Notes for Format 2
When the '-c' option is present, and the configuration file is not an absolute path, hvcm looks for the first match in <RELIANT_STARTUP_PATH>. If the default for the environment variable RELIANT_STARTUP_PATH has not been changed, this resolves to /opt/SMAW/SMAWRrms/build/<config_name>.us (hvcm adds the '.us' extension if it is not specified as part of the configuration file name). If an absolute path is specified, hvcm attempts to read only that file. Note that the search is always confined to the local node, even if you specify the '-a' or '-s' option to start RMS remotely.
When hvcm locates the specified configuration file, it checks to see if the default CONFIG.rms file is also present. If it is, hvcm compares the configuration names defined by both files to make sure they agree. If they do not agree, hvcm aborts the startup processing. The default timeout value depends on which method RMS uses to monitor the cluster.
The '-h' option sets the UDP heartbeat recovery timeout value for the cluster. See "Nodes and heartbeats".
By default, RMS monitors the state of each node with the Enhanced Lock Manager (ELM), which is implemented in the Cluster Foundation. ELM is not a polling method. Instead, it relies on locks that are held by each node and released when the node or its base monitor go down. When ELM is enabled, the UDP heartbeat timeout defaults to 600 seconds.
ELM can be disabled for rolling upgrade or debugging operations by setting the HV_USE_ELM environment variable to zero (0). See "HV_USE_ELM" in "E.2 Global environment variables." When ELM is disabled, the UDP heartbeat defaults to 45 seconds.
Note
Specifying a heartbeat timeout shorter than the default may cause premature node kills. No data loss will occur, because a node kill begins with a graceful shutdown. However, cluster performance may suffer due to latency as applications are switched to different nodes. Excessively short heartbeat timeouts may also interfere with CF event timeouts.
The '-l' option sets the diagnostic output level at startup time. The loglevels specification consists of one or more individual numeric levels or hyphen-delimited ranges, each separated by a comma.