This section explains the procedure for adding file data partitions.
You can easily change file system configuration using a wizard.
To start the Change File System Configuration Wizard, click [Change Configuration] on the [Operation] drop-down menu.
Note
Note of Operation
Information that has already been input becomes invalid and the default value corresponding to information newly set on the previous screen is set when <Next> button is selected after <Back> button is selected on the wizard screen and the operation that exerts the influence on the following screens is done.
(1) Unmounting a file system
Before changing the file system configuration, unmount the file system on all the nodes.
See
For details about command, see "11.3.1 Unmount."
(2) Setting shared disk device
A partition that will be added to the GFS Shared File System must be a logical volume of a GDS shared class. Also, the GDS logical volume must be ACTIVE.
Note
GDS logical volume should be set up as follows.
Set up the type of a disk class with which GDS logical volume belongs as shared.(Change GDS class attributes)
Set all the nodes that share GFS Shared File System as the scope of the disk class to which logical volume belongs.(Change GDS class attributes)
See
When adding the logical volume of GDS, which was used in a file system other than GFS, as the partition of the GFS Shared File System, see "1.8.4.2 Notes when using logical volumes of GDS that were used in a file system other than GFS."
See
For GDS disk class operations, see the applicable items under "Operation" "GDS Management View" in "PRIMECLUSTER Global Disk Services Configuration and Administration Guide."
For GDS logical volume operations, see the applicable items under "Operation" "GDS Management View" in "PRIMECLUSTER Global Disk Services Configuration and Administration Guide."
(3) Selecting a file system
From the [Mount tree] or [File system information] field in the main screen, select the file system to be changed. Only file systems of the sfcfs type can be selected.
Click [Change Configuration] on the [Operation] menu, the [Change File System Configuration Wizard (1)] screen appears.
(4) Selecting a partition
From the [Candidate partitions] field, select the partition to be added and click the <Add> button. More than one partition can be selected at a time. Note that those partitions that are already in use for file systems cannot be selected.
To cancel all selections of the partition currently displayed on [Component partitions] field, click the <Reset> button.
Figure 10.15 Change File System Configuration Wizard (1)
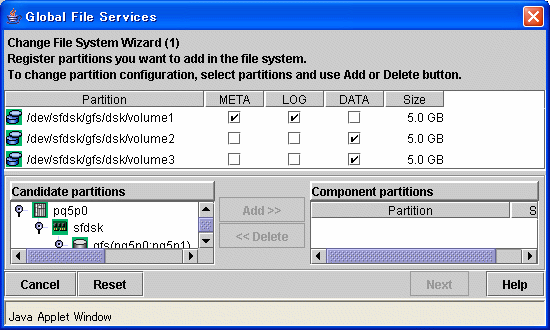
After selecting the partitions, click the <Next> button to continue. The next screen is shown in the following "Figure Change File System Configuration Wizard (2)."
To cancel the file system configuration change operation, click the <Cancel> button.
(5) Checking partition information
In the [Change File System Configuration Wizard (2)] screen, confirm the file system configuration including adding partition.
See
For an explanation of the combinations of areas (META/DATA) assigned to partitions, see "2.1.6 Partition configuration."
Note
The added partition is automatically allocated to the file data area.
Figure 10.16 Change File System Configuration Wizard (2)
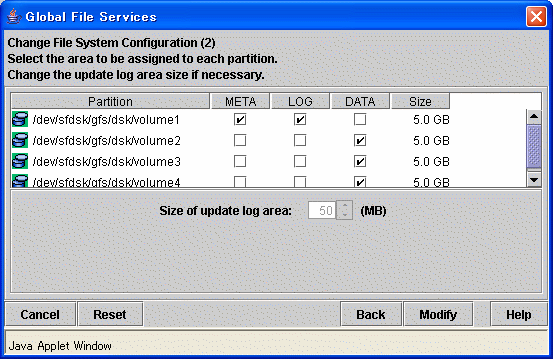
After confirming the information items, click the <Modify> button to execute the file system configuration change operation.
To return to the [Change File System Configuration Wizard (1)], click the <Back> button.
To cancel the file system configuration change operation, click the <Cancel> button.
(6) Mounting a file system
After completion of the file system attribute change operation, mount the file system if the file system is unmounted.
See
For details about command, see "11.2.6 Mount."