The following describes the procedure for creating a file system.
(1) Setting a shared disk device
The GFS Shared File System uses logical volumes of GDS as shared devices. The status of the logical volumes of GDS must be ACTIVE on each node.
Note
GDS logical volume should be set up as follows.
Set up the type of a disk class with which GDS logical volume belongs as shared.(Change GDS class attributes)
Set all the nodes that share GFS Shared File System as the scope of the disk class to which logical volume belongs.(Change GDS class attributes)
See
When creating a GFS Shared File System on the logical volume of GDS that was used in the file system other than GFS, see "1.8.4.2 Notes when using logical volumes of GDS that were used in a file system other than GFS."
See
For GDS disk class operations, see the applicable items under "Operation" "GDS Management View" in "PRIMECLUSTER Global Disk Services Configuration and Administration Guide."
For the logical volume operations of GDS, see the applicable items under "Operation" "GDS Management View" in "PRIMECLUSTER Global Disk Services Configuration and Administration Guide."
(2) Registering information in host database
MDS communicates with AC by using the IP address corresponding to the host name of the node that shares the GFS Shared File System. Therefore, the host name of the shared node and the IP address are registered in host database (for example: /etc/hosts).
Note
The IP address type of the shared node needs to match the communication protocol selected in "(9) Selecting a communication protocol." If they are not matched, the GFS Shared File System cannot be mounted.
Register the host name of the shared node as the canonical host name (for /etc/hosts, the host name described in the left end).
The following two IP address types are available for the GFS Shared File System:
Unique Local Unicast Address
Global Unicast Address
The setting of host database must be the same on all the shared nodes. If it is not, MDS down recovery fails and it may trigger a file system blockade or system panic.
See
For details on /etc/hosts, see hosts(5) of the online manual page.
(3) Setting share information
Click [Create] on the [Operation] menu and the [Create File System Wizard] screen appears. It is shown in the following "Figure Create File System Wizard (1)."
In the [Create File System Wizard (1)] screen, set the node information and enter the mount point.
Figure 10.6 Create File System Wizard (1)
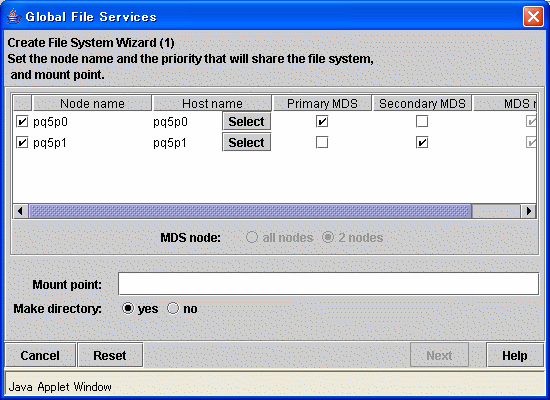
In the [Node name], select the names of the sharing nodes. Be sure to select two nodes. It is not possible to deselect the local node.
In order to select host names other than the host names displayed, click the <Select> button then select the LAN host that will be used for each node in the following [Host Name Selection Wizard] screen. If you do not click the <Select> button, the displayed host name will be used.
Figure 10.7 Host Name Selection Wizard
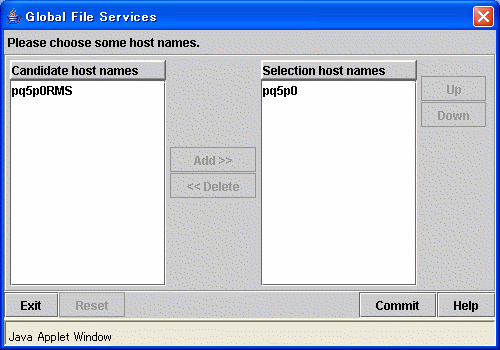
Please choose the host name of LAN used from the left-hand side [Candidate host names]. Then please click the <Add> button in order to add to the right-hand side [Selection host names]. Note that only one host name can be selected at a time in [Selection host names]. If you want to change [Selection host names], delete the host name being selected in [Selection host names].
Specify the nodes on which the [Primary MDS] and [Secondary MDS] will be started. A single, unique node must be selected for each MDS.
Specify the full path name of a mount point in the [Mount point] field. If <yes> button is selected for [Make directory], a directory is created with the following attributes:
Owner: root
Group: sys
Access right: 775
After setting the area information items, click the <Next> button to proceed to the next screen which is shown in the following "Figure Create File System Wizard (2)."
To restore the settings to their default values, click the <Reset> button.
To cancel the file system creates operation, click the <Cancel> button.
(4) Selecting a partition
After completing the MDS configuration, the register partition screen will be displayed. It is shown in the following "Figure Create File System Wizard (2)."
Figure 10.8 Create File System Wizard (2)
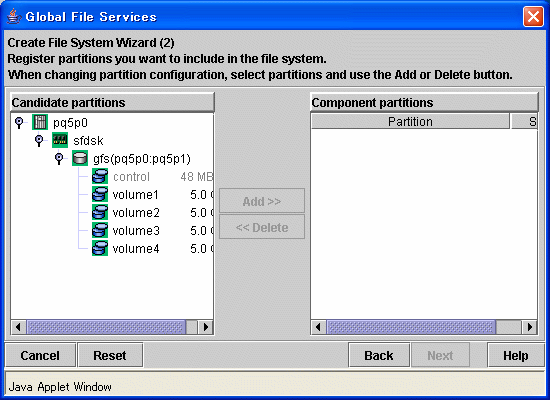
Select the partition from [Candidate partitions] field, and click the <Add> button. More than one partition can be selected at a time. However, cannot select a partition that is a part of existing file system or a management partition.
After selecting a partition, click the <Next> button to continue. The next screen is shown in "Figure Create File System Wizard (3)."
To cancel all selections of the partition currently displayed on [Component partitions] field, click the <Reset> button.
To return to the [Create File System Wizard (1)] screen, click the <Back> button.
To cancel the file system creates operation, click the <Cancel> button.
Note
If the GDS logical volume is not ACTIVE, it cannot be selected as a configuration partition. If it needs to be selected as a configuration partition, bring the logical volume into ACTIVE.
(5) Setting partition information
In the [Create File System Wizard (3)] screen, select the area (META/LOG/DATA) to be assigned to each partition selected in the [Create File System Wizard (2)].
The partition to which META is assigned becomes a representative partition.
See
For an explanation of the combinations of areas (META/LOG/DATA) assigned to partitions, see "2.1.6 Partition configuration."
Figure 10.9 Create File System Wizard (3)
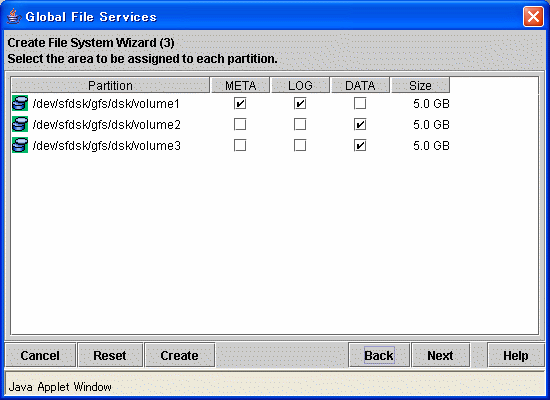
After setting the area information items, click the <Next> button to proceed to the next screen which is shown in the following "Figure Create File System Wizard (4)."
To restore the settings to their default values, click the <Reset> button.
To return to the [Create File System Wizard (2)] screen, click the <Back> button.
To cancel the file system creation operation, click the <Cancel> button.
If you do not need to change extended information, detailed information and mount information, click the <Create> button to create the file system.
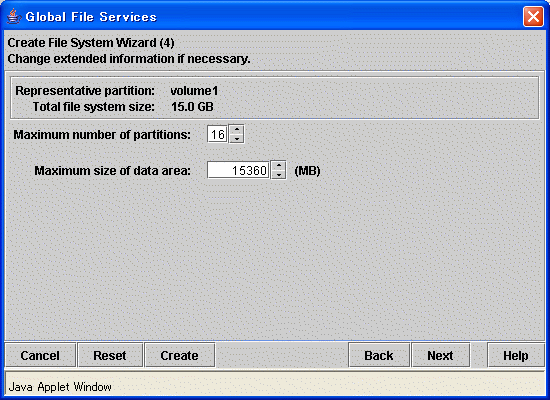
(6) Setting extended information
In the [Create File System Wizard (4)] screen, the [extended information] values should be set such that they allow for future expansion of the file system and configuration changes.
Figure 10.10 Create File System Wizard (4)
Note
Set the maximum number of partitions and the maximum size of data area after adequately considering future data area expansion for the file system to be created. For details, see "4.3.5 For future expansion."
See
The above parameter for expansion setup corresponds to specific sfcmkfs(8) options of the GFS Shared File System as follows:
[Maximum number of partitions]: maxvol=n
[Maximum size of data area]: maxdsz=n
For details about the parameters, see sfcmkfs(8).
When the extended information items are correct, click the <Next> button to proceed. The next screen is shown in the following "Figure Create File System Wizard (5)."
To restore the settings to their default values, click the <Reset> button.
To return to the [Create File System Wizard (3)] screen, click the <Back> button.
To cancel the file system creation operation, click the <Cancel> button.
If you do not need to change the detailed information and mount information, click the <Create> button to create the file system.
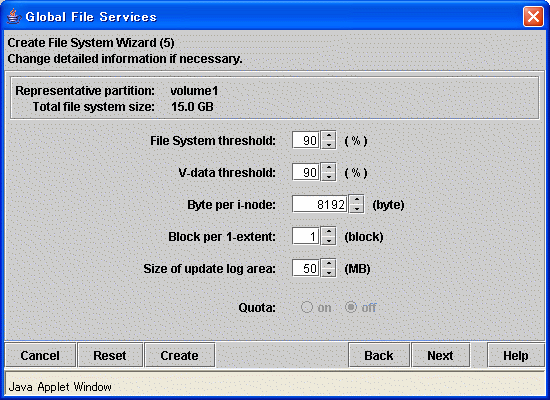
(7) Setting detailed information
In the [Create File System Wizard (5)], set the detailed information.
Figure 10.11 Create File System Wizard (5)
See
The above parameter for expansion setup corresponds to specific sfcmkfs(8) options of the GFS Shared File System as follows:
[File System threshold]: free=n
[V-data threshold]: mfree=n
[Byte per i-node]: nbpi=n
[Block per 1-extent]: nblkpext=n
[Size of update log area]: logsz=n
For details about the parameters, see sfcmkfs(8).
Note
The [File System threshold] is the value obtained by subtracting from 100 the minimum percentage of free area in the file system specified by the -o free option of sfcmkfs(8).
The [V-data threshold] is the value obtained by subtracting from 100 the minimum percentage of free area in the V-data area specified by the -o mfree option of sfcmkfs(8).
When the detailed information items are correct, click the <Next> button to continue. The next screen is shown in the following "Figure Create File System Wizard (6)."
To restore the settings to their default values, click the <Reset> button.
To return to the [Create File System Wizard (4)] screen, click the <Back> button.
To cancel the file system creation operation, click the <Cancel> button.
If you do not need to change the mount information, click the <Create> button to create the file system.
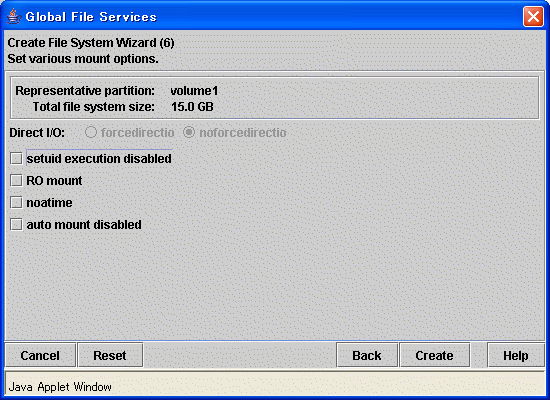
In the [Create File System Wizard (6)] screen, set the mount information.
Figure 10.12 Create File System Wizard (6)
See
The above each mount option corresponds to mount option of sfcmount(8) as follows:
[setuid execution disabled]: nosuid
[RO mount]: ro
[noatime]: noatime
[auto mount disabled]: noatrc
For details about the parameters, see sfcmount(8).
Note
The mount option strictatime cannot be specified with the GFS Management View. When specifying strictatime, directly edit /etc/fstab of all the nodes that share a file system after clicking the <Create> button.
After setting the mount information, click the <Create> button to create the file system.
To restore the settings to their default values, click the <Reset> button.
To return to the [Create File System Wizard (5)] screen, click the <Back> button.
To cancel the file system creation operation, click the <Cancel> button.
Note
If you create a file system by clicking the <Create> button, the GFS Management View will automatically add an entry to /etc/fstab.
(9) Selecting a communication protocol
After completing a file system creation, determine either IPv6 or IPv4 to be used as a communication protocol between MDS and AC.
The default (a communication protocol to be registered when creating a file system) is IPv4.
The setting of a communication protocol is performed in [Detailed information] of the [File System Attributes] screen started by clicking [Change Attributes] on the [Operation] menu of the GFS Management View. When using IPv4, this setting is not required.
Note
A communication protocol can be set for each file system; however, we recommend that users set the same communication protocol for all the file systems so that it can be easily managed.
Select the communication protocol that matches the IP address type of the shared node registered in host database in "(2) Registering information in host database." If you have selected a communication protocol that does not match it, the GFS Shared File System cannot be mounted.
See
For details of setting a communication protocol, see "10.3.1 Changing the file system attributes" in this manual.
(10) Mounting the file system
Mount the file system.
See
For information on how to mount the file system using a command, see "11.2.6 Mount."