This sub-section describes the method of backing up data from and restoring data back to mirror volumes in the primary domain through a backup server in another domain using the disk unit's copy function provided by a disk array unit.
If volume data is updated with copy functions of disk units, GDS does not recognize the update. If mirrored disk data is updated with copy functions of disk units, synchronization of the mirrors are no longer ensured. Therefore, when restoring mirror volume data using the disk unit's copy function, it is necessary to disconnect the other disk from mirroring once and reconnect it to mirroring after restoration.
The following example illustrates using Dell EMC storage units as the disk array unit and Dell EMC TimeFinder as a copy function.
When restoration is performed with TimeFinder, configuration information within the private slice is also restored. For this reason, simultaneous backup and restore for all disks within the class is required. Additionally, the object configuration and status must match at backup and at restore, and so as in restore, it is necessary to disconnect the disks from mirroring before backup and reconnect after.
See
For using Dell EMC storage units, refer to notes described in "A.2.26 To Use Dell EMC Storage Units."
For details on the Dell EMC TimeFinder command, refer to the Dell EMC's SYMCLI manual.
Figure 6.51 System Configuration
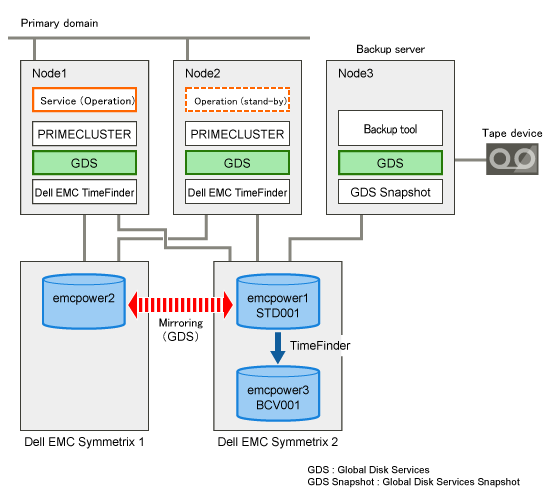
Information
In the primary domain, SynfinityDisk and SynfinityCluster are also available instead of GDS and PRIMECLUSTER.
A configuration that makes a node in the primary domain (e.g. Node2) work as a backup server is also available.
Note
Physical Device Name
Different physical device names (such as emcpower1) may be assigned to the identical physical disk in the primary domain and the backup server.
Figure 6.52 Object Configuration in Normal Operation
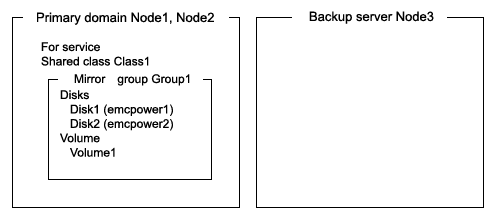
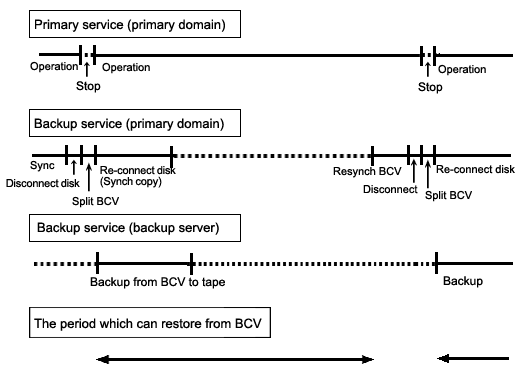
Data in a split BCV can be backed up to tape during the services.
To secure consistency of BCV data, the services should be stopped temporarily when the BCV is split.
Information
Consistency of Snapshot Data
When detaching BCV while the services are operating, data consistency must be secured through the method specific to that software, such as a file system and a database system, which manages volume data. For details, see "A.2.29 Ensuring Consistency of Snapshot Data."
Figure 6.53 Backup
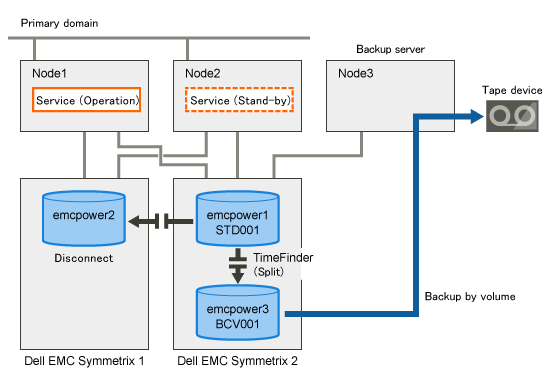
Figure 6.54 Object Configuration When Backing Up
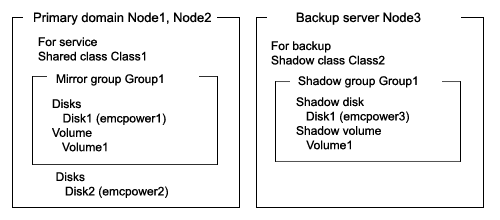
Figure 6.55 Backup Schedule
Note
When Restoring from the BCV
The following conditions must be met when performing a backup to the BCV (disconnecting the BCV).
Back up all disks registered with the backup target class (except for disks that are disconnected and in SWAP status) to the BCV. For disks not backed up to the BCV, it is necessary to disconnect from the class before the BCV is detached.
Before backup to the BCV is completed for all disks within the class (except for disks that are disconnected and in SWAP status), do not change the object configuration or status in the class.
Information
When Not Restoring from the BCV
When restore is always from tape instead of BCV, it is not necessary to perform disk disconnection and reconnection in the backup process.
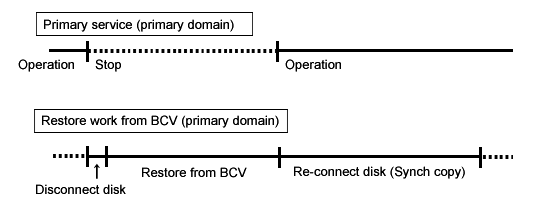
If data in a standard device is damaged while a BCV is split from the disk (standard disk) used for the services operation, the standard device data can be restored from the BCV.
Data can be restored while the service is stopped and the application volume is not in use.
Note
Conditions to Restore from the BCV
The following conditions must be met when performing a restore from the BCV.
To all disks within the restore target class (except for disks that are disconnected and in SWAP status), restore data from the BCV. For disks not backed up to the BCV, it is necessary to disconnect from the class before restore from the BCV is performed.
The configuration of objects within the restore target class must be the same as it was when the backup to the BCV (disconnection of the BCV) was performed.
Before restore to the BCV is completed for all disks within the class (except for disks that are disconnected and in SWAP status), do not reboot any node in the primary domain.
Figure 6.56 Restore from a BCV
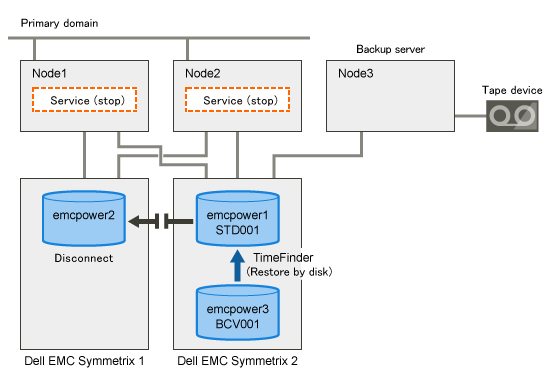
Figure 6.57 Object Configuration When Backing Up from a BCV
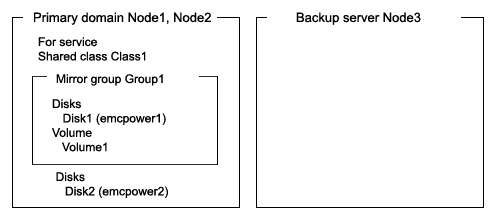
Figure 6.58 Schedule to Restore from a BCV
If data in a standard device used for the service is damaged while it is in sync with a BCV, data in the BCV is also damaged. In this case data can be restored from tape back to the standard device.
Data can be restored while the services are stopped and the application volume is not in use.
Figure 6.59 Restore from Tape
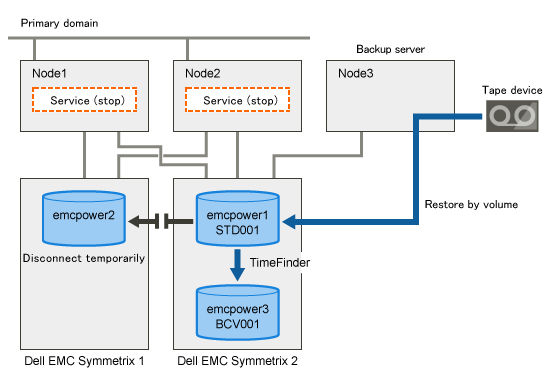
Information
In this configuration, access cannot be gained from backup server Node3 to disk emcpower2. Therefore, after data held in emcpower1 is restored from tape while emcpower2 is detached temporarily, synchronization copying from emcpower1 to emcpower2 must be performed by reattaching emcpower2. When access can be gained from Node3 to both emcpower1 and emcpower2, it is not required that emcpower2 be detached temporarily since data can be restored from tape back to both emcpower1 and emcpower2.
Figure 6.60 Object Configuration When Restoring from Tape
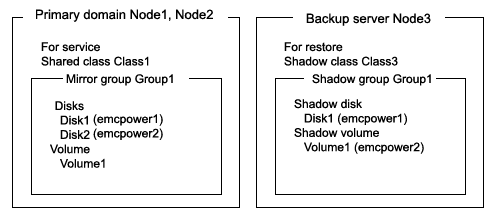
Figure 6.61 Schedule to Restore from Tape
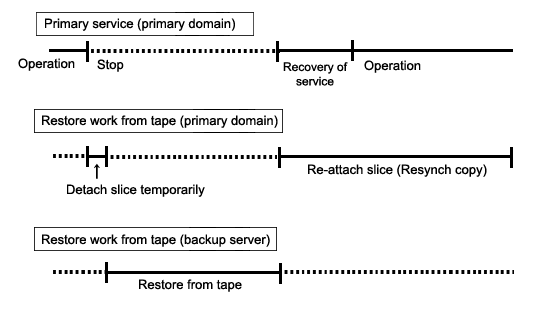
Figure 6.62 Outline of the Configuration Procedure

Figure 6.63 Outline of the Backup Procedure
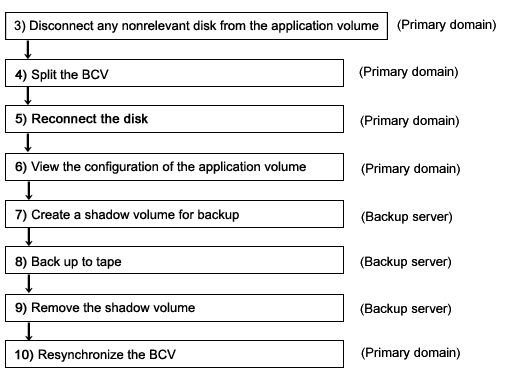
Figure 6.64 Outline of the Procedure for Restoring from a BCV
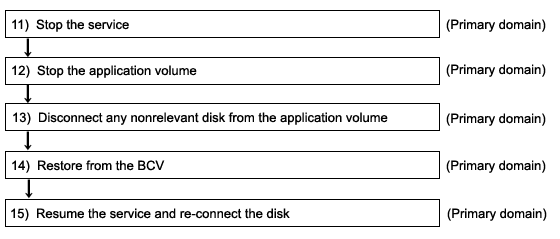
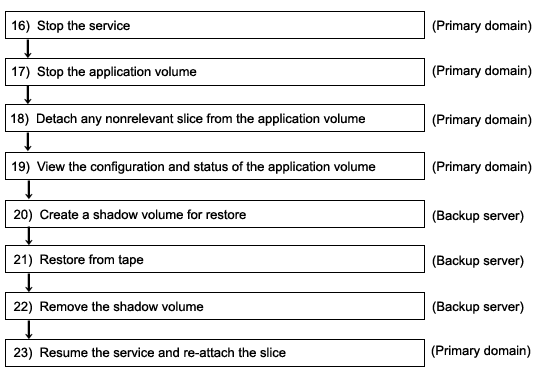
Figure 6.65 Outline of the Procedure for Restoring from Tape
Note
Automatic Resource Registration
If the backup server resides in a cluster domain (called a backup domain), those disks that are registered as resources in the primary domain or are to be registered with a shadow class in the backup domain may not be involved in the resource registration in the backup domain. In the backup domain, those relevant disks must be described in the Excluded Device List prior to executing the automatic resource registration. For details on the automatic resource registration, see "PRIMECLUSTER Installation and Administration Guide."
1) Creating an application volume
Create a mirror volume used for the services operation on disks (standard devices) emcpower1 and emcpower2. The following settings are necessary on Node1 or Node2 in the primary domain.
1-1) Registering disks
Register disks (standard devices) emcpower1 and emcpower2 with shared class Class1 that is shared on Node1 and Node2, and name them Disk1 and Disk2 respectively.
# sdxdisk -M -c Class1 -a type=shared,scope=Node1:Node2 -d emcpower1=Disk1,emcpower2=Disk2 |
1-2) Creating a mirror group
Connect disks Disk1 and Disk2 to mirror group Group1.
# sdxdisk -C -c Class1 -g Group1 -d Disk1,Disk2 |
1-3) Creating a mirror volume
Create mirror volume Volume1 to mirror group Group1.
# sdxvolume -M -c Class1 -g Group1 -v Volume1 -s 1048576 |
2) Synchronizing a BCV
Relate standard device emcpower1 to BCV device emcpower3 that will be the copy destination. The following settings are necessary on both nodes Node1 and Node2 in the primary domain.
2-1) Creating a device group
Create device group DevGroup.
# symdg create DevGroup |
2-2) Registering a standard device
Register standard device emcpower1 with device group DevGroup, and name it STD001 as a logical device.
# symld -g DevGroup add pd /dev/rdsk/emcpower1 STD001 |
2-3) Relating a BCV device
Relate BCV device emcpower3 to device group DevGroup, and name it BCV001 as a logical device.
# symbcv -g DevGroup associate pd /dev/rdsk/emcpower3 BCV001 |
2-4) Establishing a BCV pair (synchronized)
Synchronize standard device STD001 with BCV device BCV001.
# symmir -g DevGroup -full establish STD001 bcv ld BCV001 |
3) Disconnecting a disk of the application volume
In the primary domain, among disks registered with class Class1 to which application volume Volume1 belongs, disconnect a disk (Disk2) other than the backup target disk Disk1 from Class1. Execute the following command on node Node1 or Node2 in the primary domain.
# sdxswap -O -c Class1 -d Disk2 |
4) Splitting the BCV
Split BCV device emcpower3 from standard device emcpower1. The following procedure must be performed on Node1 or Node2 in the primary domain.
Information
The following example secures data consistency by stopping the services when a BCV is split. Steps 4-3) and 4-5) are not required if your software, such as a file system and a database system, that manages volume data provides functionality ensuring data consistency or repairing consistency for a split BCV. Alternatively, data consistency must be secured with the method specific to that software. For details, see "A.2.29 Ensuring Consistency of Snapshot Data."
4-1) Viewing the status of the application volume
Check the slice on standard device emcpower1 (Disk1) that is the copy source of BCV device emcpower3 among the slices of application volume Volume1 for the data validity (ACTIVE or STOP). Additionally, check that the slice of Disk2 disconnected in step 3) is in SWAP status.
# sdxinfo -S -c Class1 -o Volume1
OBJ    CLASS   GROUP   DISK    VOLUME   STATUS
------ ------- ------- ------- -------  --------
slice  Class1  Group1  Disk1   Volume1  ACTIVE
slice Class1 Group1 Disk2 Volume1 NOUSE |
If the data is invalid (not ACTIVE or STOP), repair the slice status referring to "F.1.1 Slice Status Abnormality."
4-2) Viewing the condition of the BCV pair
Confirm that standard device STD001 (emcpower1) and BCV device BCV001 (emcpower3) are in sync with each other (synchronized).
# symmir -g DevGroup query
Device Group (DG) Name: DevGroup
DG's Type             : REGULAR
DG's Symmetrix ID     : 000285502123
Standard Device BCV Device status
------------------------ ------------------------------------ --------------
Inv. Inv.Logcal Sym Tracks Logical Sym Tracks STD <=> BCV ------------------------ ------------------------------------- ------------- STD001 005 0 BCV001 073 * 61754 Synchronized |
4-3) Stopping the services
To secure consistency of data in the split BCV device, exit all applications using application volume Volume1 on Node1 and Node2.
When Volume1 is used as a file system, it should be unmounted.
4-4) Splitting the BCV pair (disconnect)
Split the BCV pair (standard device STD001 and BCV device BCV001).
# symmir -g DevGroup split |
4-5) Resuming the services
When the file system was unmounted in step 4-3), mount it again.
Resume the application stopped in step 4-3).
5) Reconnecting the disk of the application volume
Reconnect disk Disk2 disconnected in step 3) from class Class1 to which application volume Volume1 belongs to Class1.
# sdxswap -I -c Class1 -d Disk2 -e nowaitsync |
After returning from the command, synchronization copying from the slice on Disk1 of volume Volume1 to the slice on Disk2 is executed.
6) Viewing the configuration of the application volume
On Node1 or Node2 in the primary domain, view the configuration of services volume Volume1 that is the backup target.
Check the underlined parts.
# sdxinfo -c Class1 OBJ NAME TYPE CLASS GROUP DEVNAM DEVBLKS DEVCONNECT STATUS
------ ------- ------ ------- ------- --------- -------- ---------------- -------
disk Disk1 mirror Class1 Group1 emcpower1 8380800 Node1:Node2 ENABLE
disk Disk2 mirror Class1 Group1 emcpower2 8380800 Node1:Node2 ENABLEOBJ NAME CLASS DISKS BLKS FREEBLKS SPARE ------ ------- ------- ------------------- -------- -------- ----- group Group1 Class1 Disk1:Disk2 8290304 7176192 0 OBJ NAME CLASS GROUP SKIP JRM 1STBLK LASTBLK BLOCKS STATUS ------ ------- ------- ------- ---- --- -------- -------- -------- -------- volume * Class1 Group1 * * 0 65535 65536 PRIVATE volume Volume1 Class1 Group1 off on 65536 1114111 1048576 ACTIVE volume * Class1 Group1 * * 1114112 8290303 7176192 FREE OBJ CLASS GROUP DISK VOLUME STATUS ------ ------- ------- ------- ------- -------- slice Class1 Group1 Disk1 Volume1 ACTIVE slice Class1 Group1 Disk2 Volume1 ACTIVE |
7) Creating a shadow volume for backup
On backup server Node3, create a volume for backup (shadow volume) on BCV device emcpower3. The following settings are necessary on backup server Node3.
Note
Application volume data may be damaged if data is written into a shadow volume in incorrect configuration. Be sure to confirm that the shadow volume configuration is correct in step 7-4).
7-1) Registering a shadow disk
Register disk (BCV device) emcpower3 with shadow class Class2, and name it Disk1.
# sdxshadowdisk -M -c Class2 -d emcpower3=Disk1 |
Point
The disk name must correspond to the disk name assigned in step 1-1) to standard device emcpower1 that is the copy source of BCV device emcpower3. The disk names assigned in 1-1) can be viewed in the NAME field for disk information displayed with the sdxinfo command in step 6).
The class can be assigned any name. However, if Node3 resides in the same domain as Node1 and Node2, it must be assigned a name different from the name of a class created in step 1-1).
7-2) Creating a shadow group
Connect shadow disk Disk1 to mirror type shadow group Group1.
# sdxshadowdisk -C -c Class2 -g Group1 -d Disk1 |
7-3) Creating a shadow volume
Create a shadow volume Volume1 to shadow group Group1.
# sdxshadowvolume -M -c Class2 -g Group1 -v Volume1 -s 1048576 |
Point
The volume must be created in the size corresponding to the volume size in step 1-3). The size of a volume created in step 1-3) can be viewed in the BLOCKS field for volume information displayed with the sdxinfo command in step 6).
If there are multiple volumes, the corresponding shadow volumes must be created in the order of ascending values (first block numbers) in the 1STBLK field for volume information displayed with the sdxinfo command in step 6).
The volume can be assigned any name.
7-4) Viewing the configuration of the shadow volume
Using the sdxinfo command, confirm that the group configuration and the volume configuration are correct based on group information in the DISKS field, volume information in the 1STBLK field and in the BLOCKS field and so on.
Check the underlined parts.
# sdxinfo -c Class2
OBJ NAME TYPE SCOPE SPARE
------ ------- -------- ----------- -----
class Class2 local Node3 0OBJ NAME TYPE CLASS GROUP DEVNAM DEVBLKS DEVCONNECT STATUS
------ ------- ------ ------- ------- --------- -------- ---------------- -------
disk Disk1 mirror Class2 Group1 emcpower3 8380800 Node3 ENABLEOBJ NAME CLASS DISKS BLKS FREEBLKS SPARE
------ ------- ------- ------------------- -------- -------- -----
group Group1 Class2 Disk1 8290304 7176192 0OBJ NAME CLASS GROUP SKIP JRM 1STBLK LASTBLK BLOCKS STATUS ------ ------- ------- ------- ---- --- -------- -------- -------- -------- volume * Class2 Group1 * * 0 65535 65536 PRIVATE volume Volume1 Class2 Group1 off off 65536 1114111 1048576 ACTIVE volume * Class2 Group1 * * 1114112 8290303 7176192 FREE OBJ CLASS GROUP DISK VOLUME STATUS ------ ------- ------- ------- ------- -------- slice Class2 Group1 Disk1 Volume1 ACTIVE |
8) Backing up to tape
On backup server Node3, back up data in the shadow volume to tape. In the following examples, back up data in shadow volume Volume1 to a tape medium of tape device /dev/rmt/0.
See
For details on the backup method, see the manuals of file systems to be backed up and used commands.
Information
In a GFS Shared File System
Back up through the method as described in step 8a).
8a) When backing up data held in a raw device with the dd(1M) command
# dd if=/dev/sfdsk/Class2/rdsk/Volume1 of=/dev/rmt/0 bs=32768 |
8b) When backing up a ufs file system with the tar(1) command
8b-1) Activate shadow volume Volume1 in the read and write access mode (rw).
# sdxshadowvolume -F -c Class2 -v Volume1 # sdxshadowvolume -N -c Class2 -v Volume1 -e mode=rw |
8b-2) Check and repair consistency of the ufs file system on shadow volume Volume1.
If the file system was unmounted when the BCV was split in step 4), this step can be skipped.
# fsck -F ufs -y /dev/sfdsk/Class2/rdsk/Volume1 |
8b-3) Mount the ufs file system on shadow volume Volume1 on /mnt1, a temporary mount point, in the read only mode.
# mkdir /mnt1 # mount -F ufs -o ro /dev/sfdsk/Class2/rdsk/Volume1 /mnt1 |
8b-4) Back up data held in the file system to tape.
# cd /mnt1 # tar cvf /dev/rmt/0 . |
8b-5) Unmount the file system mounted in step 8b-3).
# cd / # umount /mnt1 # rmdir /mnt1 |
8c) When backing up a ufs file system with the ufsdump(1M) command
8c-1) Activate shadow volume Volume1 in the read and write access mode (rw).
# sdxshadowvolume -F -c Class2 -v Volume1 # sdxshadowvolume -N -c Class2 -v Volume1 -e mode=rw |
8c-2) Check and repair consistency of the ufs file system on shadow volume Volume1.
If the file system was unmounted when the BCV was split in step 3), this step can be skipped.
# fsck -F ufs -y /dev/sfdsk/Class2/rdsk/Volume1 |
8c-3) Back up data held in the file system to tape.
# ufsdump 0ucf /dev/rmt/0 /dev/sfdsk/Class2/rdsk/Volume1 |
9) Removing the shadow volume
After the backup process is complete, remove the shadow volume to prevent improper access to it. The following procedure must be performed on backup server Node3.
9-1) Stopping the shadow volume
Stop shadow volume Volume1.
# sdxshadowvolume -F -c Class2 -v Volume1 |
9-2) Removing the shadow volume
Remove shadow volume Volume1.
# sdxshadowvolume -R -c Class2 -v Volume1 |
9-3) Removing the shadow group
Remove shadow group Group1.
# sdxshadowgroup -R -c Class2 -g Group1 |
9-4) Removing the shadow disk
Remove shadow disk Disk1.
# sdxshadowdisk -R -c Class2 -d Disk1 |
10) Resynchronizing the BCV
Resynchronize standard device STD001 and BCV device BCV001 for the following backup. Execute the following command on Node1 or Node2 in the primary domain.
# symmir -g DevGroup establish STD001 bcv ld BCV001 |
To back up again, follow the procedure from step 4).
11) Stopping the services
Exit all applications using application volume Volume1 on Node1 and Node2 in the primary domain.
When Volume1 is used as a file system, unmount it.
12) Stopping the application volume
Stop application volume Volume1 on Node1 and Node2 in the primary domain. Execute the following command on Node1 or Node2.
# sdxvolume -F -c Class1 -v Volume1 -e allnodes |
13) Disconnecting any nonrelevant disk from the application volume
In the primary domain, disconnect any disk (Disk2) other than Disk1 that is the restore target from Class1, among disks connected to Class1 to which application volume Volume1 belongs. Execute the following command on Node1 or Node2 in the primary domain.
# sdxswap -O -c Class1 -d Disk2 |
14) Restoring from the BCV
Restore data held in standard device STD001 from BCV device BCV001 in the primary domain. The following procedure must be performed on Node1 or Node2 in the primary domain.
14-1) Restoring from the BCV
Restore data held in standard device STD001 from BCV device BCV001.
# symmir -g DevGroup restore STD001 BCV ld BCV001 |
14-2) Viewing the status of restore
When restore is in process, a BCV pair of standard device STD001 and BCV device BCV001 is in the RestInProg status. Confirm that restore is complete and the BCV pair is made the Restored status.
# symmir -g DevGroup query
Device Group (DG) Name: DevGroup
DG's Type : REGULAR
DG's Symmetrix ID : 000285502123 Standard Device BCV Device State
------------------------- ------------------------------------ ------------
Inv. Inv.Logical Sym Tracks Logical Sym Tracks STD <=> BCV ------------------------- ------------------------------------ ------------ STD001 005 0 BCV001 073 * 0 Restored |
15) Resuming the services and reconnecting the disk back to the application volume
Resume the services in the primary domain. The following settings are necessary on the node that runs the service.
Information
In the following example resuming the service is put above resynchronizing the application volume. Through this procedure the services are resumed first and then resynchronization of the volume is secured during the services operation. If resynchronizing the volume should be put above resuming the services, the procedure should be followed in the order of steps 15-1), 15-3), 15-4) (confirming that the synchronization copying is complete), and 15-2).
15-1) Activating the application volume
Activate application volume Volume1.
# sdxvolume -N -c Class1 -v Volume1 |
15-2) Resuming the services
When the file system on application volume Volume1 was unmounted in step 11), mount it again.
Start the applications using Volume1.
15-3) Reconnecting the disk to the application volume
Reconnect Disk2 disconnected from Class1 to which application volume Volume1 belongs in step 13).
# sdxswap -I -c Class1 -d Disk2 -e nowaitsync |
After returning from the command, synchronization copying from the slice on Disk1 of volume Volume1 to the slice on Disk2 is executed.
154) Viewing the copy status
The status of synchronization copying can be viewed using the sdxinfo -S command. The copy destination slice is in COPY status if copying is in progress and it will be in ACTIVE status after the copy process ends normally (note, however, that it will be in STOP status when Volume1 is in STOP status).
# sdxinfo -S -c Class1 -o Volume1 |
16) Stopping the services
Exit all applications using application volume Volume1 on Node1 and Node2 in the primary domain.
When Volume1 is used as a file system, unmount it.
17) Stopping the services application
To write-lock volume Volume1, inactivate Volume1 on Node1 and Node2 in the primary domain. Execute the following command on Node1 or Node2.
# sdxvolume -F -c Class1 -v Volume1 -e allnodes |
18) Detaching any nonrelevant slice from the application volume
Temporarily detach the slice on any disk (Disk2) other than Disk1 that is the restore target from Volume1, among slices in application volume Volume1. Execute the following command on Node1 or Node2 in the primary domain.
# sdxslice -M -c Class1 -d Disk2 -v Volume1 -a jrm=off |
Point
On backup server Node3, after Disk1 data is restored from tape, the slice on Disk2 is supposed to be reattached to application volume Volume1 in the primary domain. At this point the entire volume data must be copied to the attached slice. For this reason, the JRM mode of a detached slice must be set to off in advance.
Information
If access can be gained from backup server Node3 to Disk2, data can be restored from tape back to both Disk1 and Disk2 on Node3. Under these circumstances, this procedure (detaching a slice) should not be performed.
19) Viewing the configuration and status of the application volume
On Node1 and Node2 in the primary domain, see the configuration and status of application volume Volume1 that is restore target. Confirm that Volume1 is in STOP status and that only restore target slice Volume1.Disk1 is in STOP status among the slices constituting the volume and the other slices are in TEMP or TEMP-STOP status. If the volume or slice status is invalid, repair it referring to "F.1.3 Volume Status Abnormality" or "F.1.1 Slice Status Abnormality."
# sdxinfo -c Class1
OBJ    NAME    TYPE     SCOPE       SPARE
------ ------- -------- ----------- -----
class  Class1  shared   Node1:Node2 0
OBJ NAME TYPE CLASS GROUP DEVNAM DEVBLKS DEVCONNECT STATUS ------ ------- ------ ------- ------- --------- -------- ---------------- ------- disk Disk1 mirror Class1 Group1 emcpower1 8380800 Node1:Node2 ENABLE disk Disk2 mirror Class1 Group1 emcpower2 8380800 Node1:Node2 ENABLE OBJ NAME CLASS DISKS BLKS FREEBLKS SPARE ------ ------- ------- ------------------- -------- -------- ----- group Group1 Class1 Disk1:Disk2 8290304 7176192 0 OBJ NAME CLASS GROUP SKIP JRM 1STBLK LASTBLK BLOCKS STATUS ------ ------- ------- ------- ---- --- -------- -------- -------- -------- volume * Class1 Group1 * * 0 65535 65536 PRIVATE volume Volume1 Class1 Group1 off on 65536 1114111 1048576 STOP volume * Class1 Group1 * * 1114112 8290303 7176192 FREE OBJ CLASS GROUP DISK VOLUME STATUS ------ ------- ------- ------- ------- -------- slice Class1 Group1 Disk1 Volume1 STOP slice Class1 Group1 Disk2 Volume1 TEMP |
Information
When access can be gained from backup server Node3 to all of the disks constituting Volume1 (Disk1 and Disk2), you must confirm that all of the slices of Volume1 are in the STOP status.
20) Creating a shadow volume for restoration
On backup server Node3, create a volume for restoration (shadow volume) in disk emcpower1. The following settings are necessary on backup server Node3.
20-1) Registering a shadow disk
Register disk emcpower1 with shadow class Class3, and name it Disk1.
# sdxshadowdisk -M -c Class3 -d emcpower1=Disk1 |
Point
The disk name must correspond to the disk name assigned to emcpower1 in step 1-1). The disk names assigned in 1-1) can be viewed in the NAME field displayed with the sdxinfo command in step 19).
The class can be assigned any name. However, if Node3 resides in the same domain as Node1 and Node2, it must be assigned a name different from the name of the class created in step 1-1).
Information
When access can be gained from backup server Node3 to all of the disks constituting Volume1 (emcpower1 and emcpower2), you must register all of the disks constituting Volume1 (emcpower1 and emcpower2) with a shadow class.
20-2) Creating a shadow group
Connect shadow disk Disk1 to mirror type shadow group Group1.
# sdxshadowdisk -C -c Class3 -g Group1 -d Disk1 |
Information
When access can be gained from backup server Node3 to all of the disks constituting Volume1 (emcpower1 and emcpower2), you must connect all of the disks constituting Volume1 (emcpower1 and emcpower2) to a shadow group.
20-3) Creating a shadow volume
Create shadow volume Volume1 to shadow group Group1.
# sdxshadowvolume -M -c Class3 -g Group1 -v Volume1 -s 1048576 |
Point
The volume must be created in the size corresponding to the volume size in step 1-3). The size of a volume created in step 1-3) can be viewed in the BLOCKS field for volume information displayed with the sdxinfo command in step 19).
If there are multiple volumes, the corresponding shadow volumes must be created in the order of ascending values (first block numbers) in the 1STBLK field for volume information displayed with the sdxinfo command in step 19).
The volume can be assigned any name.
20-4) Setting the access mode of the shadow volume
Activate shadow volume Volume1 in the read and write access mode (rw).
# sdxshadowvolume -F -c Class3 -v Volume1 # sdxshadowvolume -N -c Class3 -v Volume1 -e mode=rw |
20-5) Viewing the shadow volume configuration
Using the sdxinfo command, confirm that the group configuration and the volume configuration are correct based on group information in the DISKS field, volume information in the 1STBLK field and in the BLOCKS field and so on.
# sdxinfo -c Class3
OBJ NAME TYPE SCOPE SPARE
------ ------- -------- ----------- -----
class Class3 local Node3 0OBJ NAME TYPE CLASS GROUP DEVNAM DEVBLKS DEVCONNECT STATUS ------ ------- ------ ------- ------- --------- -------- ---------------- ------- disk Disk1 mirror Class3 Group1 emcpower1 8380800 Node3 ENABLE OBJ NAME CLASS DISKS BLKS FREEBLKS SPARE ------ ------- ------- ------------------- -------- -------- ----- group Group1 Class3 Disk1 8290304 7176192 0 OBJ NAME CLASS GROUP SKIP JRM 1STBLK LASTBLK BLOCKS STATUS ------ ------- ------- ------- ---- --- -------- -------- -------- -------- volume * Class3 Group1 * * 0 65535 65536 PRIVATE volume Volume1 Class3 Group1 off off 65536 1114111 1048576 ACTIVE volume * Class3 Group1 * * 1114112 8290303 7176192 FREE OBJ CLASS GROUP DISK VOLUME STATUS ------ ------- ------- ------- ------- -------- slice Class3 Group1 Disk1 Volume1 ACTIVE |
21) Restoring from tape
On backup server Node3, restore shadow volume data from tape to which it was backed up in step 8). In the following examples, restore data held in shadow volume Volume1 from a tape medium of tape device /dev/rmt/0.
See
For details on the restore method, see the manuals of file systems to be restored and used commands.
Information
In a GFS Shared File System
Restore through the method as described in step 21a).
21a) When restoring data held in a raw device with the dd(1M) command
# dd if=/dev/rmt/0 of=/dev/sfdsk/Class3/rdsk/Volume1 bs=32768 |
21b) When restoring a ufs file system with the tar(1) command
21b-1) Create a ufs file system to shadow volume Volume1.
# newfs /dev/sfdsk/Class3/rdsk/Volume1 |
21b-2) Mount the ufs file system on shadow volume Volume1 on /mnt2, a temporary mount point.
# mkdir /mnt2 # mount -F ufs /dev/sfdsk/Class3/dsk/Volume1 /mnt2 |
21b-3) Restore data held in the file system from tape.
# cd /mnt2 # tar xvf /dev/rmt/0 |
21b-4) Unmount the file system mounted in step 21b-2).
# cd / # umount /mnt2 # rmdir /mnt2 |
21c) When restoring a ufs file system with the ufsrestore(1M) command
21c-1) Create a ufs file system to shadow volume Volume1.
# newfs /dev/sfdsk/Class3/rdsk/Volume1 |
21c-2) Mount the ufs file system on shadow volume Volume1 on /mnt2, a temporary mount point.
# mkdir /mnt2 # mount -F ufs /dev/sfdsk/Class3/dsk/Volume1 /mnt2 |
21c-3) Restore data held in the file system from tape.
# cd /mnt2 # ufsrestore rvf /dev/rmt/0 |
21c-4) Delete the temporary file created by the ufsrestore(1M) command.
# rm /mnt2/restoresymtable |
21c-5) Unmount the file system mounted in step 21c-2).
# cd / # umount /mnt2 # rmdir /mnt2 |
22) Removing the shadow volume
After the restore process is complete, remove the shadow volume to prevent improper access to it. The following procedure must be performed on backup server Node3.
22-1) Stopping the shadow volume
Stop shadow volume Volume1.
# sdxshadowvolume -F -c Class3 -v Volume1 |
22-2) Removing the shadow volume
Remove shadow volume Volume1.
# sdxshadowvolume -R -c Class3 -v Volume1 |
22-3) Removing the shadow group
Remove shadow group Group1.
# sdxshadowgroup -R -c Class3 -g Group1 |
22-4) Removing the shadow disk
Remove shadow disk Disk1.
# sdxshadowdisk -R -c Class3 -d Disk1 |
Information
When access can be gained from backup server Node3 to all of the disks constituting Volume1 (emcpower1 and emcpower2), you must remove all of the disks registered with shadow class Class3 in step 20) (emcpower1 and emcpower2).
23) Resuming the services and reattaching the slice to the application volume
Resume the services in the primary domain. The following settings are necessary on the node that runs the services.
Information
In the following example resuming the services is put above resynchronizing the application volume. Through this procedure the services are resumed first and then resynchronization of the volume is secured during the services operation. If resynchronizing the volume should be put above resuming the services, the procedure should be followed in the order of steps 23-1), 23-3), 23-4) (confirming that the synchronization copying is complete), and 23-2).
23-1) Activating the application volume
Activate application volume Volume1.
# sdxvolume -N -c Class1 -v Volume1 |
23-2) Resuming the services
When the file system on application volume Volume1 was unmounted in step 16), mount it again.
Start the applications using Volume1.
23-3) Reattaching the slice to the application volume
Reattach slice Volume1.Disk2 temporarily detached from application volume Volume1 in step 18).
# sdxslice -R -c Class1 -d Disk2 -v Volume1 |
After returning from the command, synchronization copying from the slice on Disk1 of volume Volume1 to the slice on Disk2 is executed.
23-4) Viewing the copy status
The status of synchronization copying can be viewed using the sdxinfo -S command. The copy destination slice is in COPY status if copying is in progress and it will be in ACTIVE status after the copy process ends normally (note, however, that it will be in STOP status when Volume1 is in STOP status).
# sdxinfo -S -c Class1 -o Volume1
OBJ    CLASS   GROUP   DISK    VOLUME  STATUS
------ ------- ------- ------- ------- --------
slice  Class1  Group1  Disk1   Volume1 ACTIVE
slice Class1 Group1 Disk2 Volume1 COPY |