This section describes the procedure for using the file export utility to export files and folders to DVD/CD.
OS that allows export
The OS that can export files to CD media and DVD media are as follows:
Windows 7 Ultimate
Windows 7 Enterprise
Windows 7 Professional
Windows 7 Home Premium
Windows 8.1 Enterprise
Windows 8.1 Pro
Windows 10 Home
Windows 10 Pro
Windows 10 Enterprise
Windows 10 Education
Conditions of DVD/CD that allows export
Types of the media that can be exported: CD-R, CD-RW, DVD-R, DVD-RW
Status of the media that can be exported: blank media
Blank media refers to the following.
Unformatted CD-R/RW or DVD-R/RW media after purchasing. However, the specific circumstance when the media has already been formatted should be excluded.
The CD-RW/DVD-RW media that has been burned but erased with the Export Utility.
The CD-R, CD-RW, DVD-R and DVD-RW that are formatted by the following methods cannot be used as the media that allows export even if no file exists after formatting.
When the disk is formatted to UDF for packet writing
When the disk is formatted to CDFS for streaming writing
Erase DVD-RW/CD-RW
When erasing the data existing in a DVD-RW/CD-RW media and exporting files to that DVD/CD, use the File Export Utility to erase data. The steps of erasing data are as follows.
Start the File Export Utility window.
Select Erase CD-RW/DVD-RW from the File menu.
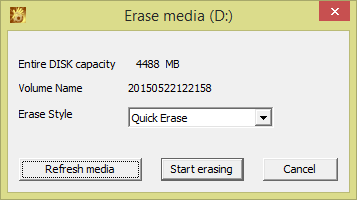
The Erase media window is displayed. Select a DVD/CD drive that contains the media for data erasing, and then click the Erase button.
The Erase media window is displayed.

When erasing DVD/CD quickly
Select Quick Erase. Quick erase means only to erase the PMA(Program Memory Area) and TOC(Table Of Contents) field.
When erasing DVD/CD completely
Select Complete Erase. Complete erase means to erase all fields of the DVD/CD.
When updating the DVD/CD information displayed in the window
Click the Refresh media button. The Entire DISK capacity and Volume Name of DVD/CD will be displayed again.
Select the Erase Style for a DVD/CD, and click the Start erasing button.
The confirmation window asking whether erase process is to be executed is displayed.
To erase, click the OK button.
The Erasing media window is displayed, and data erasing is started.
The completion window will be displayed when processing is finished. Click the OK button.
Export File and Folder
The steps of exporting files and folders to a DVD/CD with File Export Utility are as follows.
Note
Confirm the status of file
Do not access the file that is being exported through the export utility from another application. When the file in the export process is being accessed, an error may occur.
When decrypting the file in the export destination, the OS operation authority is required for encrypting files, and files cannot be decrypted without operation authority.
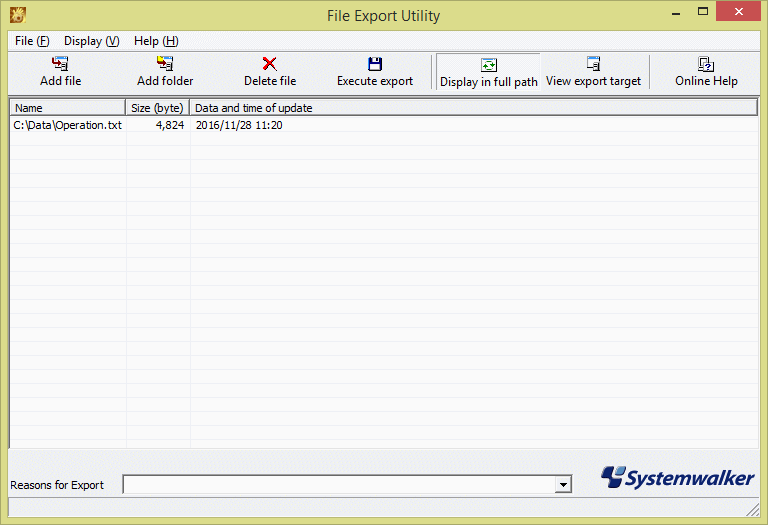
Start the File Export Utility window.
Add the file or folder to be exported with any of the following methods.
Note
The following restrictions are applied to the length of the file name or folder name of the export target.
Therefore, before export, check the length of the file name or folder name to be exported to make sure it is within the limit of export target.
In particular, when exporting folders, if the subordinate files exceed the limit, an error will also occur, which will disable the export. Be aware of this.
[About the character encoding, length of file name and folder name of export target]
The maximum length of the file name of the export target is 240 bytes (including path length) (folder separator (\) is counted as 1 byte, and 1 character of a file name and folder name is counted as 2 bytes).
In addition, file name and folder name are specified within halfwidth and 64 fullwidth characters respectively.
UNICODE characters cannot be used for the file name and folder name of the export target.
The following restrictions are applied to the character code of the file name and folder name of the export target.
[About the character encoding of the name of the file and folder to be exported]
When encrypting the file or folder before export, or exporting a file or folder to CD/DVD, the UNICODE characters cannot be used in the name of the file and folder to be exported.
Use the menu of the File Export Utility window.
Select Add file from the File menu when exporting files.
The selection window for the file to be exported is displayed.
Select the file or folder to be exported and click the Open button.
Repeat a. and b. when exporting multiple files.
Drag and drop the files and folders to the File Export Utility window.
Note
When executing in Windows 7, Windows 8.1 and Windows 10
If you right-click on Execute as Administrator when starting the Export Utility, drag and drop cannot be performed. But with the administrator login, drag and drop can be performed from Execute as Administrator.
The File Export Utility window is displayed.

When folder export is selected, the total size of files under this folder will be displayed in Size.
When the input field of reasons for export is displayed, enter the reason.
Select Execute export from the File menu.
Depending on the policy settings, sometimes only removable disks and DVDs/CDs are displayed as options for the destination drive.
Click the OK button on the execution confirmation window.
The Select target for normal file export window is displayed.
Select the DVD/CD drive of the target to be exported, and click the OK button.
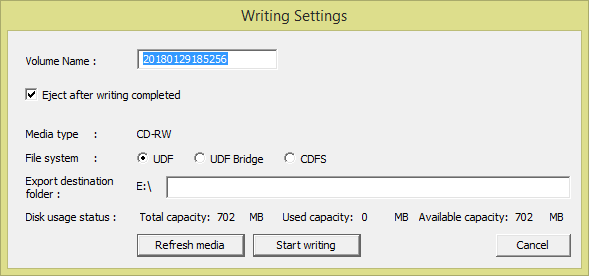
The Writing Settings window is displayed.

Enter the following information, and click the Start writing button.
Item Name | Description | |
|---|---|---|
Volume Name | Enter the name of DVD/CD that is written. | |
Eject after writing completed | Select it to eject the media after the writing has finished. | |
File system | UDF | Write in UDF format. |
UDF Bridge | Write in UDF Bridge format. | |
CDFS | Write in UDF format. | |
Export destination folder | Enter the created folder name when creating a folder in the DVD/CD of the target for export. The following halfwidth symbols cannot be used in folder name. '\', '/', ':', ';', '*', '?', '"', '<', '>', '|' | |
When inserting a writable DVD/CD media, information of the DVD/CD media will be displayed (total capacity, used space and remaining space). To display the latest information, click the Refresh media button.
The Writing window is displayed.
The completion window is displayed after the file export is complete. Click the OK button.
When accessing the DVD/CD drive immediately after writing the DVD/CD media, it is likely that the media information cannot be viewed. In this case, eject the media and insert it again.