In order to allocate users to groups, users should be registered in the corresponding group.
When importing configuration information from Active Directory, for the registration of a user, refer to "Display Configuration Information Tree".
Point
When managing user policies collectively, operate from Master Management Server
In the Server Settings Tool, when user policies are collective management, add, update, move and delete users through the Master Management Server.
The following are two methods for registering users:
Register users one by one
Register users collectively using CSV file
When Active Directory Linkage is not performed, up to 10000 cases can be registered at one operation.
When Active Directory Linkage is performed, up to 100000 cases can be registered under the Local group of configuration information tree at one operation.
It is necessary to have Import CSV File authority for the Management Console during operation. The setting of authority is performed in the Detail authority of the Administrator information settings window of the Server Settings Tool.
The CSV file of allocated user information should be created in advance. For details on the CSV file, refer to "User Information" of Reference Manual.
Note
Set registration information correctly
Set registration information correctly in the CSV file. When the CSV file is not created according to the following description, even if error exists in one line, none of the users be registered (the part with correct setting will not be registered at the end of processing). Therefore, all users need to be registered again.
Register Users One by One
Follow the procedure below:
Start Management Console.
Select User Policy Settings from the User Settings menu.
The User Policy Settings window is displayed.
Nothing will be displayed in the user list and user properties.
The initial value that is set in the each policy of Terminal Initial Settings window will be displayed in the user policy list.
The collection of following logs cannot be set as user policy. Therefore, in Windows > Log collection operation in the User Policy Settings window, the buttons for collecting these logs do not exist. When collecting the following logs, set it as CT policy.
File Operation Log
Logon/Logoff Log
Linkage Application Log
Select the user group with users to be registered from the user group tree.
Click the New user button of user properties.
Enter the required information into user properties and click the Add button.
For details of input information, refer to "User Properties".
The value of terminal initial settings is set as user policy and the confirmation window is displayed.
Click the OK button.
Register Users Collectively Using CSV File
This section describes how to allocate users collectively using the CSV file.
Start Management Console.
Select User Policy Settings from the User Settings menu.
The User Policy Settings window is displayed.
Select Import User Information in CSV Format of the Link with CSV menu
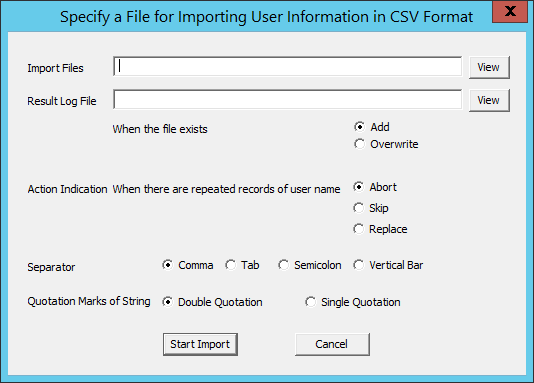
The Specify a File for Importing User Information in CSV Format window is displayed.

Item Name | Description |
|---|---|
Import Files | Specify the created CSV file. The specification method is as follows:
The maximum length of the full path is 218 halfwidth characters (109 fullwidth characters). In addition, the following symbols cannot be used in a file name: "\""/"":""*""?"""""<"">""|" Refer to "User Information" in the Reference Manual for details on the specification of the CSV file for importing. |
Result Log File (Required) | Specify the file for outputting execution result when importing CSV files. Errors during import will also be output to this file. The specification method is as follows:
The maximum length of the full path is 218 halfwidth characters (109 fullwidth characters). In addition, the following symbols cannot be used in a file name: "\""/"":""*""?"""""<"">""|" |
When the file exists (Required) | In Specify result log file, select an output method when the log output file has already been specified:
|
Action Indication When there are repeated records of user name (Required) | Select one of the following operations if duplicate User Name exists when importing a CSV file:
|
Separator (Required) | Select the separator that has been input when creating a CSV file. An error may occur in the case of wrong selection. |
Quotation marks of String | Select the quotation of string that has been input when creating a CSV file.
|
An input example of the user information CSV import file is shown below:
'taro','Taro Fujitsu','100000','Department Manager','Administration Department','5555','Asset manager'
'hanako','Hanako Fujitsu','100001','Section Manager','Administration Department','5555',''
After entering all the above information, click the Start Import button.
The Display the Status of Importing User Information in CSV Format window is displayed and the import of CSV files starts.
If an error occurs, it will be displayed in the Display the Status of Importing User Information in CSV Format window. In addition, the same content will also be output to the operation log file. After the error has been confirmed and corrected, register all the user information again.
Return to the User Policy Settings window, and click the Refresh button.
The user information imported from the CSV file is displayed.