You need to set up Web-Based Admin View, as described below, after setting up Fast switching mode on GLS (Redundant Line Control Function):
Note
You need the following configurations on the management servers and monitored nodes that support GLS Fast switching mode.
Setup of Client (Setup of IP route table)
Using the MS-DOS command prompt, define the following for each client:
For IPv4
C:\Windows>route add <virtual IP address A> MASK <subnet mask> <IP address A>
C:\Windows>route add <virtual IP address B> MASK <subnet mask> <IP address B>
Should be connected to the same network as the client out of the virtual IP addresses defined by GLS on a primary management server, and of the IP addresses corresponded to the physical interface names composed by those virtual IP addresses.
Should be connected to the same network as the client out of the virtual IP addresses defined by GLS on a secondary management server, and of the IP addresses corresponded to the physical interface names composed by those virtual IP addresses.
Subnet mask
255.255.255.255 is set up.
For IPv6
C:\Windows>route add <virtual IP address A>/<prefix length> <IP address A>
C:\Windows>route add <virtual IP address B>/<prefix length> <IP address B>
Should be connected to the same network as the client out of the virtual IP addresses defined by GLS on a primary management server, and of the IP addresses corresponded to the physical interface names composed by those virtual IP addresses.
Should be connected to the same network as the client out of the virtual IP addresses defined by GLS on a secondary management server, and of the IP addresses corresponded to the physical interface names composed by those virtual IP addresses.
128 is set up.
Note
Since information set up by the route command is deleted if the client is re-IPL, you need to register it in a batch file or log procedure in the startup folder.
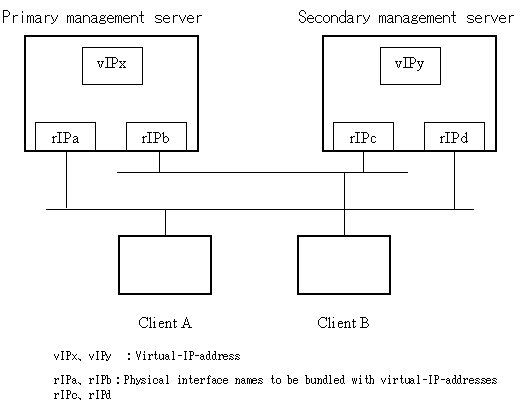
These are the setup examples by wvSetparam command in the following environment.

For IPv4
Setup for client A
C:\Windows>route add <vIPx> 255.255.255.255 <rIPa>
C:\Windows>route add <vIPy> 255.255.255.255 <rIPd>
Setup for client B
C:\Windows>route add <vIPx> 255.255.255.255 <rIPb>
C:\Windows>route add <vIPy> 255.255.255.255 <rIPc>
For IPv6
Setup for client A
C:\Windows>route add <vIPx>/128 <rIPa>
C:\Windows>route add <vIPy>/128 <rIPd>
Setup for client B
C:\Windows>route add <vIPx>/128 <rIPb>
C:\Windows>route add <vIPy>/128 <rIPc>
Make an IP address redundant using the following steps:
Stop Web-Based Admin View on all the management servers and monitored nodes.
Refer to "6.1 Stop".
Set up an IP address
Execute the following command on the management servers or monitored nodes where GLS virtual IP address needs to be set.
# /etc/opt/FJSVwvbs/etc/bin/wvSetparam mip <mip>
# /etc/opt/FJSVwvbs/etc/bin/wvSetparam httpip <httpip>
<mip> is mip. It sets the virtual IP address.
<mip> is httpip. It sets the virtual IP address.
Change the management server settings
If the changed monitored node acts as a cluster management server as well, you must change the management server settings on all the management server sand monitored nodes.
# /etc/opt/FJSVwvbs/etc/bin/wvSetparam primary-server <primary management server IP address or Host name>
# /etc/opt/FJSVwvbs/etc/bin/wvSetparam secondary-server <secondary management server IP address or Host name>
Specify mip of the management servers respectively for each IP address or host name of primary and secondary management servers.
Restart Web-Based Admin View on all the management servers and monitored nodes.
Refer to "6.2 Restart".
Note
Only the IP address can be set to a primary management server, secondary management server, and httpip.