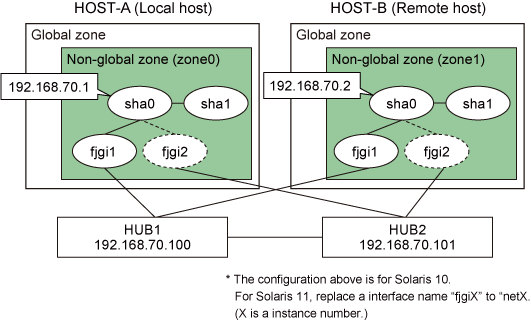
This section explains how to configure highly reliable networks of non-global zones with the shared IP configuration.
This section describes an example configuration procedure of the network shown in the diagram below.

[HOST-A zone0]
1) Login to the non-global zone
1-1) Login to the non-global zone by executing the following command:
# /usr/sbin/zlogin zone0 |
2) Setting up the system
2-1) Define IP addresses and hostnames in the /etc/inet/hosts file.
192.168.70.1 zone0 # HOST-A zone0 Virtual IP 192.168.70.2 zone1 # HOST-B zone1 Virtual IP 192.168.70.100 swhub1 # primary HUB IP 192.168.70.101 swhub2 # secondary HUB IP |
2-2) When the OS type in a non-global zone is Solaris 10
Write the hostnames defined above in the /etc/hostname.fjgi1 file.
Contents of /etc/hostname.fjgi1
zone0 |
2-2) When the OS type in a non-global zone is Solaris 11
Set the host by the interface used with the ipadm(1M) command and also by the host name defined above.
Interface net1
# /usr/sbin/ipadm create-ip net1 # /usr/sbin/ipadm create-addr -T static -a zone0/24 net1/v4 |
2-3) Define the subnet mask in the /etc/inet/netmasks file.
192.168.70.0 255.255.255.0 |
3) Reboot (For Solaris 10)
Run the following command to reboot the non-global zone. Run this command from the non-global zone. Make sure fjgi1 is enabled by running the ifconfig command after rebooting the system.
# /usr/sbin/shutdown -y -i6 -g0 |
4) Creation of virtual interface
4-1) For Solaris 10
# /opt/FJSVhanet/usr/sbin/hanetconfig create -n sha0 -m e -i 192.168.70.1 -t fjgi1,fjgi2 |
4-1) For Solaris 11
# /opt/FJSVhanet/usr/sbin/hanetconfig create -n sha0 -m e -i 192.168.70.1 -t net1,net2 |
Note
Ensure that the physical IP address specified using option '-i' is the same IP address configured in /etc/hostname.fjgi1 or with the ipadm(1M) command.
5) Setting up the HUB monitoring function
# /opt/FJSVhanet/usr/sbin/hanetpoll create -n sha0 -p 192.168.70.100,192.168.70.101 -b off |
6) Setting up the Standby patrol monitoring function
# /opt/FJSVhanet/usr/sbin/hanetconfig create -n sha1 -m p -t sha0 |
7) Activation of virtual interface
# /opt/FJSVhanet/usr/sbin/strhanet |
8) Starting the HUB monitoring function
# /opt/FJSVhanet/usr/sbin/hanetpoll on |
[HOST-B zone1]
1) Login to the non-global zone
1-1) Login to the non-global zone by executing the following command:
# /usr/sbin/zlogin zone1 |
2) Setting up the system
2-1) Define IP addresses and hostnames in the /etc/inet/hosts file. Defined information is the same as for HOST-A zone0.
2-2) When the OS type in a non-global zone is Solaris 10
Write the hostnames defined above in the /etc/hostname.fjgi1 file.
Contents of /etc/hostname.fjgi1
zone1 |
2-2) When the OS type in a non-global zone is Solaris 11
Set the host by the interface used with the ipadm(1M) command and also by the host name defined above.
Interface net1
# /usr/sbin/ipadm create-ip net1 # /usr/sbin/ipadm create-addr -T static -a zone1/24 net1/v4 |
2-3) Define the subnet mask in the /etc/inet/netmasks file. Defined content is same as for HOST-A zone0.
3) Reboot (For Solaris 10)
Run the following command to reboot the non-global zone. Run this command from the non-global zone. Make sure fjgi1 is enabled by running the ifconfig command after rebooting the system.
# /usr/sbin/shutdown -y -i6 -g0 |
4) Creation of virtual interface
4-1) For Solaris 10
# /opt/FJSVhanet/usr/sbin/hanetconfig create -n sha0 -m e -i 192.168.70.2 -t fjgi1,fjgi2 |
4-1) For Solaris 11
# /opt/FJSVhanet/usr/sbin/hanetconfig create -n sha0 -m e -i 192.168.70.2 -t net1,net2 |
Note
Ensure that the physical IP address specified using option '-i' is the same IP address configured in /etc/hostname.fjgi1 or with the ipadm(1M) command.
5) Setting up the HUB monitoring function
# /opt/FJSVhanet/usr/sbin/hanetpoll create -n sha0 -p 192.168.70.100,192.168.70.101 -b off |
6) Setting up the Standby patrol monitoring function
# /opt/FJSVhanet/usr/sbin/hanetconfig create -n sha1 -m p -t sha0 |
7) Activation of virtual interface
# /opt/FJSVhanet/usr/sbin/strhanet |
8) Starting the HUB monitoring function
# /opt/FJSVhanet/usr/sbin/hanetpoll on |
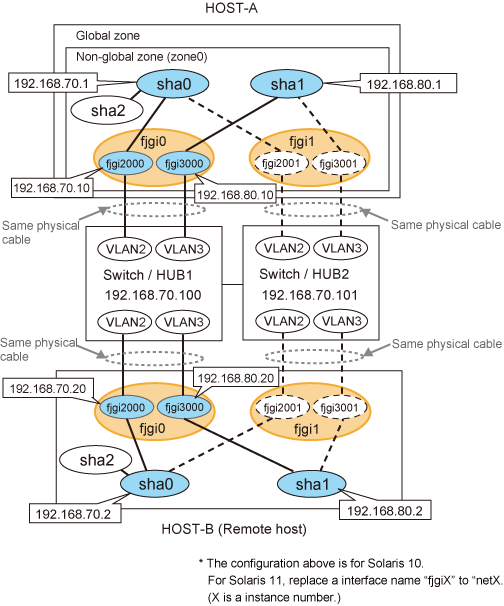
This section describes an example configuration procedure of the network shown in the diagram below.

[HOST-A Global zone]
1) Setting up the system
1-1) For Solaris 11, set the interface to be used by using the dladm(1M) command.
Interface net2000
# /usr/sbin/dladm create-vlan -l net0 -v 2 |
Interface net2001
# /usr/sbin/dladm create-vlan -l net1 -v 2 |
Interface net3000
# /usr/sbin/dladm create-vlan -l net0 -v 3 |
Interface net3001
# /usr/sbin/dladm create-vlan -l net1 -v 3 |
1-2) Set non-global zones so that the following interfaces can be used in non-global zones with the exclusive-IP configuration: fjgi2000, fjgi2001, fjgi3000, and fjgi3001 for Solaris 10; net2000, net2001, net3000, and net3001 for Solaris 11. For more information about setting non-global zones, see the manual of Solaris.
[HOST-A zone0]
1) Login to the non-global zone
1-1) Login to the non-global zone by executing the following command:
# /usr/sbin/zlogin zone0 |
2) Setting up the system
2-1) Define IP addresses and hostnames in /etc/inet/hosts file.
192.168.70.1 zone0a # zone-0 Virtual IP 192.168.70.10 zone071 # zone-0 Physical IP (Tagged VLAN interface) 192.168.80.1 zone0b # zone-0 Virtual IP 192.168.80.10 zone081 # zone-0 Physical IP (Tagged VLAN interface) 192.168.70.2 hostc # HOST-B Virtual IP 192.168.70.20 host72 # HOST-B Physical IP (Tagged VLAN interface) 192.168.80.2 hostd # HOST-B Virtual IP 192.168.80.20 host82 # HOST-B Physical IP (Tagged VLAN interface) 192.168.70.100 swhub1 # primary Switch/HUB IP 192.168.70.101 swhub2 # secondary Switch/HUB IP |
2-2) For Solaris 10
Write the hostnames defined above in the /etc/hostname.fjgi2000 file and the /etc/hostname.fjgi3000 file.
Contents of /etc/hostname.fjgi2000
host71 |
Contents of /etc/hostname.fjgi3000
host81 |
2-2) For Solaris 11
Set the host by the interface used with the dladm(1M) command and the ipadm(1M) commandand also by the host name defined above.
Interface net2000
# /usr/sbin/ipadm create-ip net2000 # /usr/sbin/ipadm create-addr -T static -a hosta71/24 net2000/v4 |
Interface net3000
# /usr/sbin/ipadm create-ip net3000 # /usr/sbin/ipadm create-addr -T static -a hosta81/24 net3000/v4 |
2-3) Define the subnet mask in the /etc/inet/netmasks file.
192.168.70.0 255.255.255.0 192.168.80.0 255.255.255.0 |
3) Creation of virtual interface
3-1) For Solaris 10
# /opt/FJSVhanet/usr/sbin/hanetconfig create -n sha0 -m d -i 192.168.70.1 -e 192.168.70.10 -t fjgi2000,fjgi2001 # /opt/FJSVhanet/usr/sbin/hanetconfig create -n sha1 -m d -i 192.168.80.1 -e 192.168.80.10 -t fjgi3000,fjgi3001 |
3-1) For Solaris 11
# /opt/FJSVhanet/usr/sbin/hanetconfig create -n sha0 -m d -i 192.168.70.1 -e 192.168.70.10 -t net2000,net2001 # /opt/FJSVhanet/usr/sbin/hanetconfig create -n sha1 -m d -i 192.168.80.1 -e 192.168.80.10 -t net3000,net3001 |
Note
Ensure that the physical IP address specified using option '-e' is the same IP address configured in /etc/hostname.fjgi2000, in /etc/hostname.fjgi3000, or with the ipadm(1M) command.
4) Setting up the HUB monitoring function
# /opt/FJSVhanet/usr/sbin/hanetpoll create -n sha0 -p 192.168.70.100,192.168.70.101 -b on |
5) Setting up the HUB monitoring function (Synchronized switching)
# /opt/FJSVhanet/usr/sbin/hanetpoll copy -n sha0,sha1 |
6) Setting up the Standby patrol monitoring function
Please define only one Standby patrol monitoring function.
# /opt/FJSVhanet/usr/sbin/hanetconfig create -n sha2 -m p -t sha0 |
7) Reboot
Run the following command to reboot the system. Make sure the following interfaces are enabled by using the ifconfig command after rebooting the system: fjgi2000 and fjgi3000 for Solaris 10; net2000 and net3000 for Solaris 11.
# /usr/sbin/shutdown -y -i6 -g0 |
[HOST-B]
1) Setting up the system
1-1) Define IP addresses and hostnames in /etc/inet/hosts file. Defined information is the same as for HOST-A zone0.
1-2) For Solaris 10
Write the hostnames defined above in the /etc/hostname /etc/hostname.fjgi2000 file and the /etc/hostname.fjgi3000 file.
Contents of /etc/hostname.fjgi2000
host72 |
Contents of /etc/hostname.fjgi3000
host82 |
1-2) For Solaris 11
Set the host by the interface used with the dladm(1M) command and the ipadm(1M) commandand also by the host name defined above.
Interface net2000
# /usr/sbin/dladm create-vlan -l net0 -v 2 # /usr/sbin/ipadm create-ip net2000 # /usr/sbin/ipadm create-addr -T static -a hosta72/24 net2000/v4 |
Interface net2001
# /usr/sbin/dladm create-vlan -l net1 -v 2 |
Interface net3000
# /usr/sbin/dladm create-vlan -l net0 -v 3 # /usr/sbin/ipadm create-ip net3000 # /usr/sbin/ipadm create-addr -T static -a hosta82/24 net3000/v4 |
Interface net3001
# /usr/sbin/dladm create-vlan -l net1 -v 3 |
1-3) Define the subnet mask in /etc/inet/netmasks file. Defined content is same as HOST-A zone0.
2) Creation of virtual interface
2-1) For Solaris 10
# /opt/FJSVhanet/usr/sbin/hanetconfig create -n sha0 -m d -i 192.168.70.2 -e 192.168.70.20 -t fjgi2000,fjgi2001 # /opt/FJSVhanet/usr/sbin/hanetconfig create -n sha1 -m d -i 192.168.80.2 -e 192.168.80.20 -t fjgi3000,fjgi3001 |
2-1) For Solaris 11
# /opt/FJSVhanet/usr/sbin/hanetconfig create -n sha0 -m d -i 192.168.70.2 -e 192.168.70.20 -t net2000,net2001 # /opt/FJSVhanet/usr/sbin/hanetconfig create -n sha1 -m d -i 192.168.80.2 -e 192.168.80.20 -t net3000,net3001 |
Note
Ensure that the physical IP address specified using option '-e' is the same IP address configured in /etc/hostname.fjgi2000, in /etc/hostname.fjgi3000, or with the ipadm(1M) command.
3) Setting up the HUB monitoring function
# /opt/FJSVhanet/usr/sbin/hanetpoll create -n sha0 -p 192.168.70.100,192.168.70.101 -b on |
4) Setting up the HUB monitoring function (Synchronized switching)
# /opt/FJSVhanet/usr/sbin/hanetpoll copy -n sha0,sha1 |
5) Setting up the Standby patrol monitoring function
Please define only one Standby patrol monitoring function.
# /opt/FJSVhanet/usr/sbin/hanetconfig create -n sha2 -m p -t sha0 |
6) Reboot
Run the following command to reboot the system. Make sure the following interfaces are enabled by using the ifconfig command after rebooting the system: fjgi2000 and fjgi3000 for Solaris 10; net2000 and net3000 for Solaris 11.
# /usr/sbin/shutdown -y -i6 -g0 |
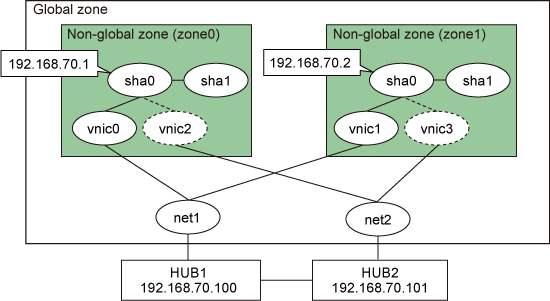
This section describes an example configuration procedure of the network shown in the diagram below. However, VNIC (interface created by the dladm(1M) command) used in this example of configuration is available with Solaris 11. Therefore, this function is not available in Solaris 10.

[Global zone]
1) Setting up the system
1-1) Set the interface to be used by using the dladm(1M) command.
Interface vnic0
# /usr/sbin/dladm create-vnic -l net1 vnic0 |
Interface vnic1
# /usr/sbin/dladm create-vnic -l net1 vnic1 |
Interface vnic2
# /usr/sbin/dladm create-vnic -l net2 vnic2 |
Interface vnic3
# /usr/sbin/dladm create-vnic -l net2 vnic3 |
1-2) Set non-global zones so that interfaces of vnic0, vnic1, vnic2, and vnic3 can be used in non-global zones with the exclusive-IP configuration. For more information about setting non-global zones, see the manual of Solaris 11.
[zone0]
1) Login to the non-global zone
1-1) Login to the non-global zone by executing the following command:
# /usr/sbin/zlogin zone0 |
2) Setting up the system
2-1) Define IP addresses and hostnames in the /etc/inet/hosts file.
192.168.70.1 zone0 # HOST-A zone0 Virtual IP 192.168.70.2 zone1 # HOST-B zone1 Virtual IP 192.168.70.100 swhub1 # primary HUB IP 192.168.70.101 swhub2 # secondary HUB IP |
2-2) Set the interface with host names defied above by using the ipadm(1M) command.
Interface vnic0
# /usr/sbin/ipadm create-ip vnic0 # /usr/sbin/ipadm create-addr -T static -a zone0/24 vnic0/v4 |
2-3) Define the subnet mask in the /etc/inet/netmasks file.
192.168.70.0 255.255.255.0 |
3) Reboot
Run the following command to reboot the non-global zone. Run this command from the non-global zone. Make sure vnic0 is enabled by running the ifconfig command after rebooting the system.
# /usr/sbin/shutdown -y -i6 -g0 |
4) Creation of virtual interface
# /opt/FJSVhanet/usr/sbin/hanetconfig create -n sha0 -m e -i 192.168.70.1 -t vnic0,vnic2 |
Note
Ensure that the physical IP address specified using option '-i' is the same IP address configured by the ipadm command.
5) Setting up the HUB monitoring function
# /opt/FJSVhanet/usr/sbin/hanetpoll create -n sha0 -p 192.168.70.100,192.168.70.101 -b off |
6) Setting up the Standby patrol monitoring function
# /opt/FJSVhanet/usr/sbin/hanetconfig create -n sha1 -m p -t sha0 |
7) Activation of virtual interface
# /opt/FJSVhanet/usr/sbin/strhanet |
8) Starting the HUB monitoring function
# /opt/FJSVhanet/usr/sbin/hanetpoll on |
[zone1]
1) Login to the non-global zone
1-1) Login to the non-global zone by executing the following command:
# /usr/sbin/zlogin zone1 |
2) Setting up the system
2-1) Define IP addresses and hostnames in the /etc/inet/hosts file. Defined information is the same as for zone0.
2-2) Set the interface with host names defied above by using the ipadm(1M) command.
Interface vnic1
# /usr/sbin/ipadm create-ip vnic1 # /usr/sbin/ipadm create-addr -T static -a zone1/24 vnic1/v4 |
2-3) Define the subnet mask in the /etc/inet/netmasks file. Defined content is same as for zone0.
3) Reboot
Run the following command to reboot the non-global zone. Run this command from the global zone. Make sure vnic1 is enabled by running the ifconfig command after rebooting the system.
# /usr/sbin/shutdown -y -i6 -g0 |
4) Creation of virtual interface
# /opt/FJSVhanet/usr/sbin/hanetconfig create -n sha0 -m e -i 192.168.70.2 -t vnic1,vnic3 |
Note
Ensure that the physical IP address specified using option '-i' is the same IP address configured by the ipadm command.
5) Setting up the HUB monitoring function
# /opt/FJSVhanet/usr/sbin/hanetpoll create -n sha0 -p 192.168.70.100,192.168.70.101 -b off |
6) Setting up the Standby patrol monitoring function
# /opt/FJSVhanet/usr/sbin/hanetconfig create -n sha1 -m p -t sha0 |
7) Activation of virtual interface
# /opt/FJSVhanet/usr/sbin/strhanet |
8) Starting the HUB monitoring function
# /opt/FJSVhanet/usr/sbin/hanetpoll on |