This section explains how to configure highly reliable networks of non-global zones with the shared IP configuration.
This section describes an example configuration procedure of the network shown in the diagram below.
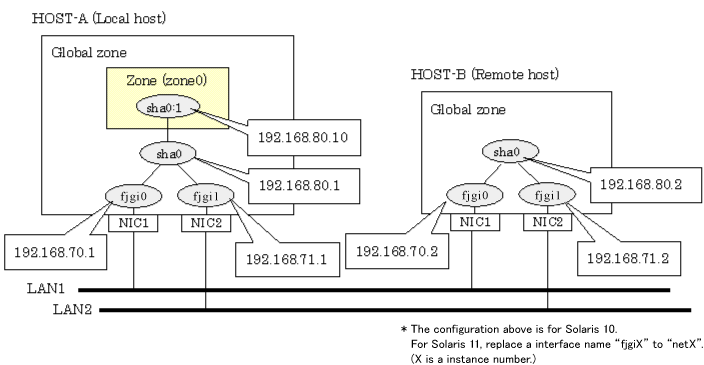
[HOST-A]
1) Setting up the system
1-1) Define IP addresses and hostnames in /etc/inet/hosts file.
192.168.70.1 host11 # HOST-A Physical IP (1) 192.168.71.1 host12 # HOST-A Physical IP (2) 192.168.80.1 hosta # HOST-A Virtual IP 192.168.70.2 host21 # HOST-B Physical IP (1) 192.168.71.2 host22 # HOST-B Physical IP (2) 192.168.80.2 hostb # HOST-B Virtual IP 192.168.80.10 zone0 # zone0 Logical IP |
1-2) For Solaris 10
Write the hostnames defined above in /etc/hostname.fjgi0 file and /etc/hostname.fjgi1 file. If a file does not exist, create a new file.
Contents of /etc/hostname.fjgi0
host11 |
Contents of /etc/hostname.fjgi1
host12 |
1-2) For Solaris 11
Set the host by the interface used with the ipadm(1M) command and also by the host name defined above.
Interface net0
# /usr/sbin/ipadm create-ip net0 # /usr/sbin/ipadm create-addr -T static -a host11/24 net0/v4 |
Interface net1
# /usr/sbin/ipadm create-ip net1 # /usr/sbin/ipadm create-addr -T static -a host12/24 net1/v4 |
1-3) Define the subnet mask in /etc/inet/netmasks file.
192.168.70.0 255.255.255.0 192.168.71.0 255.255.255.0 192.168.80.0 255.255.255.0 |
2) Reboot (For Solaris 10)
Run the following command to reboot the system. Make sure fjgi0 and fjgi1 are enabled as IPv4 interfaces after rebooting the system.
# /usr/sbin/shutdown -y -i6 -g0 |
3) Creation of virtual interface
3-1) For Solaris 10
# /opt/FJSVhanet/usr/sbin/hanetconfig create -n sha0 -m t -i 192.168.80.1 -t fjgi0,fjgi1 |
3-1) For Solaris 11
# /opt/FJSVhanet/usr/sbin/hanetconfig create -n sha0 -m t -i 192.168.80.1 -t net0,net1 |
4) Activation of virtual interface
# /opt/FJSVhanet/usr/sbin/strhanet |
5) Set up a zone
Set up a zone by executing the following command:
# /usr/sbin/zonecfg -z zone0 |
5-1) Create a zone.
zonecfg:zone0> create zonecfg:zone0> set zonepath=/zones/zone0 |
5-2) Specify an IP address that is allocated to the zone and the virtual interface name that is defined in Fast switching mode.
zonecfg:zone0> add net zonecfg:zone0:net> set address=192.168.80.10/24 zonecfg:zone0:net> set physical=sha0 zonecfg:zone0:net> end |
Note
For Solaris 11, the default network is the exclusive-IP zone (ip-type=exclusive). Change the default network to the shared IP zone (ip-type=shared) before setting above values. For details, refer to the Solaris manual.
5-3) Check the above setting.
zonecfg:zone0> export |
5-4) Check setup consistency.
zonecfg:zone0> verify |
5-5) Register the setting.
zonecfg:zone0> commit zonecfg:zone0> exit |
6) Install the zone
Install the zone by executing the following command:
# /usr/sbin/zoneadm -z zone0 install |
Note
When a zone is booted for the first time after installation, the zone is in an unconfigured state. Therefore, it is necessary to define an internal zone configuration. Please refer to the manual of Solaris for the definition methods.
7) Start up the zone
Start up the zone by executing the following command:
# /usr/sbin/zoneadm -z zone0 boot |
[HOST-B]
1) Setting up the system
1-1) Define IP addresses and hostnames in /etc/inet/hosts file. Defined information is the same as for HOST-A.
1-2) For Solaris 10
Write the hostnames defined above in /etc/hostname.fjgi0 file and /etc/hostname.fjgi1 file. If a file does not exist, create a new file.
Contents of /etc/hostname.fjgi0
host21 |
Contents of /etc/hostname.fjgi1
host22 |
1-2) For Solaris 11
Set the host by the interface used with the ipadm(1M) command and also by the host name defined above.
Interface net0
# /usr/sbin/ipadm create-ip net0 # /usr/sbin/ipadm create-addr -T static -a host21/24 net0/v4 |
Interface net1
# /usr/sbin/ipadm create-ip net1 # /usr/sbin/ipadm create-addr -T static -a host22/24 net1/v4 |
1-3) Define the subnet mask in /etc/inet/netmasks file. Defined content is same as HOST-A.
2) Reboot (For Solaris 10)
Run the following command to reboot the system. Make sure fjgi0 and fjgi1 are enabled as IPv4 interfaces after rebooting the system.
# /usr/sbin/shutdown -y -i6 -g0 |
3) Creation of virtual interface
3-1) For Solaris 10
# /opt/FJSVhanet/usr/sbin/hanetconfig create -n sha0 -m t -i 192.168.80.2 -t fjgi0,fjgi1 |
3-1) For Solaris 11
# /opt/FJSVhanet/usr/sbin/hanetconfig create -n sha0 -m t -i 192.168.80.2 -t net0,net1 |
4) Activation of virtual interface
# /opt/FJSVhanet/usr/sbin/strhanet |
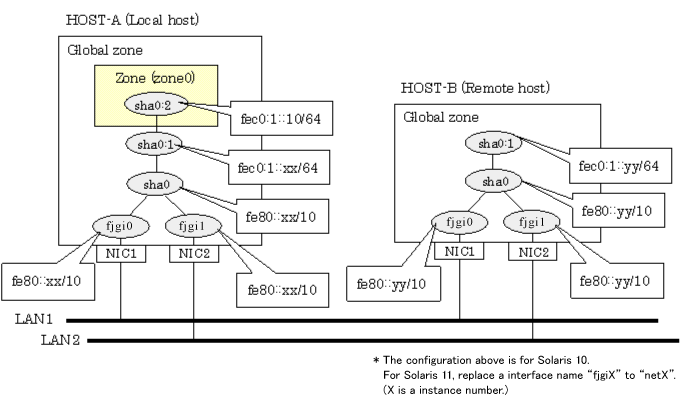
This section describes an example configuration procedure of the network shown in the diagram below.
The xx, yy in the figure below are assigned automatically by the automatic address configuration.
[HOST-A]
1) Setting up the system
1-1) Create /etc/inet/ndpd.conf file and set the followings:
ifdefault AdvSendAdvertisements true # Every interface sends a router advertisement. prefix fec0:1::0/64 sha0 # sha0 sends Prefix "fec0:1::0/64". |
Note
In the Solaris server that runs Fast switching mode, configure two or more router as IPv6 router. If the IPv6 router breaks down, it cannot use site-local address to communicate. To prevent this, it is recommended to setup at least two IPv6 routers.
For details on /etc/inet/ndpd.conf, refer to the Solaris manual.
1-2) For Solaris 10
Create /etc/hostname6.fjgi0 and /etc/hostname6.fjgi1 files as an empty file.
1-2) For Solaris 11
Set the interface to be used by using the ipadm(1M) command.
Interface net0
# /usr/sbin/ipadm create-ip net0 # /usr/sbin/ipadm create-addr -T addrconf net0/v6 |
Interface net1
# /usr/sbin/ipadm create-ip net1 # /usr/sbin/ipadm create-addr -T addrconf net1/v6 |
2) Reboot (For Solaris 10)
Run the following command to reboot the system. Make sure fjgi0 and fjgi1 are enabled as IPv6 interfaces after rebooting the system.
# /usr/sbin/shutdown -y -i6 -g0 |
3) Creation of virtual interface
3-1) For Solaris 10
# /opt/FJSVhanet/usr/sbin/hanetconfig create inet6 -n sha0 -m t -t fjgi0,fjgi1 |
3-1) For Solaris 11
# /opt/FJSVhanet/usr/sbin/hanetconfig create inet6 -n sha0 -m t -t net0,net1 |
4) Activation of virtual interface
# /opt/FJSVhanet/usr/sbin/strhanet |
5) Set up a zone
Set up a zone by executing the following command:
# /usr/sbin/zonecfg -z zone0 |
5-1) Create a zone.
zonecfg:zone0> create zonecfg:zone0> set zonepath=/zones/zone0 |
5-2) Specify an IP address that is allocated to the zone and the virtual interface name that is defined in Fast switching mode.
zonecfg:zone0> add net zonecfg:zone0:net> set address=fec0:1::10/64 zonecfg:zone0:net> set physical=sha0 zonecfg:zone0:net> end |
Note
For Solaris 11, the default network is the exclusive-IP zone (ip-type=exclusive). Change the default network to the shared IP zone (ip-type=shared) before setting above values. For details, refer to the Solaris manual.
The host name of the IPv6 address cannot be specified for the zone network setting. If you use the IPv6 address, specify an IP address instead of the host name.
5-3) Check the above setting.
zonecfg:zone0> export |
5-4) Check setup consistency.
zonecfg:zone0> verify |
5-5) Register the setting.
zonecfg:zone0> commit zonecfg:zone0> exit |
6) Install the zone
Install the zone by executing the following command:
# /usr/sbin/zoneadm -z zone0 install |
Note
When a zone is booted for the first time after installation, the zone is in an unconfigured state. Therefore, it is necessary to define an internal zone configuration. Please refer to the manual of Solaris for the definition methods.
7) Start up the zone
Start up the zone by executing the following command:
# /usr/sbin/zoneadm -z zone0 boot |
[HOST-B]
1) Setting up the system
1-1) Create /etc/inet/ndpd.conf file. Defined information is the same as for HOST-A.
1-2) For Solaris 10
Create /etc/hostname6.fjgi0 and /etc/hostname6.fjgi1 files as an empty file.
1-2) For Solaris 11
Set the interface to be used by using the ipadm(1M) command.
Interface net0
# /usr/sbin/ipadm create-ip net0 # /usr/sbin/ipadm create-addr -T addrconf net0/v6 |
Interface net1
# /usr/sbin/ipadm create-ip net1 # /usr/sbin/ipadm create-addr -T addrconf net1/v6 |
2) Reboot (For Solaris 10)
Run the following command to reboot the system. Make sure fjgi0 and fjgi1 are enabled as IPv6 interfaces after rebooting the system.
# /usr/sbin/shutdown -y -i6 -g0 |
3) Creation of virtual interface
3-1) For Solaris 10
# /opt/FJSVhanet/usr/sbin/hanetconfig create inet6 -n sha0 -m t -t fjgi0,fjgi1 |
3-1) For Solaris 11
# /opt/FJSVhanet/usr/sbin/hanetconfig create inet6 -n sha0 -m t -t net0,net1 |
4) Activation of virtual interface
# /opt/FJSVhanet/usr/sbin/strhanet |
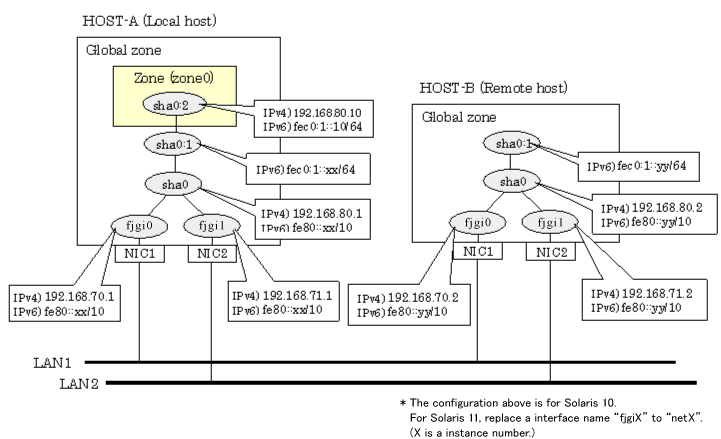
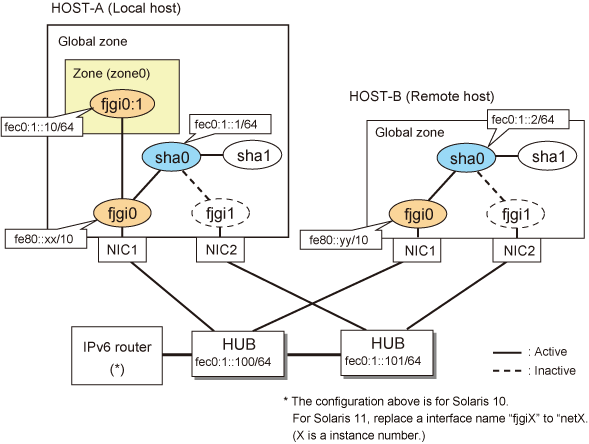
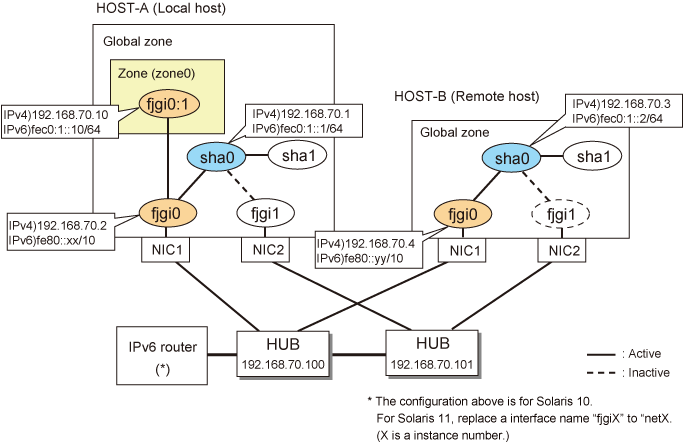
This section describes an example configuration procedure of the network shown in the diagram below.
The xx, yy in the figure below are assigned automatically by the automatic address configuration.
[HOST-A]
1) Setting up the system
1-1) Define IP addresses and hostnames in /etc/inet/hosts file.
192.168.70.1 host11 # HOST-A Physical IP (1) 192.168.71.1 host12 # HOST-A Physical IP (2) 192.168.80.1 hosta # HOST-A Virtual IP 192.168.70.2 host21 # HOST-B Physical IP (1) 192.168.71.2 host22 # HOST-B Physical IP (2) 192.168.80.2 hostb # HOST-B Virtual IP 192.168.80.10 zone0 # zone0 Logical IP |
1-2) For Solaris 10
Write the hostnames defined above in /etc/hostname.fjgi0 file and /etc/hostname.fjgi1 file. If a file does not exist, create a new file.
Contents of /etc/hostname.fjgi0
host11 |
Contents of /etc/hostname.fjgi1
host12 |
1-2) For Solaris 11
Set the host by the interface used with the ipadm(1M) command and also by the host name defined above.
Interface net0
# /usr/sbin/ipadm create-ip net0 # /usr/sbin/ipadm create-addr -T static -a host11/24 net0/v4 |
Interface net1
# /usr/sbin/ipadm create-ip net1 # /usr/sbin/ipadm create-addr -T static -a host12/24 net1/v4 |
1-3) Define the subnet mask in /etc/inet/netmasks file.
192.168.70.0 255.255.255.0 192.168.71.0 255.255.255.0 192.168.80.0 255.255.255.0 |
1-4) Create /etc/inet/ndpd.conf file and set the followings:
ifdefault AdvSendAdvertisements true # Every interface sends a router advertisement. prefix fec0:1::0/64 sha0 # sha0 sends Prefix "fec0:1::0/64". |
Note
In the Solaris server that runs Fast switching mode, configure two or more router as IPv6 router. If the IPv6 router breaks down, it cannot use site-local address to communicate. To prevent this, it is recommended to setup at least two IPv6 routers.
For details on /etc/inet/ndpd.conf, refer to the Solaris manual.
1-5) For Solaris 10
Create /etc/hostname6.fjgi0 and /etc/hostname6.fjgi1 files as an empty file.
1-5) For Solaris 11
Set the interface to be used by using the ipadm(1M) command.
Interface net0
# /usr/sbin/ipadm create-addr -T addrconf net0/v6 |
Interface net1
# /usr/sbin/ipadm create-addr -T addrconf net1/v6 |
2) Reboot (For Solaris 10)
Run the following command to reboot the system. Make sure fjgi0 and fjgi1 are enabled as IPv4/IPv6 interfaces after rebooting the system.
# /usr/sbin/shutdown -y -i6 -g0 |
3) Creation of virtual interface
3-1) For Solaris 10
# /opt/FJSVhanet/usr/sbin/hanetconfig create -n sha0 -m t -i 192.168.80.1 -t fjgi0,fjgi1 # /opt/FJSVhanet/usr/sbin/hanetconfig create inet6 -n sha0 -m t -t fjgi0,fjgi1 |
3-1) For Solaris 11
# /opt/FJSVhanet/usr/sbin/hanetconfig create -n sha0 -m t -i 192.168.80.1 -t net0,net1 # /opt/FJSVhanet/usr/sbin/hanetconfig create inet6 -n sha0 -m t -t net0,net1 |
4) Activation of virtual interface
# /opt/FJSVhanet/usr/sbin/strhanet |
5) Set up a zone
Set up a zone by executing the following command:
# /usr/sbin/zonecfg -z zone0 |
5-1) Create a zone.
zonecfg:zone0> create zonecfg:zone0> set zonepath=/zones/zone0 |
5-2) Specify an IP address that is allocated to the zone and the virtual interface name that is defined in Fast switching mode.
zonecfg:zone0> add net zonecfg:zone0:net> set address=192.168.80.10/24 zonecfg:zone0:net> set physical=sha0 zonecfg:zone0:net> end zonecfg:zone0> add net zonecfg:zone0:net> set address=fec0:1::10/64 zonecfg:zone0:net> set physical=sha0 zonecfg:zone0:net> end |
Note
For Solaris 11, the default network is the exclusive-IP zone (ip-type=exclusive). Change the default network to the shared IP zone (ip-type=shared) before setting above values. For details, refer to the Solaris manual.
The host name of the IPv6 address cannot be specified for the zone network setting. If you use the IPv6 address, specify an IP address instead of the host name.
5-3) Check the above setting.
zonecfg:zone0> export |
5-4) Check setup consistency.
zonecfg:zone0> verify |
5-5) Register the setting.
zonecfg:zone0> commit zonecfg:zone0> exit |
6) Install the zone
Install the zone by executing the following command:
# /usr/sbin/zoneadm -z zone0 install |
Note
When a zone is booted for the first time after installation, the zone is in an unconfigured state. Therefore, it is necessary to define an internal zone configuration. Please refer to the manual of Solaris for the definition methods.
7) Start up the zone
Start up the zone by executing the following command:
# /usr/sbin/zoneadm -z zone0 boot |
[HOST-B]
1) Setting up the system
1-1) Define IP addresses and hostnames in /etc/inet/hosts file. Defined information is the same as for HOST-A.
1-2) For Solaris 10
Write the hostnames defined above in /etc/hostname.fjgi0 file and /etc/hostname.fjgi1 file. If a file does not exist, create a new file.
Contents of /etc/hostname.fjgi0
host21 |
Contents of /etc/hostname.fjgi1
host22 |
1-2) For Solaris 11
Set the host by the interface used with the ipadm(1M) command and also by the host name defined above.
Interface net0
# /usr/sbin/ipadm create-ip net0 # /usr/sbin/ipadm create-addr -T static -a host21/24 net0/v4 |
Interface net1
# /usr/sbin/ipadm create-ip net1 # /usr/sbin/ipadm create-addr -T static -a host22/24 net1/v4 |
1-3) Define the subnet mask in /etc/inet/netmasks file. Defined content is same as HOST-A.
1-4) Create /etc/inet/ndpd.conf file. Defined information is the same as for HOST-A.
1-5) For Solaris 10
Create /etc/hostname6.fjgi0 and /etc/hostname6.fjgi1 files as an empty file.
1-5) For Solaris 11
Set the interface to be used by using the ipadm(1M) command.
Interface net0
# /usr/sbin/ipadm create-addr -T addrconf net0/v6 |
Interface net1
# /usr/sbin/ipadm create-addr -T addrconf net1/v6 |
2) Reboot (For Slaris 10)
Run the following command to reboot the system. Make sure fjgi0 and fjgi1 are enabled as IPv4/IPv6 interfaces after rebooting the system.
# /usr/sbin/shutdown -y -i6 -g0 |
3) Creation of virtual interface
3-1) For Solaris 10
# /opt/FJSVhanet/usr/sbin/hanetconfig create -n sha0 -m t -i 192.168.80.2 -t fjgi0,fjgi1 # /opt/FJSVhanet/usr/sbin/hanetconfig create inet6 -n sha0 -m t -t fjgi0,fjgi1 |
3-1) For Solaris 11
# /opt/FJSVhanet/usr/sbin/hanetconfig create -n sha0 -m t -i 192.168.80.2 -t net0,net1 # /opt/FJSVhanet/usr/sbin/hanetconfig create inet6 -n sha0 -m t -t net0,net1 |
4) Activation of virtual interface
# /opt/FJSVhanet/usr/sbin/strhanet |
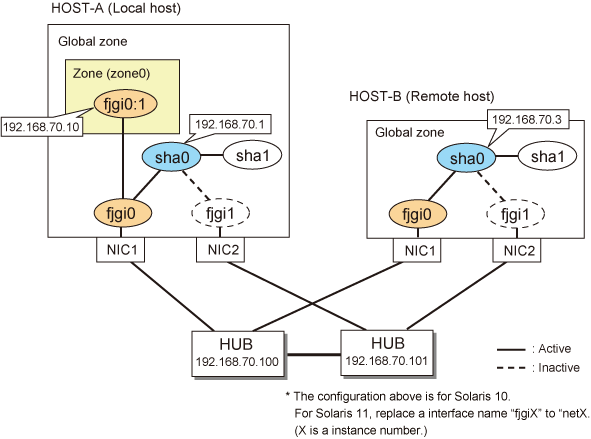
This section describes an example configuration procedure of the network shown in the diagram below.
If the Standby patrol monitoring function is not used, omit 5) in the procedure for setting up on each host.
[HOST-A]
1) Setting up the system
1-1) Define IP addresses and hostnames in /etc/inet/hosts file.
192.168.70.1 hosta # HOST-A Virtual IP 192.168.70.3 hostb # HOST-B Virtual IP 192.168.70.10 zone0 # zone0 Logical IP 192.168.70.100 swhub1 # Primary HUB IP 192.168.70.101 swhub2 # Secondary HUB IP |
1-2) For Solaris 10
Write the hostnames defined above in /etc/hostname.fjgi0 fiile.
Contents of /etc/hostname.fjgi0
hosta |
1-2) For Solaris 11
Set the host by the interface used with the ipadm(1M) command and also by the host name defined above.
Interface net0
# /usr/sbin/ipadm create-ip net0 # /usr/sbin/ipadm create-addr -T static -a hosta/24 net0/v4 |
1-3) Define the subnet mask in /etc/inet/netmasks file.
192.168.70.0 255.255.255.0 |
2) Reboot (For Solaris 10)
Run the following command to reboot the system. Make sure fjgi0 is enabled as IPv4 interfaces after rebooting the system.
# /usr/sbin/shutdown -y -i6 -g0 |
3) Creation of virtual interface
3-1) For Solaris 10
# /opt/FJSVhanet/usr/sbin/hanetconfig create -n sha0 -m e -i 192.168.70.1 -t fjgi0,fjgi1 |
3-1) For Solaris 11
# /opt/FJSVhanet/usr/sbin/hanetconfig create -n sha0 -m e -i 192.168.70.1 -t net0,net1 |
Note
Ensure that the physical IP address specified using option '-i' is the same IP address configured by /etc/hostname.fjgi0 file or the ipadm(1M) command.
4) Setting up the HUB monitoring function
# /opt/FJSVhanet/usr/sbin/hanetpoll create -n sha0 -p 192.168.70.100,192.168.70.101 -b off |
5) Setting up the Standby patrol monitoring function
# /opt/FJSVhanet/usr/sbin/hanetconfig create -n sha1 -m p -t sha0 |
6) Change the method of deactivating the standby interface
# /opt/FJSVhanet/usr/sbin/hanetparam -d plumb |
7) Activation of virtual interface
# /opt/FJSVhanet/usr/sbin/strhanet |
8) Starting the HUB monitoring function
# /opt/FJSVhanet/usr/sbin/hanetpoll on |
9) Set up a zone
Set up a zone by executing the following command:
# /usr/sbin/zonecfg -z zone0 |
9-1) Create a zone.
zonecfg:zone0> create zonecfg:zone0> set zonepath=/zones/zone0 |
9-2) Specify an IP address that is allocated to the zone and the virtual interface name that is defined in NIC switching mode.
9-2-1) For Solaris 10
zonecfg:zone0> add net zonecfg:zone0:net> set address=192.168.70.10/24 zonecfg:zone0:net> set physical=fjgi0 zonecfg:zone0:net> end |
9-2-1) For Solaris 11
zonecfg:zone0> add net zonecfg:zone0:net> set address=192.168.70.10/24 zonecfg:zone0:net> set physical=net0 zonecfg:zone0:net> end |
Note
For Solaris 11, the default network is the exclusive-IP zone (ip-type=exclusive). Change the default network to the shared IP zone (ip-type=shared) before setting above values. For details, refer to the Solaris manual.
If you specify the redundant physical interface in NIC switching mode, specify the primary physical interface.
9-3) Check the above setting.
zonecfg:zone0> export |
9-4) Check setup consistency.
zonecfg:zone0> verify |
9-5) Register the setting.
zonecfg:zone0> commit zonecfg:zone0> exit |
10) Install the zone
Install the zone by executing the following command:
# /usr/sbin/zoneadm -z zone0 install |
Note
When a zone is booted for the first time after installation, the zone is in an unconfigured state. Therefore, it is necessary to define an internal zone configuration. Please refer to the manual of Solaris for the definition methods.
11) Start up the zone
Start up the zone by executing the following command:
# /usr/sbin/zoneadm -z zone0 boot |
[HOST-B]
1) Setting up the system
1-1) Define IP addresses and hostnames in /etc/inet/hosts file. Defined information is the same as for HOST-A.
1-2) For Solaris 10
Write the hostnames defined above in /etc/hostname.fjgi0 file.
Contents of /etc/hostname.fjgi0
hostb |
1-2) For Solaris 11
Set the host by the interface used with the ipadm(1M) command and also by the host name defined above.
Interface net0
# /usr/sbin/ipadm create-ip net0 # /usr/sbin/ipadm create-addr -T static -a hostb/24 net0/v4 |
1-3) Define the subnet mask in /etc/inet/netmasks file. Defined content is same as HOST-A.
2) Reboot (For Solaris 10)
Run the following command to reboot the system. Make sure fjgi0 is enabled as IPv4 interfaces after rebooting the system.
# /usr/sbin/shutdown -y -i6 -g0 |
3) Creation of virtual interface
3-1) For Solaris 10
# /opt/FJSVhanet/usr/sbin/hanetconfig create -n sha0 -m e -i 192.168.70.3 -t fjgi0,fjgi1 |
3-1) For Solaris 11
# /opt/FJSVhanet/usr/sbin/hanetconfig create -n sha0 -m e -i 192.168.70.3 -t net0,net1 |
Note
Ensure that the physical IP address specified using option '-i' is the same IP address configured by /etc/hostname.fjgi0 file or the ipadm(1M) command.
4) Setting up the HUB monitoring function
# /opt/FJSVhanet/usr/sbin/hanetpoll create -n sha0 -p 192.168.70.100,192.168.70.101 -b off |
5) Setting up the Standby patrol monitoring function
# /opt/FJSVhanet/usr/sbin/hanetconfig create -n sha1 -m p -t sha0 |
6) Activation of virtual interface
# /opt/FJSVhanet/usr/sbin/strhanet |
7) Starting the HUB monitoring function
# /opt/FJSVhanet/usr/sbin/hanetpoll on |
This section describes an example configuration procedure of the network shown in the diagram below.
The xx, yy in the figure below are assigned automatically by the automatic address configuration.
If the Standby patrol monitoring function is not used, omit 5) in the procedure for setting up on each host.
Note
An example of configuring /etc/inet/ndpd.conf to use Solaris server as an IPv6 router is described below:
For details on /etc/inet/ndpd.conf, refer to the Solaris manual.
For Solaris 10
ifdefault AdvSendAdvertisements true # Every interface sends a router advertisement. prefix fec0:1::0/64 fjgi0 # fjgi0 sends Prefix "fec0:1::0/64". |
For Solaris 11
ifdefault AdvSendAdvertisements true # Every interface sends a router advertisement. prefix fec0:1::0/64 net0 # nt0 sends Prefix "fec0:1::0/64". |
[HOST-A]
1) Setting up the system
1-1) For Solaris10
Create /etc/hostname6.fjgi0 file as an empty file.
1-1) For Solaris11
Set the interface to be used by using the ipadm(1M) command.
Interface net0
# /usr/sbin/ipadm create-ip net0 # /usr/sbin/ipadm create-addr -T addrconf net0/v6 |
1-2) Define IP addresses and hostnames in /etc/inet/ipnodes file.
fec0:1::1 v6hosta # HOST-A Virtual IP fec0:1::2 v6hostb # HOST-B Virtual IP fec0:1::100 swhub1 # Primary HUB IP fec0:1::101 swhub2 # Secondary HUB IP |
2) Reboot (For Solaris 10)
Run the following command to reboot the system. Make sure fjgi0 is enabled as IPv6 interfaces after rebooting the system.
# /usr/sbin/shutdown -y -i6 -g0 |
3) Creation of virtual interface
3-1) For Solaris 10
# /opt/FJSVhanet/usr/sbin/hanetconfig create inet6 -n sha0 -m d -i fec0:1::1/64 -t fjgi0,fjgi1 |
3-1) For Solaris 11
# /opt/FJSVhanet/usr/sbin/hanetconfig create inet6 -n sha0 -m d -i fec0:1::1/64 -t net0,net1 |
4) Setting up the HUB monitoring function
# /opt/FJSVhanet/usr/sbin/hanetpoll create -n sha0 -p fec0:1::100,fec0:1::101 -b off |
5) Setting up the Standby patrol monitoring function
# /opt/FJSVhanet/usr/sbin/hanetconfig create -n sha1 -m p -t sha0 |
6) Change the method of deactivating the standby interface
# /opt/FJSVhanet/usr/sbin/hanetparam -d plumb |
7) Activation of virtual interface
# /opt/FJSVhanet/usr/sbin/strhanet |
8) Starting the HUB monitoring function
# /opt/FJSVhanet/usr/sbin/hanetpoll on |
9) Set up a zone
Set up a zone by executing the following command:
# /usr/sbin/zonecfg -z zone0 |
9-1) Create a zone.
zonecfg:zone0> create zonecfg:zone0> set zonepath=/zones/zone0 |
9-2) Specify an IP address that is allocated to the zone and the virtual interface name that is defined in NIC switching mode.
9-2-1) For Solaris 10
zonecfg:zone0> add net zonecfg:zone0:net> set address=fec0:1::10/64 zonecfg:zone0:net> set physical=fjgi0 zonecfg:zone0:net> end |
9-2-1) For Solaris 11
zonecfg:zone0> add net zonecfg:zone0:net> set address=fec0:1::10/64 zonecfg:zone0:net> set physical=net0 zonecfg:zone0:net> end |
Note
The host name of the IPv6 address cannot be specified for the zone network setting. If you use the IPv6 address, specify an IP address instead of the host name.
If you specify the redundant physical interface in NIC switching mode, specify the primary physical interface.
For Solaris 11, the default network is the exclusive-IP zone (ip-type=exclusive). Change the default network to the shared IP zone (ip-type=shared) before setting above values. For details, refer to the Solaris manual.
9-3) Check the above setting.
zonecfg:zone0> export |
9-4) Check setup consistency.
zonecfg:zone0> verify |
9-5) Register the setting.
zonecfg:zone0> commit zonecfg:zone0> exit |
10) Install the zone
Install the zone by executing the following command:
# /usr/sbin/zoneadm -z zone0 install |
Note
When a zone is booted for the first time after installation, the zone is in an unconfigured state. Therefore, it is necessary to define an internal zone configuration. Please refer to the manual of Solaris for the definition methods.
11) Start up the zone
Start up the zone by executing the following command:
# /usr/sbin/zoneadm -z zone0 boot |
[HOST-B]
1) Setting up the system
1-1) For Solaris 10
Create /etc/hostname6.fjgi0 file as an empty file.
1-1) For Solaris 11
Set the interface to be used by using the ipadm(1M) command.
Interface net0
# /usr/sbin/ipadm create-ip net0 # /usr/sbin/ipadm create-addr -T addrconf net0/v6 |
1-2) Define takeover virtual IP addresses and hostnames in /etc/inet/ipnodes file. Defined information is the same as for HOST-A.
2) Reboot (For Solaris 10)
Run the following command to reboot the system. Make sure fjgi0 is enabled as IPv6 interfaces after rebooting the system.
# /usr/sbin/shutdown -y -i6 -g0 |
3) Creation of virtual interface
3-1) For Solaris 10
# /opt/FJSVhanet/usr/sbin/hanetconfig create inet6 -n sha0 -m d -i fec0:1::2/64 -t fjgi0,fjgi1 |
3-1) For Solaris 11
# /opt/FJSVhanet/usr/sbin/hanetconfig create inet6 -n sha0 -m d -i fec0:1::2/64 -t net0,net1 |
4) Setting up the HUB monitoring function
# /opt/FJSVhanet/usr/sbin/hanetpoll create -n sha0 -p fec0:1::100,fec0:1::101 -b off |
5) Setting up the Standby patrol monitoring function
# /opt/FJSVhanet/usr/sbin/hanetconfig create -n sha1 -m p -t sha0 |
6) Activation of virtual interface
# /opt/FJSVhanet/usr/sbin/strhanet |
7) Starting the HUB monitoring function
# /opt/FJSVhanet/usr/sbin/hanetpoll on |
This section describes an example configuration procedure of the network shown in the diagram below.
The xx, yy in the figure below are assigned automatically by the automatic address configuration.
The dotted line indicates that the interface is inactive.
If the Standby patrol monitoring function is not used, omit 6) in the procedure for setting up on each host.
Note
An example of configuring /etc/inet/ndpd.conf to use Solaris server as an IPv6 router is described below:
For details on /etc/inet/ndpd.conf, refer to the Solaris manual.
For Solaris 10
ifdefault AdvSendAdvertisements true # Every interface sends a router advertisement. prefix fec0:1::0/64 fjgi0 # fjgi0 sends Prefix "fec0:1::0/64". |
For Solaris 11
ifdefault AdvSendAdvertisements true # Every interface sends a router advertisement. prefix fec0:1::0/64 net0 # net0 sends Prefix "fec0:1::0/64". |
[HOST-A]
1) Setting up the system
1-1) Define IP addresses and hostnames in /etc/inet/hosts file.
192.168.70.1 hosta # HOST-A Virtual IP 192.168.70.2 host11 # HOST-A Physical IP 192.168.70.3 hostb # HOST-B Virtual IP 192.168.70.4 host21 # HOST-B Physical IP 192.168.70.10 zone0 # zone0 Locigal IP 192.168.70.100 swhub1 # Primary HUB IP 192.168.70.101 swhub2 # Secondary HUB IP |
1-2) For Solaris 10
Write the hostnames defined above in /etc/hostname.fjgi0 file. If a file does not exist, create a new file.
Contents of /etc/hostname.fjgi0
host11 |
1-2) For Solaris 11
Set the host by the interface used with the ipadm(1M) command and also by the host name defined above.
Interface net0
# /usr/sbin/ipadm create-ip net0 # /usr/sbin/ipadm create-addr -T static -a host11/24 net0/v4 |
1-3) Define the subnet mask in /etc/inet/netmasks file.
192.168.70.0 255.255.255.0 |
1-4) For Solaris 10
Create /etc/hostname6.fjgi0 file as an empty file.
1-4) For Solaris 11
Set the interface to be used by using the ipadm(1M) command.
Interface net0
# /usr/sbin/ipadm create-addr -T addrconf net0/v6 |
1-5) Define IP addresses and hostnames in /etc/inet/ipnodes file.
fec0:1::1 v6hosta # HOST-A Virtual IP fec0:1::2 v6hostb # HOST-B Virtual IP |
2) Reboot (For Solaris 10)
Run the following command to reboot the system. Make sure fjgi0 is enabled as IPv4/IPv6 interfaces after rebooting the system.
# usr/sbin/shutdown -y -i6 -g0 |
3) Creation of IPv4 virtual interface
3-1) For Solaris 10
# /opt/FJSVhanet/usr/sbin/hanetconfig create -n sha0 -m d -i 192.168.70.1 -e 192.168.70.2 -t fjgi0,fjgi1 |
3-1) For Solaris 11
# /opt/FJSVhanet/usr/sbin/hanetconfig create -n sha0 -m d -i 192.168.70.1 -e 192.168.70.2 -t net0,net1 |
Note
Ensure that the physical IP address specified using option '-e' is the same IP address configured in /etc/hostname.fjgi0 or with the ipadm(1M) command.
4) Creation of IPv6 virtual interface
# /opt/FJSVhanet/usr/sbin/hanetconfig copy inet6 -n sha0,sha0 -i fec0:1::1/64 |
5) Setting up the HUB monitoring function
# /opt/FJSVhanet/usr/sbin/hanetpoll create -n sha0 -p 192.168.70.100,192.168.70.101 -b off |
6) Setting up the Standby patrol monitoring function
# /opt/FJSVhanet/usr/sbin/hanetconfig create -n sha1 -m p -t sha0 |
7) Change the method of deactivating the standby interface
# /opt/FJSVhanet/usr/sbin/hanetparam -d plumb |
8) Activation of virtual interface
# /opt/FJSVhanet/usr/sbin/strhanet |
9) Starting the HUB monitoring function
# /opt/FJSVhanet/usr/sbin/hanetpoll on |
10) Set up a zone
Set up a zone by executing the following command:
# /usr/sbin/zonecfg -z zone0 |
10-1) Create a zone.
zonecfg:zone0> create zonecfg:zone0> set zonepath=/zones/zone0 |
10-2) Specify an IP address that is allocated to the zone and the virtual interface name that is defined in NIC switching mode.
10-2-1) For Solaris 10
zonecfg:zone0> add net zonecfg:zone0:net> set address=192.168.70.10 zonecfg:zone0:net> set physical=fjgi0 zonecfg:zone0:net> end zonecfg:zone0> add net zonecfg:zone0:net> set address=fec0:1::10/64 zonecfg:zone0:net> set physical=fjgi0 zonecfg:zone0:net> end |
10-2-1) For Solaris 11
zonecfg:zone0> add net zonecfg:zone0:net> set address=192.168.70.10 zonecfg:zone0:net> set physical=net0 zonecfg:zone0:net> end zonecfg:zone0> add net zonecfg:zone0:net> set address=fec0:1::10/64 zonecfg:zone0:net> set physical=net0 zonecfg:zone0:net> end |
Note
For Solaris 11, the default network is the exclusive-IP zone (ip-type=exclusive). Change the default network to the shared IP zone (ip-type=shared) before setting above values. For details, refer to the Solaris manual.
The host name of the IPv6 address cannot be specified for the zone network setting. If you use the IPv6 address, specify an IP address instead of the host name.
If you specify the redundant physical interface in NIC switching mode, specify the primary physical interface.
10-3) Check the above setting.
zonecfg:zone0> export |
10-4) Check setup consistency.
zonecfg:zone0> verify |
10-5) Register the setting.
zonecfg:zone0> commit zonecfg:zone0> exit |
11) Install the zone
Install the zone by executing the following command:
# /usr/sbin/zoneadm -z zone0 install |
Note
When a zone is booted for the first time after installation, the zone is in an unconfigured state. Therefore, it is necessary to define an internal zone configuration. Please refer to the manual of Solaris for the definition methods.
12) Start up the zone
Start up the zone by executing the following command:
# /usr/sbin/zoneadm -z zone0 boot |
[HOST-B]
1) Setting up the system
1-1) Define IP addresses and hostnames in /etc/inet/hosts file. Defined information is the same as for HOST-A.
1-2) For Solaris 10
Write the hostnames defined above in /etc/hostname.fjgi0 file. If a file does not exist, create a new file.
Contents of /etc/hostname.fjgi0
host21 |
1-2) For Solaris 11
Set the host by the interface used with the ipadm(1M) command and also by the host name defined above.
Interface net0
# /usr/sbin/ipadm create-ip net0 # /usr/sbin/ipadm create-addr -T static -a host21/24 net0/v4 |
1-3) Define the subnet mask in /etc/inet/netmasks file. Defined content is same as HOST-A.
1-4) For Solaris 10
Create /etc/hostname6.fjgi0 file as an empty file.
1-4) For Solaris 11
Set the interface to be used by using the ipadm(1M) command.
Interface net0
# /usr/sbin/ipadm create-addr -T addrconf net0/v6 |
1-5) Define IP addresses and hostnames in /etc/inet/ipnodes file. Defined content is same as HOST-A.
2) Reboot (For Solaris 10)
Run the following command to reboot the system. Make sure fjgi0 is enabled as IPv4/IPv6 interfaces after rebooting the system.
# /usr/sbin/shutdown -y -i6 -g0 |
3) Creation of IPv4 virtual interface
3-1) For Solaris 10
# /opt/FJSVhanet/usr/sbin/hanetconfig create -n sha0 -m d -i 192.168.70.3 -e 192.168.70.4 -t fjgi0,fjgi1 |
3-1) For Solaris 11
# /opt/FJSVhanet/usr/sbin/hanetconfig create -n sha0 -m d -i 192.168.70.3 -e 192.168.70.4 -t net0,net1 |
Note
Ensure that the physical IP address specified using option '-e' is the same IP address configured in /etc/hostname.fjgi0 or with the ipadm(1M) command.
4) Creation of IPv6 virtual interface
# /opt/FJSVhanet/usr/sbin/hanetconfig copy inet6 -n sha0,sha0 -i fec0:1::2/64 |
5) Setting up the HUB monitoring function
# /opt/FJSVhanet/usr/sbin/hanetpoll create -n sha0 -p 192.168.70.100,192.168.70.101 -b off |
6) Setting up the Standby patrol monitoring function
# /opt/FJSVhanet/usr/sbin/hanetconfig create -n sha1 -m p -t sha0 |
7) Activation of virtual interface
# /opt/FJSVhanet/usr/sbin/strhanet |
8) Starting the HUB monitoring function
# /opt/FJSVhanet/usr/sbin/hanetpoll on |
This section describes an example configuration procedure of the network shown in the diagram below.
For configuring the GS, refer to the GS manual.
The dotted line indicates that the interface is inactive.
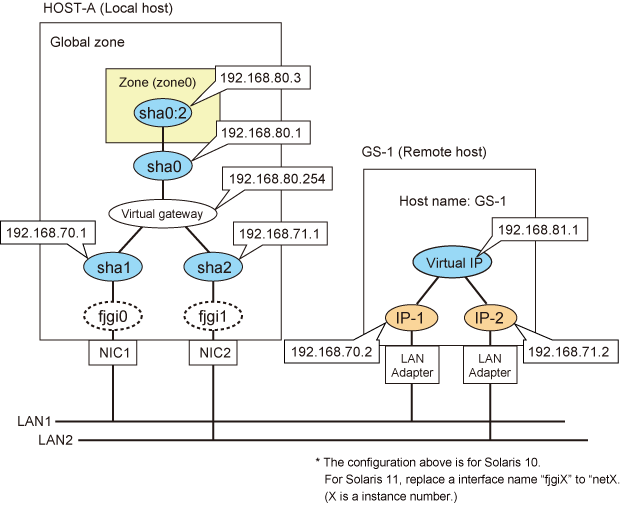
[HOST-A]
1) Setting up the system
1-1) Define IP addresses and hostnames in the /etc/inet/hosts file.
192.168.70.1 host11 # HOST-A Virtual IP (mode:n) 192.168.71.1 host12 # HOST-A Virtual IP (mode:n) 192.168.80.1 hosta # HOST-A Virtual IP (mode:c) 192.168.80.254 virgw # Virtual gateway 192.168.70.2 gs11 # GS-1 Physical IP IP(IP-1) 192.168.71.2 gs12 # GS-1 Physical IP IP(IP-2) 192.168.81.1 gsa # GS-1 Virtual IP |
1-2) Define the subnet mask in the /etc/inet/netmasks file.
192.168.70.0 255.255.255.0 192.168.71.0 255.255.255.0 192.168.80.0 255.255.255.0 |
2) Creation of virtual interface
2-1) For Solaris 10
# /opt/FJSVhanet/usr/sbin/hanetconfig create -n sha1 -m n -i 192.168.70.1 -t fjgi0 # /opt/FJSVhanet/usr/sbin/hanetconfig create -n sha2 -m n -i 192.168.71.1 -t fjgi1 # /opt/FJSVhanet/usr/sbin/hanetconfig create -n sha0 -m c -i 192.168.80.1 -t sha1,sha2 |
2-1) For Solaris 11
# /opt/FJSVhanet/usr/sbin/hanetconfig create -n sha1 -m n -i 192.168.70.1 -t net0 # /opt/FJSVhanet/usr/sbin/hanetconfig create -n sha2 -m n -i 192.168.71.1 -t net1 # /opt/FJSVhanet/usr/sbin/hanetconfig create -n sha0 -m c -i 192.168.80.1 -t sha1,sha2 |
3) Creation of logical virtual interface
# /opt/FJSVhanet/usr/sbin/hanetconfig create -n sha0:2 -i 192.168.80.3 |
4) Setting up the virtual gateway
# /opt/FJSVhanet/usr/sbin/hanetgw create -n sha0 -g 192.168.80.254 |
5) Setting the Communication target monitoring function
# /opt/FJSVhanet/usr/sbin/hanetobserv create -n GS-1 -i 192.168.81.1 -t 192.168.70.2,192.168.71.2 -m on -r on |
6) Set up a zone
Set up a zone by executing the following command:
/usr/sbin/zonecfg -z zone0 |
6-1) Create a zone.
zonecfg:zone0> create zonecfg:zone0> set zonepath=/zones/zone0 |
Note
For Solaris 11, the default network is the exclusive-IP zone (ip-type=exclusive). Change the default network to the shared IP zone (ip-type=shared) before setting above values. For details, refer to the Solaris manual.
6-2) Check the above setting.
zonecfg:zone0> export |
6-3) Check setup consistency.
zonecfg:zone0> verify |
6-4) Register the setting.
zonecfg:zone0> commit zonecfg:zone0> exit |
Note
In GS/SURE linkage mode, communication is not supported with the IP address specified by the zonecfg command.
After activating a logical virtual interface and starting up a zone, you need to assign an IP address to a zone by using the ifconfig(1M) command.
7) Install the zone
Install the zone by executing the following command:
# /usr/sbin/zoneadm -z zone0 install |
Note
When a zone is booted for the first time after installation, the zone is in an unconfigured state. Therefore, it is necessary to define an internal zone configuration. Please refer to the manual of Solaris for the definition methods.
8) Start up the zone
Start up the zone by executing the following command:
# /usr/sbin/zoneadm -z zone0 boot |
9) Activation of virtual interface
# /opt/FJSVhanet/usr/sbin/strhanet |
10) Assigning the logical interface to the zone
# /usr/sbin/ifconfig sha0:2 zone zone0 |
Note
When rebooting a zone for maintenance work, remove the assignment of the logical virtual interfaces to the zone by using the ifconfig command, and then stop the zone.
# /usr/sbin/ifconfig sha0:2 -zone |
If you stop the zone while the logical virtual interfaces are assigned to the zone, logical virtual interfaces are removed by the operating system.
Point
When the zone is automatically started on startup of the system, you can assign an IP to a zone with the script of the service for Redundant Line Control function of user command execution function. The following is an example of the script.
'fjsvhanet-poll') # # add procedure for fjsvhanet-poll service # # logger -p daemon.notice "execute script for fjsvhanet-poll service" # /usr/sbin/ifconfig sha0:2 zone zone0 # ;; |
When manually starting the zone, you must assign logical virtual interfaces to the zone by using the ifconfig command every time after starting the zone.