The following is an example of configuration for adding a virtual NIC in the Solaris Zones environment (exclusive-IP zones).
Figure 3.2 Example of configuration in the Solaris Zones environment (exclusive-IP zones)
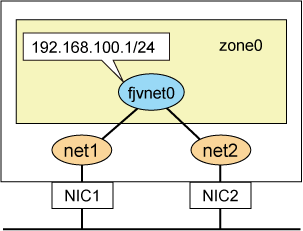
Create a virtual NIC "fjvnet0" on the global zone by bundling "net1" and "net2." Set an IP address to the virtual NIC "fjvnet0" after assigning it to the exclusive-IP zone "zone0." This procedure is shown below:
Creating a virtual NIC
Create a virtual NIC on the global zone with the rvnetadm create command.
# /opt/FJSVrvnet/bin/rvnetadm create -n fjvnet0 -i net1,net2
See
For details on the rvnetadm command, see "A.1 rvnetadm command."
Enabling a network monitoring function
Enable a network monitoring function with the rvnetadm start-observ command.
# /opt/FJSVrvnet/bin/rvnetadm start-observ
Note
When a network monitoring function is enabled, disable it with the rvnetadm stop-observ command, and then enable it with the rvnetadm start-observ command again.
See
For details on the rvnetadm command, see "A.1 rvnetadm command."
Network setting for an exclusive-IP zone
Assign a virtual NIC to the exclusive-IP zone with the zonecfg command, and then start it with the zoneadm command.
# zonecfg -z zone0
zonecfg:zone0> add net   <- Add a network interface setting.
zonecfg:zone0:net> set physical=fjvnet0  <- Specify a virtual NIC interface.
zonecfg:zone0:net> end
zonecfg:zone0> verify    <- Check integrity.
zonecfg:zone0> commit    <- Register a zone.
zonecfg:zone0> exit      <- Zone setting is completed.
# zoneadm -z zone0 boot  <- Start up zone0.
Note
Use virtual NICs in a network interface (net) registered in the resource. Virtual NICs cannot be used in an automatic network interface (anet).
See
For details on the zonecfg(1M) and zoneadm(1M) commands, see the Solaris manual.
Setting up an IP address in the exclusive-IP zone
Define the virtual NIC as an IP interface with the ipadm create-ip command after logging in to the exclusive-IP zone with the zlogin command. Then, assign an IP address to the IP interface with the ipadm create-addr command.
# zlogin zone0
# ipadm create-ip fjvnet0
# ipadm create-addr -T static -a 192.168.100.1/24 fjvnet0/v4
See
For details on the ipadm(1M) command, see the Solaris manual.
The following is an example of configuration for adding a virtual NIC in the Kernel Zones environment.
Figure 3.3 Example of configuration in the Kernel Zones environment
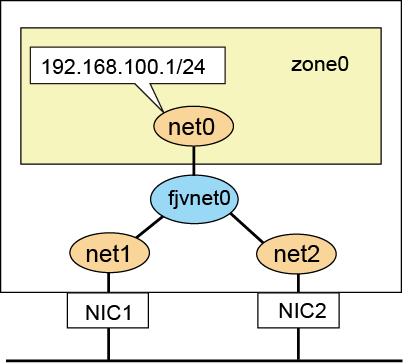
Create a virtual NIC "fjvnet0" by bundling "net1" and "net2" on the global zone, and then assign it to the Kernel Zone "zone0." After that, set an IP address to the NIC "net0" on "zone0" that was connected to the virtual NIC "fjvnet0."
Creating a virtual NIC
Create a virtual NIC on the global zone with the rvnetadm create command.
# /opt/FJSVrvnet/bin/rvnetadm create -n fjvnet0 -i net1,net2
See
For details on the rvnetadm command, see "A.1 rvnetadm command."
Enabling a network monitoring function
Enable a network monitoring function with the rvnetadm start-observ command.
# /opt/FJSVrvnet/bin/rvnetadm start-observ
Note
When the network monitoring function is enabled, disable it with the rvnetadm stop-observ command, and then enable it with the rvnetadm start-observ command again.
See
For details on the rvnetadm command, see "A.1 rvnetadm command."
Network setting for a Kernel Zone
Assign a virtual NIC to the Kernel Zone with the zonecfg command, and then start it with the zoneadm command.
# zonecfg -z zone0
zonecfg:zone0> add net   <- Add a network interface setting.
zonecfg:zone0:net> set physical=fjvnet0  <- Specify a virtual NIC interface.
zonecfg:zone0:net> end
zonecfg:zone0> verify    <- Check integrity.
zonecfg:zone0> commit    <- Register a zone.
zonecfg:zone0> exit      <- Zone setting is completed.
# zoneadm -z zone0 boot  <- Start up zone0.
Note
Use virtual NICs in a network interface (net) registered in the resource. Virtual NICs cannot be used in an automatic network interface (anet).
See
For details on the zonecfg(1M) and zoneadm(1M) commands, see the Solaris manual.
Setting up an IP address in the Kernel Zone
Define the virtual NIC as an IP interface with the ipadm create-ip command after logging in to the Kernel Zone with the zlogin command. Then, assign an IP address to the IP address with the ipadm create-addr command.
# zlogin zone0
# ipadm create-ip net0
# ipadm create-addr -T static -a 192.168.100.1/24 net0/v4
See
For details on the ipadm(1M) command, see the Solaris manual.