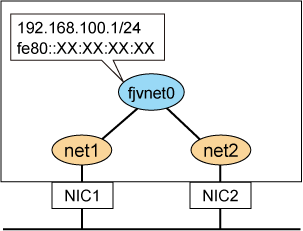
The following is an example of configuration for adding a virtual NIC in the physical server environment:
Figure 3.1 Example of configuration in the physical server environment

The procedure below shows how to configure IPv4 and IPv6 addresses automatically by bundling "net1" and "net2" to create the virtual NIC "fjvnet0":
Creating a virtual NIC
Create a virtual NIC with the rvnetadm create command.
# /opt/FJSVrvnet/bin/rvnetadm create -n fjvnet0 -i net1,net2
See
For details on the rvnetadm command, see "A.1 rvnetadm command."
Enabling a network monitoring function
Enable a network monitoring function with the rvnetadm start-observ command.
# /opt/FJSVrvnet/bin/rvnetadm start-observ
Note
When a network monitoring function is enabled, disable it with the rvnetadm stop-observ command, and then enable it with the rvnetadm start-observ command again.
See
For details on the rvnetadm command, see "A.1 rvnetadm command."
Setting up an IP address
Define the virtual NIC as an IP interface with the ipadm create-ip command. Configure the IP address with the ipadm create-addr command.
# ipadm create-ip fjvnet0
# ipadm create-addr -T static -a 192.168.100.1/24 fjvnet0/v4static
# ipadm create-addr -T addrconf fjvnet0/v6addrconf
See
For details on the ipadm(1M) command, see the Solaris manual.