After installing the smart device (agent) (Android), set up the URL for synchronizing communication with the Relay Server.
Note
Immediately after installation of the smart device (agent) (Android)
The smart device (agent) (Android) will not perform any operation log collection or operation prohibition until the URL for synchronization is set up and the device is synchronized with the Relay Server. Therefore, after installing the smart device (agent) (Android), you must set up the URL for synchronization, and synchronize with the Relay Server.
Immediately after the smart device (agent) (Android) is installed, it is configured so that it can be uninstalled.
To prevent uninstallation, synchronize with the Relay Server after setting a client management password.
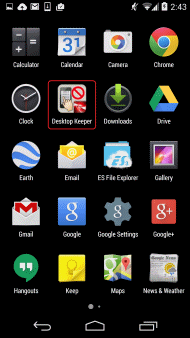
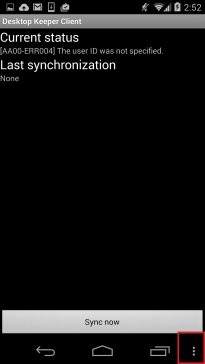
Start the agent (Desktop Keeper Client) that you installed.
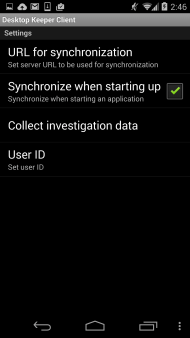
After starting the installed agent, tap the menu to display the options menu. Then tap the lower right of the screen and tap Settings.
In the settings screen, tap URL for synchronization.
Enter the URL of the Relay Server in URL for synchronization, and tap OK.
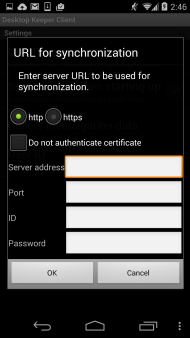
Configure the URL for synchronization as follows:
If connecting to the Relay Server:
http, https
Set the protocol for communication with smart devices.
If you configured HTTPS communication using the procedure in "2.9.3.2 Configuring HTTPS Communication", select https.
Do not authenticate certificate
Not selected: Do not connect if the certificate is untrusted. (Initial value)
Selected: Connect even if the certificate is untrusted.
Server address
Specify the address of the Relay Server.
If a server name is specified:
- Specify up to 15 halfwidth characters.
- It can contain halfwidth alphanumeric characters (A-Z, a-z, 0-9) and halfwidth hyphens (-).
- Symbols other than hyphens (-) cannot be specified.
- It cannot contain only numbers.
If an IPv4 address is specified:
- Specify up to 15 halfwidth characters.
- It can contain halfwidth numbers (0-9) and halfwidth periods (.).
Note: If a server name is specified, it is necessary to be able to resolve it. Otherwise, communication will not be possible between the Management Server or Master Management Server and the client (CT).
Port
HTTP/HTTPS listener port: Port number specified using the procedure in "2.9.3.1 Setting Smart Device/PC Information"
ID
Not supported
Password
Not supported
If connecting via a Proxy server:
http, https
Set the protocol for communication with the Proxy server.
Select http or https.
Server address
Specify the address of the Proxy server.
If a server name is specified:
- Specify up to 15 halfwidth characters.
- It can contain halfwidth alphanumeric characters (A-Z, a-z, 0-9) and halfwidth hyphens (-).
- Symbols other than hyphens (-) cannot be specified.
- It cannot contain only numbers.
If an IPv4 address is specified:
- Specify up to 15 halfwidth characters.
- It can contain halfwidth numbers (0-9) and halfwidth periods (.).
Note: If a server name is specified, it is necessary to be able to resolve it. Otherwise, communication will not be possible between the Management Server or Master Management Server and the client (CT).
Port
HTTP/HTTPS listener port: Port number of the Proxy server
ID
ID for basic authentication
(When performing basic authentication using the Proxy server)
Password
Password for basic authentication
(When performing basic authentication using the Proxy server)
In the settings screen, tap User ID.
Enter the user ID, and tap OK.
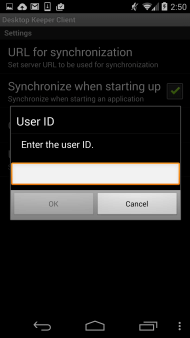
If you tap Cancel without entering a user ID, the following message will be displayed.
AA001-SEL001 Cannot communicate to the server without a user ID. Finish?
To exit, tap OK. However, the device will not be able to communicate with the Management Server.
To return to the User ID screen, tap Cancel.
You can use the following characters for the user ID:
You can specify up to 20 characters.
The halfwidth alphanumeric characters and symbols "-", "@", ".", "_" can be used.
Alphabetic characters are case-sensitive.
In the settings screen, check the Synchronize when starting up setting. If it has not been selected, tap it to select.
Tap the back button to return to the agent screen.
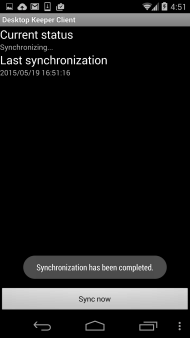
In the agent screen, tap Sync now.
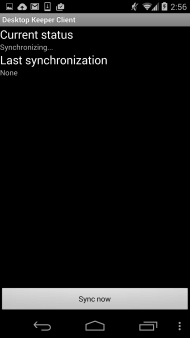
When Synchronization has been completed is displayed, synchronization is complete. The latest policy will be applied at this time.
To prevent uninstallation
When you start Desktop Keeper Client, the confirmation message shown below will be displayed.
When you tap Activate, this will prevent uninstallation of Desktop Keeper Client.
After tapping Cancel, to uninstall Desktop Keeper Client you will need to enter the password that was set in Client management password in the Terminal Operation Settings window of the Management Console.
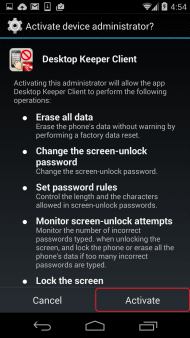
It is recommended that you configure Desktop Keeper Client to prevent uninstallation.