For the virtual bridge created in advance, only provide the function for connection with the virtual bridge. Manually perform virtual bridge settings in advance.
Use a different VLAN ID for each virtual bridge to connect with the virtual bridge.
Additionally, the following settings must be performed in advance.
Create a virtual bridge
Create a virtual bridge with the same name (including upper and lower case characters) for all VM hosts comprising the cluster.
This enables migration of VM guests between VM hosts.
When a virtual bridge has already been manually configured and server virtualization software other than RHEL5-Xen is being used with the same manager, set a different name from the one used by the virtual switch, virtual network, and virtual bridge on the other virtualization software.
Configure Virtual Bridge Communication Settings
Right-click the LAN switch blade in the server resource tree, and select [Modify]-[Network Settings] from the popup menu.
Configure LAN switch blades to enable communication using the tagged VLAN between virtual bridges using the same name.
The ROR console can be used for VLAN configuration of LAN switch blade external ports.
For details, refer to "5.4.4 Configuring VLANs on LAN Switch Blades" in the "User's Guide for Infrastructure Administrators (Resource Management) CE".
Define the Supported Virtual Bridge and VLAN ID
Supported virtual bridges and VLAN IDs are defined in the virtual bridge definition file of Resource Orchestrator.
For details on definition file format, refer to "File Format for Virtual Bridge Definitions".
Create Network Resources
From the GUI:
In the [Create a network resource] dialog containing the VLAN ID that was specified in steps 2 and 3, check the [Use configured virtual switches/port profile.] checkbox and create a network resource.
From the Command-line:
Create the XML file that defines network resources.
Define the VLAN ID specified in steps 2 and 3 in the XML file.
In this case, specify auto="false" in the Network element.
To create the network resource, execute the rcxadm network create command specifying the XML file created in step a.
The network resources are created.
For details on the rcxadm network command, refer to "3.9 rcxadm network" in the "Reference Guide (Command/XML) CE".
For details on the Network element, refer to "15.6 Network Resources" in the "Reference Guide (Command/XML) CE".
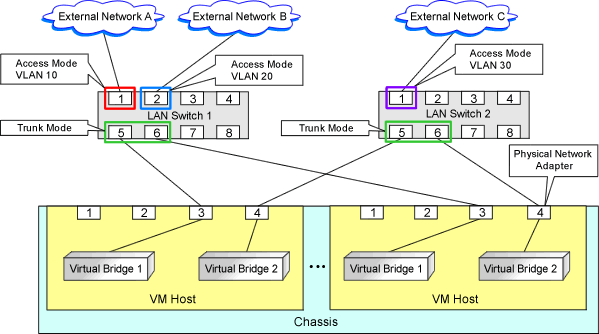
An example of virtual NIC configuration and connection with virtual bridge using network resources is given below:
Figure 8.8 Virtual NIC Configuration and Connection with Virtual Networks Using Bridge Resources
File Format for Virtual Bridge Definitions
[Linux Manager]
/etc/opt/FJSVrcvmr/customize_data
vnetwork_rhelxen.rcxprop
Describe the virtual bridge definition file in one line as below:
"Virtual bridge name on the VM_host"=VLAN ID |
For the VLAN ID, a value from 1 to 4094 can be specified.
Example
"xenbr0"=10
Blank spaces before and after equal signs ("=") are ignored.
Describe the virtual bridge correctly, as the entry is case-sensitive.
Save files using the UTF-8 character code.
When there are multiple lines with the same virtual bridge name, all specified lines are valid.
When the same VLAN ID is included in a line with a different virtual bridge name, the first occurrence in the file is valid and the lines after it are ignored.
An error occurs during L-Server creation if the definition of the VLAN ID of the network resource connected to the NIC cannot be found.