To audit power saving settings, the following settings are required.
Settings of power consumption
Settings of auditing items of power saving settings
Set power consumption
Perform settings related to the calculation of power consumption volume.
Log in to the main menu, and click Environment Setup.
The Environment Setup window will be displayed.
Click Option.
The following window will be displayed.
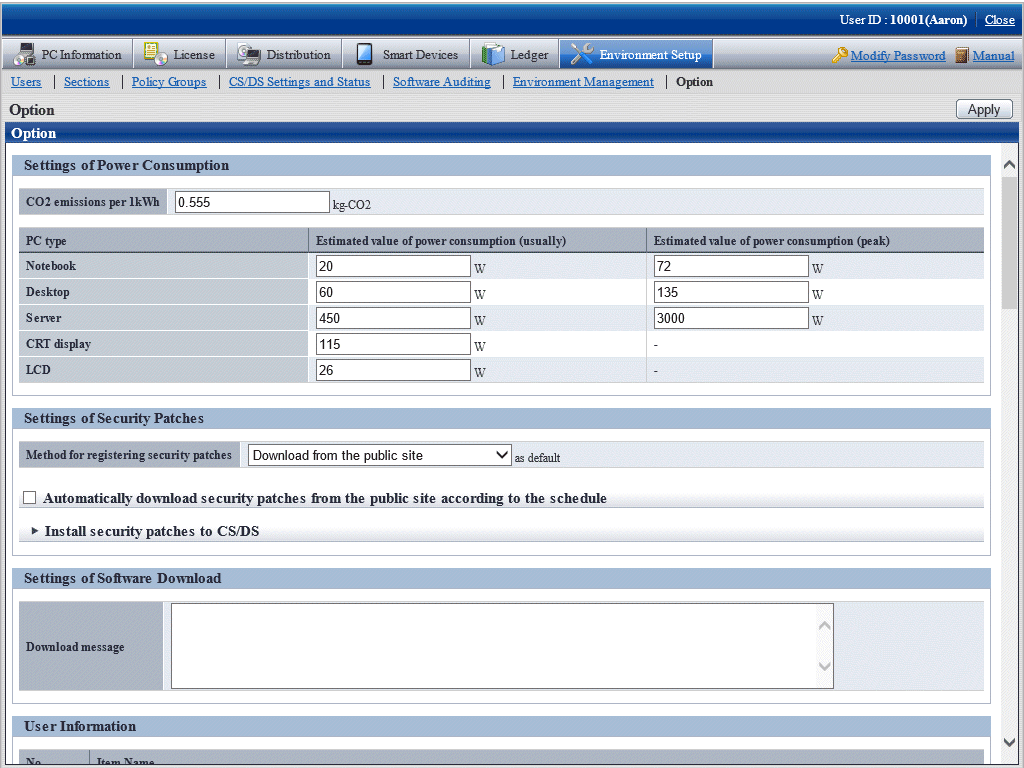
Set the following items.
Based on the value set here, calculate the value of the following items.
Value of Settings of Power Consumption of the diagnosis result window (power saving) of operation settings
Item | Description |
|---|---|
CO2 emissions per 1kWh | Set the CO2 emission equivalent to 1kWh with a value within 0.000~9.999. Default value (0.555 Kg-CO2) is the standard value by Ministry of the Environment Government of Japan. |
PC type | Set the estimated value of power consumption volume. The default value of power consumption is described according to the average value of power consumption of Server, Desktop PC and Notebook PC of Fujitsu products in the past 3 years. The power consumption volume of PC varies depending on the PC model, CPU type, size of display and other accessories. If these values are greatly different from the actual operation, modify the value.
|
Click the Apply button.
Set auditing items of power saving settings
The setting items of power saving to be audited is set in Environment Setup > Policy Groups of the main menu.
For details, refer to "4.2.1.1 Set the Auditing Items of Power-Saving Settings".
Set the auditing items of power saving settings.
The procedure is as follows.
In addition, the setting of auditing items is also effective for command mode CT. When it is set to display the window, the Diagnosis result window of operation settings will be displayed.
Log in to the main menu, and click Environment Setup.
The Environment Setup window will be displayed.
Click Policy Groups.
The following window will be displayed.
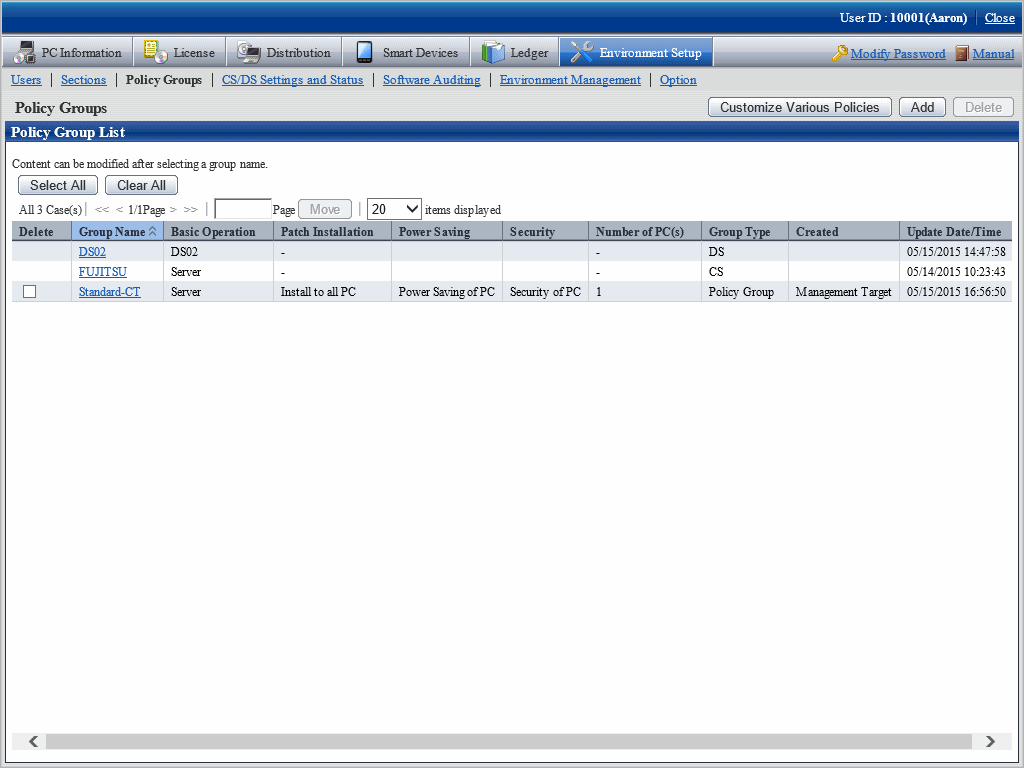
Click the Customize various policies button.
The following window will be displayed.
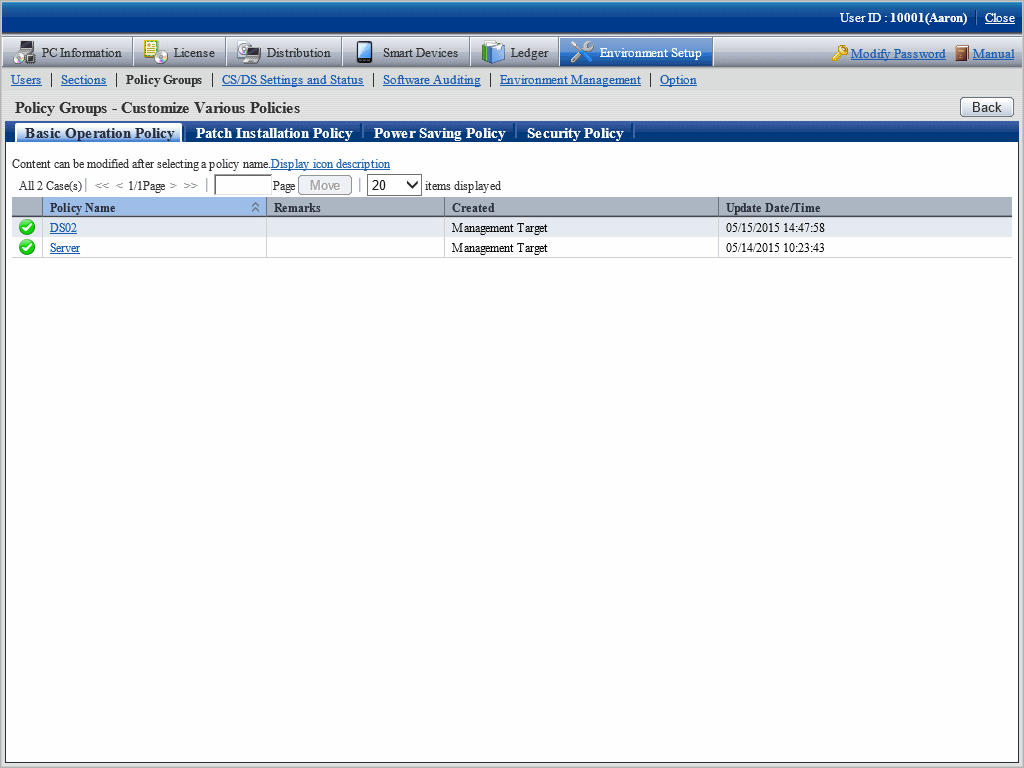
Click the Power saving policy tab.
The following window will be displayed.
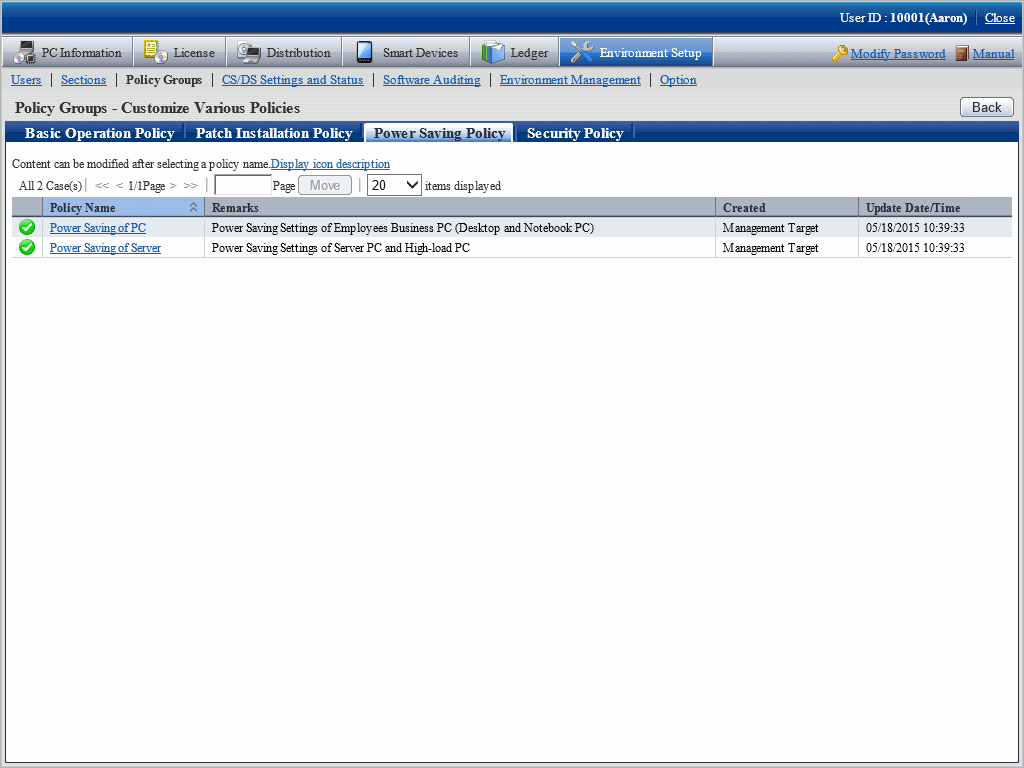
Select the one of the following setting patterns based on purpose and click the link of policy name.
The recommended detailed settings have been set in each policy. The customization can be performed based on this setting.
Purpose | Auditing Contents |
|---|---|
Power Saving of PC | It is the power saving auditing policy for business PC (desktop PC, notebook PC) used by general employees. Audit the all the power saving auditing items. |
Power Saving of Server | It is the power saving auditing settings for server PC and PC with high load. Audit the power settings of monitor only. |
Perform the operation settings of Diagnosis result window of operation settings.
Click the Operation Settings tab, and the following window will be displayed.
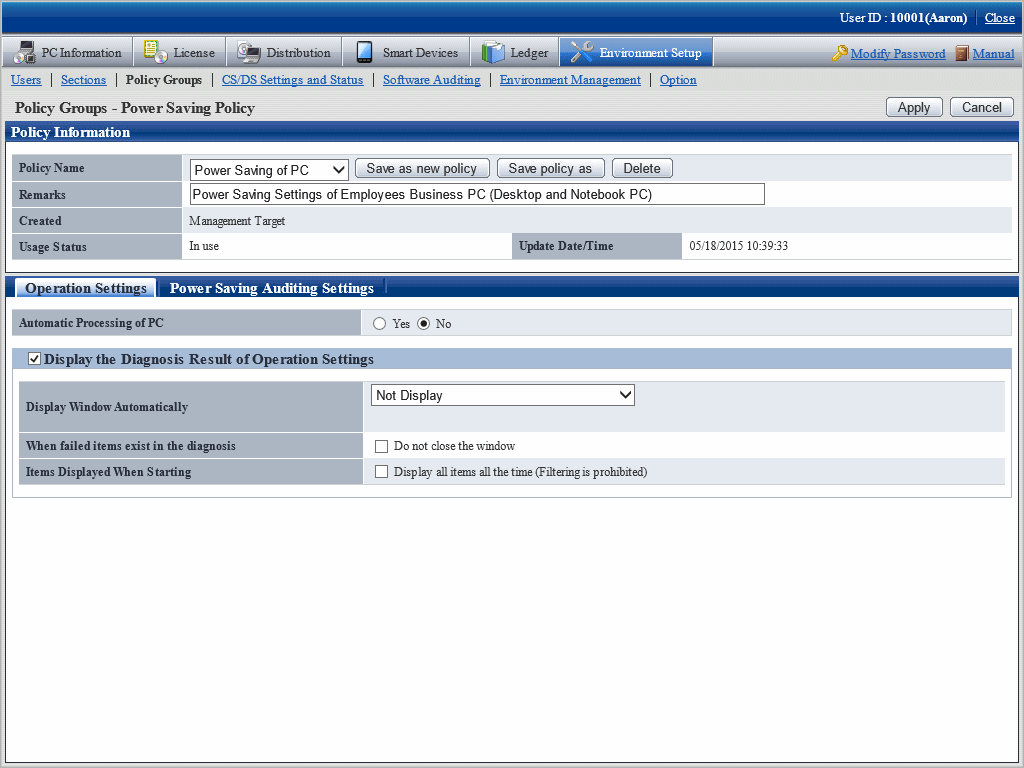
Set the following items.
Item | Description | Initial Value | |
|---|---|---|---|
Automatic Processing of PC (Note 1) | Set whether each auditing item will change settings automatically according to Systemwalker Desktop Patrol. | No | |
Display the Diagnosis Result of Operation Settings (Note 2) | Set whether to display the Diagnosis result window of operation settings. When it is selected, the following items can be set. | Selected | |
Display Window Automatically | The timing of automatically displaying the diagnosis result window is selected from the following.
| Not Display | |
| |||
When failed items exist in the diagnosis | If failed items exist, it is selected when users are not allowed to close the Diagnosis result window of operation settings. | Not selected | |
Items Displayed When Starting | When the auditing window is started, select it to display all items constantly. | Not selected | |
Note 1)
When Yes is selected for Automatic Processing of PC, power saving settings of Desktop Patrol will be added in the properties of PC power options.
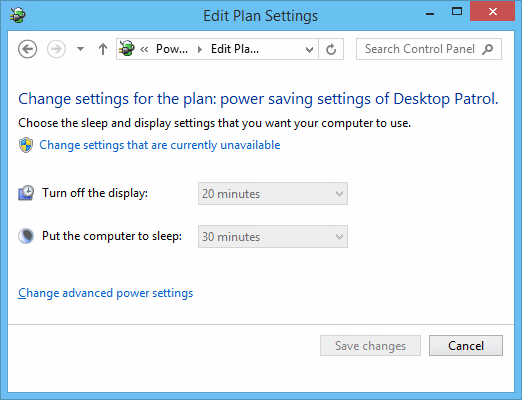
Note 2)
The setting that is different from the power saving policy and security policy can be set for this item.
The operation of performing different settings in each policy is as follows.
Setting Item | Power Saving Policy | Security Policy | Operation | |
|---|---|---|---|---|
Display the Diagnosis Result of Operation Settings | - | Selected/Not selected | Selected/Not selected | The selected tab will be displayed. If none of them is selected, window will not be displayed. |
Display Window Automatically | Not Display | Not Display | Window will not be displayed automatically. | |
Not Display | Display During Logon | Window will be displayed automatically at logon. | ||
Not Display | Display During Logon and Specified time | Window will be displayed automatically at logon and at specified time. | ||
Display During Logon | Not Display | Window will be displayed automatically at logon. | ||
Display During Logon | Display During Logon | Window will be displayed automatically at logon. | ||
Display During Logon | Display During Logon and Specified time | Window will be displayed automatically at logon and at specified time. | ||
Display During Logon and Specified time | Not Display | Window will be displayed automatically at logon and at specified time. | ||
Display During Logon and Specified time | Display During Logon | Window will be displayed automatically at logon and at specified time. | ||
Display at logon and specified time | Display at logon and specified time | Window will be displayed automatically at logon and at specified time.(*1) | ||
Perform Inventory collection when displaying | Selected/Not selected | Selected/Not selected | After it is selected, inventory collection will be performed at the timing specified in Display Window Automatically. Operation can be set according to each policy. | |
When failed items exist in the diagnosis | Selected/Not selected | Selected/Not selected | When failed items exist in the selected tab, the window cannot be closed. | |
Items Displayed When Starting | Selected/Not selected | Selected/Not selected | The narrowing function of the selected tab will be disabled. | |
*1)In power saving policy and security policy, when the time that is different from the specified time is specified, the window will be displayed automatically in the following 3 timings.
At logon
Specified time set in power saving policy
Specified time set in security policy
Set the auditing items of power saving.
Click the Power Saving Auditing Settings tab and the following window will be displayed.
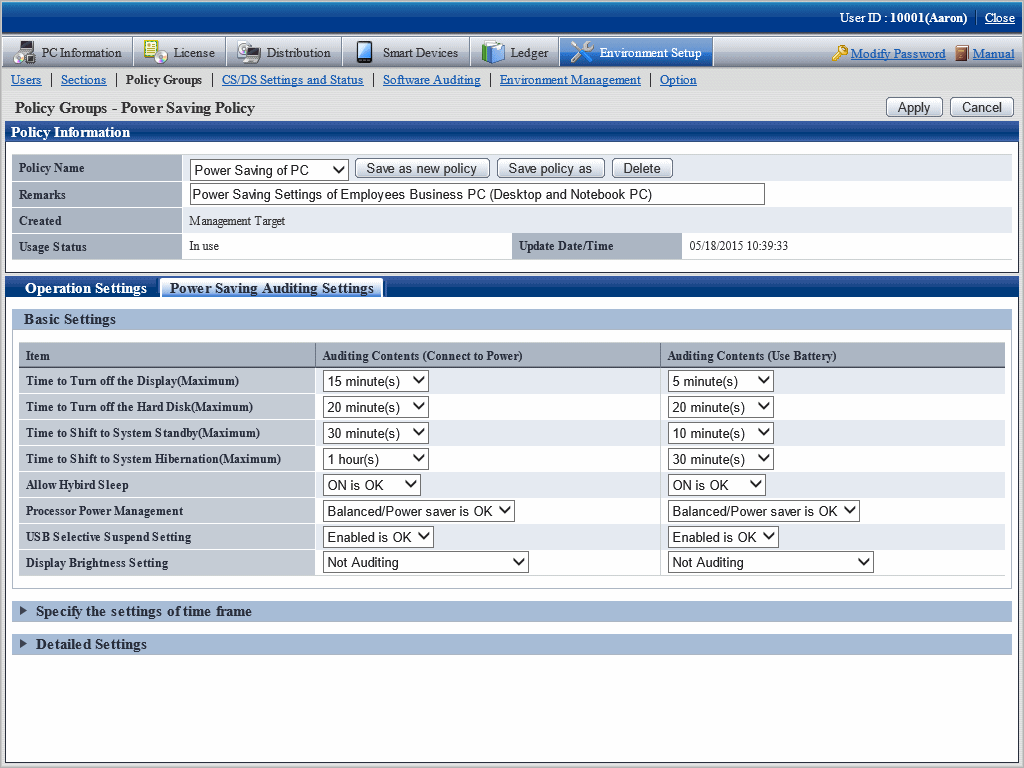
Set the following auditing items.
Item | Description | Value set at auto-processing | Initial Value | |||
|---|---|---|---|---|---|---|
Power Saving of PC | Power Saving of Server | |||||
Connect to power | Use battery | Connect to power | Use battery | |||
Time to Turn off the Display(Maximum) (Note 1) | When there is no operation on the PC, audit whether it is set to cut off power of monitor at proper time. Select from the following.
*The selectable range is within 1 minute ~ 5 hours. | Brightness Settings of Display | 15 minutes | 5 minutes | 15 minutes | 5 minutes |
Time to Turn off the Hard Disk(Maximum) (Note 1) | When there is no operation on the PC, audit whether it is set to cut off the power of hard disk at proper time. Select from the following.
*The selectable range is within 3 minutes ~ 5 hours. | Brightness Settings of Display | 20 minutes | 20 minutes | Not Auditing | Not Auditing |
Time to Shift to System Standby(Maximum) (Note 1) | When there is no operation on the PC, audit whether it is set to shift to system standby at proper time. Select from the following.
*The selectable range is within 1 minute ~ 5 hours. | Brightness Settings of Display | 30 minutes | 10 minutes | Not Auditing | Not Auditing |
Time to Shift to System Hibernation(Maximum) (Note 1) | When there is no operation on the PC, audit whether it is set to shift to system sleep at proper time. Select from the following.
*The selectable range is within 1 minute ~ 6 hours. | Brightness Settings of Display | 1 hour | 30 minutes | Not Auditing | Not Auditing |
Allow Hybrid Sleep (Note 2) | Audit the setting items of Hyper sleep. Select from the following.
| Set to ON | Set to ON is OK | Set to ON is OK | Not Auditing | Not Auditing |
Processor Power Management (Note 2) | When there is no operation on the PC, audit whether it is set to reduce the CPU clock speed. Select the minimum value of CPU clock speed from the following.
| Display Brightness Setting | Balanced/Power saver is OK | Balanced/Power saver is OK | Not Auditing | Not Auditing |
USB Selective Suspend Setting (Note 2) | Audit the settings of selective suspension of USB. Select from the following.
| Set to Valid | Valid is OK | Valid is OK | Not Auditing | Not Auditing |
Display Brightness Setting (Note 2) | Audit the brightness of display. Select from the following.
| Display Brightness Setting | Not Auditing | Not Auditing | Not Auditing | Not Auditing |
Select the time of various items from the following.
Item | Selection |
|---|---|
Time to Turn off the Display(Maximum) Time to Shift to System Standby(Maximum) | 1 minute, 2 minutes, 3 minutes, 5 minutes, 10 minutes, 15 minutes, 20 minutes, 25 minutes, 30 minutes, 45 minutes, 1 hour, 2 hours, 3 hours, 4 hours, 5 hours, None |
Time to Shift to System Hibernation(Maximum) | 1 minute, 2 minutes, 3 minutes, 5 minutes, 10 minutes, 15 minutes, 20 minutes, 25 minutes, 30 minutes, 45 minutes, 1 hour, 2 hours, 3 hours, 4 hours, 5 hours, 6 hours, None |
Time to Turn off the Hard Disk | 3 minutes, 5 minutes, 10 minutes, 15 minutes, 20 minutes, 25 minutes, 30 minutes, 45 minutes, 1 hour, 2 hours, 3 hours, 4 hours, 5 hours, None |
This item is only effective in Windows Vista(R), Windows(R) 7, Windows(R) 8, Windows(R) 10, Windows Server(R) 2008 and Windows Server(R) 2012.
The set value can be modified by force only on the PC with power saving technology of processor.
Made by Intel: Extended edition of Intel SpeedStep(R) Technology(EIST), Demand & Base & Switching (DBS)
Made by AMD: PowerNow!, Cool'n'Quiet
The motherboard/BIOS may not be supported. At this time, no item can be displayed in the diagnosis result.
Power management settings (settings to transition to hibernation) cannot be configured on PCs that have Rapid Start Technology installed.
None will be displayed for the settings value on the operating system. For this reason, Time to Shift to System Hibernation will not be handled automatically on the PCs in question.
Click Control Panel > Power Options, and for the selected plan click Change plan settings.
Click Change advanced power settings.
In Sleep > Hibernate after, set the following items:
On battery
Plugged in
Note
About auto-processing
In the Active Directory environment, the setting of Windows group policy is effective, so it may not be able to process automatically sometimes. Modify the setting of Windows group policy to not audit for the items set in Windows group policy.
To modify the setting of auto-processing according to time frame, click Specify the settings of time frame.
The following window will be displayed.
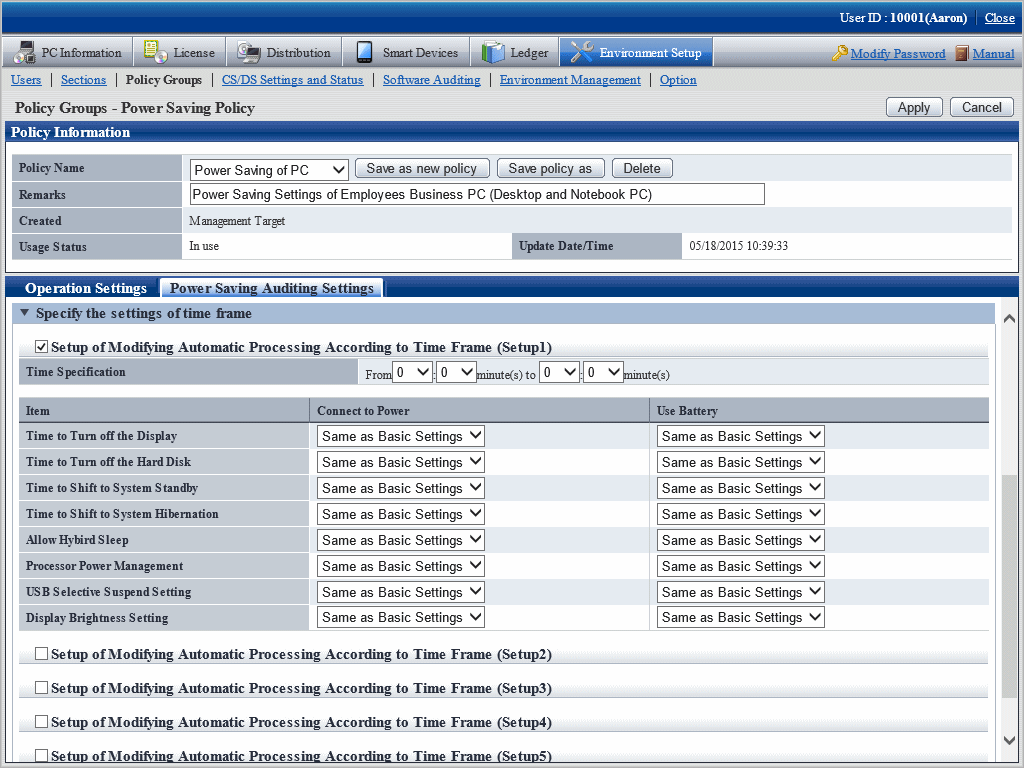
In the Operation Settings tab, select Yes for Automatic Processing of PC, and the operation of auto-processing that is different from the specified time frame can be set.
Up to 5 items can be created for the setting of operation that specified time frame.
Item | Description | Value set at auto-processing | Initial Value | ||||
|---|---|---|---|---|---|---|---|
Power Saving of PC | Power Saving of server | ||||||
Connect to power | Use battery | Connect to power | Use battery | ||||
Setup of Modifying Automatic Processing According to Time Frame | Select it when modifying the settings of auto-processing at specified time frame. When it is selected, the following items can be set. | - | Not selected | Not selected | Not selected | Not selected | |
Time to Turn off the Display | The content that can be set is same as the basic settings. | Same as basic settings | Same as basic settings | Same as basic settings | Same as basic settings | Same as basic settings | |
Time to Turn off the Hard Disk | |||||||
Time to Shift to System Standby | |||||||
Time to Shift to System Hibernation | |||||||
Allow Hybrid Sleep | |||||||
Processor Power Management | |||||||
USB Selective Suspend Setting | |||||||
Display Brightness Setting | |||||||
Point
About Security Patch installation at Standby/Suspension Status
Security patches cannot be installed when PC is in standby/sleep status.
When it is expected to install security patches in operation, set to disable the system from shifting into standby/sleep status at the time frame when installation of security patches is performed in "Setting to Specify Time Frame" mentioned above.
To perform more detailed settings, click Detailed Settings.
The following window will be displayed.
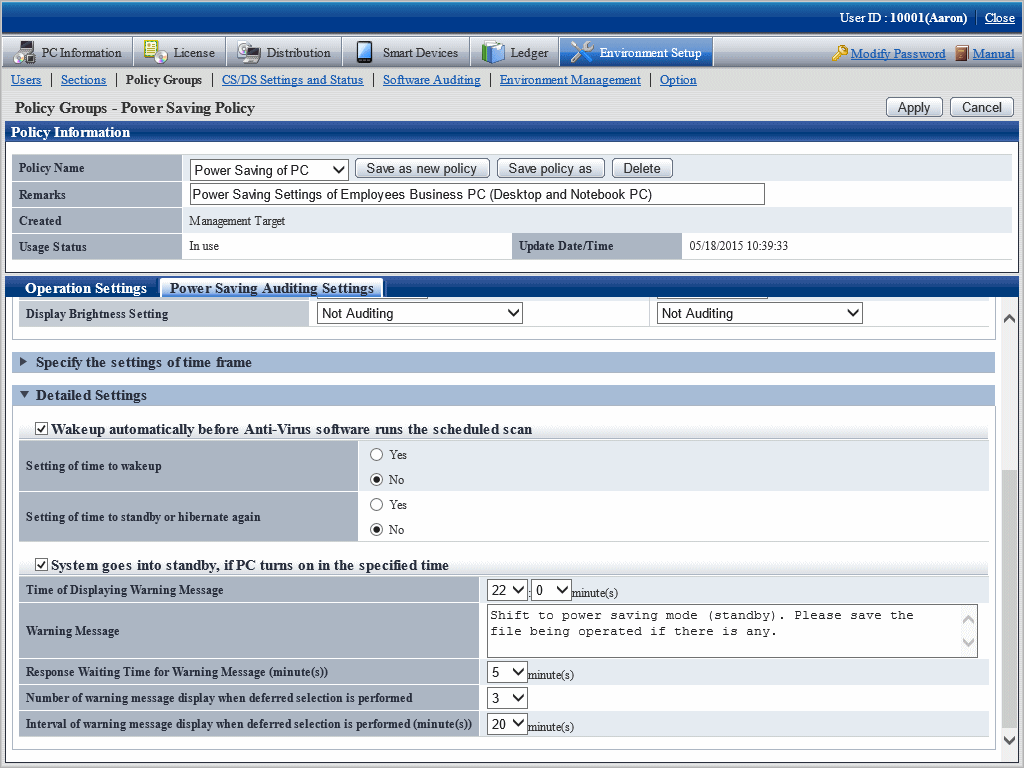
Set the following items.
Item | Description | Initial Value | ||
|---|---|---|---|---|
Power Saving of PC | Power Saving of Server | |||
Wakeup automatically before Anti-virus software runs the scheduled scan | When performing the auditing of security settings, select it when it is expected to restore the system from standby/sleep status. When it is selected, the following items can be set. | Not selected | Not selected | |
Setting of time to wakeup (Note 1) | Select whether to specify the time to restore from standby/sleep.
When Yes is selected, time frame should be specified. The default is 12pm. | No | No | |
Setting of time to standby or hibernate again | Select whether to specify the time to shift to standby/sleep again after restoring from standby/sleep.
When Yes is selected, the time frame should be specified. The default is 30 minutes later. | No | No | |
System goes into standby, if PC turns on in the specified time | When PC is started at specified time, select it when shifting to system standby. When it is selected, the following items can be set. | Not selected | Not selected | |
Time of Displaying Warning Messages | Set the time to display warning message. | 22:00 | 22:00 | |
Warning Message | Set the warning message using up 512 fullwidth characters or 1024 halfwidth characters. | (Note 2) | (Note 2) | |
Response Waiting Time for Warning Messages | Set the time to wait when there is no response in warning message with a value within 1~60 minutes. | 5 | 5 | |
Number of warning message display when deferred selection is performed | When Delay is selected in warning message, set the times to display warning message again within 0~10 times. | 3 | 3 | |
Interval of warning message display when deferred selection is performed | When Delay is selected in warning message, set the interval to display warning message again with a value within 1~60 minutes. | 20 | 20 | |
For the anti-virus software of the following vendors, even if No is selected in Setting of time to wakeup, it can still restore automatically before the scheduled scan.
Endpoint Protection 12.1 of Symantec Corporation
VirusScan Enterprise 8.7i/8.8 of McAfee Corporation
Virusbuster Corporate Edition 10.0/10.5/10.6 of TrendMicro Corporation
When the anti-virus software apart from the above is used, select Yes in Setting of time to wakeup and specify the time.
For characters that cannot be entered in warning message, refer to "1.2 Main menu".
The initial value of warning message is as follows.
Shift to power saving mode (standby). Please save the file being operated.
Click the Apply button and save the settings.