This section describes how to install a new Management Server and Master Management Server of Systemwalker Desktop Keeper.
When installing for the first time, the Management Console will also be installed.
There are two ways to install the Management Server or Master Management Server:
Installation using the wizard
Silent installation
If the old version of the Management Server/Master Management Server has been installed, when installing Management Server/Master Management Server of V15.1.0, refer to "Chapter 4 Upgrading".
Note
Upon completion, the primary administrator (secureadmin) password will be set as follows in the Server Settings Tool, Backup Tool, and Restoration Tool.
secureadmin initial password: secureadmin
Also, if a database is constructed during installation, the user ID and password will be set for the Management Console and Log Viewer.
Management Console/Log Viewer user ID: systemadmin
Management Console/Log Viewer password: systemadmin
When logging after installation using the initial password, the user will be prompted to change the password. Follow the prompt to change it.
The password is recommended to be at least eight characters long and contain a combination of alphanumeric characters and symbols. It is recommended to change the password periodically.
Refer to the "Operating Environment" in the Systemwalker Desktop Keeper User's Guide to confirm if the required disk capacity can be ensure in the drive specified in the installation target of database related files.
Refer to "Operating Environment" in the Systemwalker Desktop Keeper User's Guide to confirm "Products that cannot be used in mixture".
Refer to the "Port Number List" in the Systemwalker Desktop Keeper Reference Manual to confirm the port numbers being used.
When copying the Systemwalker Desktop Keeper installer from the DVD-ROM to a local disk, ensure that the target path does not contain double-byte characters.
Installation will not be possible if any of the databases below remain in the system:
Symfoware RDB SWDTK
Symfoware RDB SWDTK2
To check if one of these databases remains in the system, click Control Panel > Administrative Tools > Services.
If you install Systemwalker Desktop Keeper in an environment where Systemwalker Desktop Keeper is already installed, services that manage iOS devices will automatically stop.
In this case, you cannot use the services that manage iOS devices until you restart the operating system.
Steps to install a Management Server/Master Management Server are as follows. In addition, refer to the Systemwalker Desktop Keeper User's Guide for information on the operating environment.
Log in to Windows with a user that belongs to the Administrators group or a user that belongs to the Domain Admins group. If other applications are being used, close them.
After the DVD-ROM of Systemwalker Desktop Keeper is inserted into the PC, the installer window will be displayed. Select Management Server/Management Console Installation.
If the above-mentioned installer is not started, start "swsetup.exe" from the DVD-ROM drive.
After the "Welcome to use Systemwalker Desktop Keeper Server installation" window is displayed, click the Next button.
The Select the installation target window is displayed.
If the installation target displayed is not to be changed, click Next.
If the installation target displayed is to be changed, click the Browse button of the folder to be changed, and click the Next button after the folder has been changed.
The installation folder of each component is as follows:
Management Server or Master Management Server: installFolder\Server
Management Console: installFolder\MngConsole
Database-related files: installFolder\DB
Log Analyzer linkage commands: installFolder\LogAnalyzer
Note
When the installation target folder of server functions and the installation target folder of the following database related files are taken as compressed or encrypted target, the running of the application might be affected. Do not perform compression or encryption settings.
Specify Installation Target Folder using up to 85 halfwidth characters, except for commas (,), semicolons (;), number signs (#), and halfwidth kana (it cannot contain fullwidth spaces, hiragana, katakana, and kanji).
The specified drive must be NTFS-formatted (it cannot be a network drive).
The Installation parameter settings window will be displayed.
Enter the required information, and click Next.
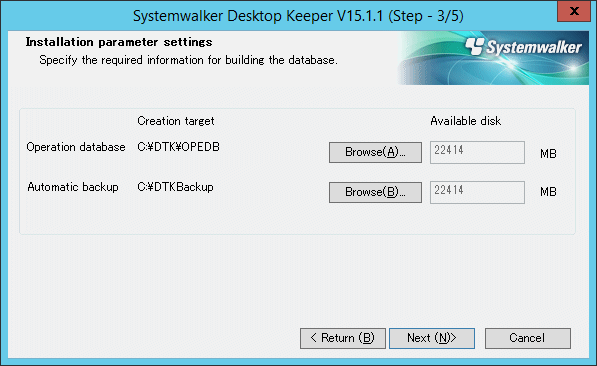
Item | Description |
|---|---|
Operation database > Creation target | Specify the database creation folder. It must meet the following conditions:
|
Automatic backup > Creation target | Specify the automatic backup folder. It must meet the following conditions:
|
Operation database > Availabe disk | Displays the disk availability of the specified operation database creation folder. |
Automatic backup > Availabe disk | Display the disk availability of the specified automatic backup creation folder. |
Note
For Operation database > Creation target, and Automatic backup > Creation target, estimate the required database availability beforehand using the database availability estimation tool, and specify a drive with sufficient disk availability.
Note
The initial values of automatic backup/deletion are set as follows:
Automatic backup: Use
Task name: DTK_Auto_Backup_Command
Backup folder: Folder specified during installation
Schedule type: Once daily
Execution start time: 0:00
Save period: 30 days
With these settings, the data will be saved for 30 days, and then deleted after that (31 days or longer).
Refer to "3.1.2.2 Automatic Data Backup and Deletion" for details on each item and changing the settings.
The "The installation preparation is completed." window is displayed.
When starting the installation, click the Install button to start installation.
When confirming the set content or wishing to modify it, click the Return button to reset.
The message below will be displayed. Click OK and continue with the installation process.
Register the following as login information of the Server Settings Tool:
 User ID: secureadmin
 Password: secureadmin

Register the following as login information of Management Console/main menu:
 User ID: systemadmin
 Password: systemadmin
The message below will be displayed. Click OK and continue with the installation process.
Upon completion, a window informing that the installation completed successfully will be displayed.
Installation will continue until the window is displayed, so wait until completion.
The message below will be displayed. Click Finish.
The installation of Systemwalker Desktop Keeper management server was completed.
Upon successful completion, the confirmation window will be displayed.
To use the program, click Yes. The operating system will restart.
Note
Silent installation of the Management Server or Master Management Server can only be performed when you are performing installation for the first time.
When performing silent installation in an environment where the Management Server or Master Management Server will coexist with the Log Analyzer Server, you should install the Management Server or Master Management Server first.
Installation process must not be interrupted during silent installation.
Follow the procedure below to perform silent installation of the Management Server or Master Management Server:
Create an installation parameter CSV file.
If you are performing installation using the default values for all parameters, this step is not required.
Refer to "A.1.1 Installation Parameter CSV File" for details.
Use the parameter setup command to create a response file.
If you did not create an installation parameter CSV file in step 1, this step is not required.
Refer to "A.1.2 Parameter Setup Command" for details.
Use the silent installation script to execute installation.
Refer to "A.1.4 Silent Installation Script" for details.
Check the installation result.
Check the returned value and message from the silent installation script.