You will now add some additional functionality to your application to allow you to add, delete, and update records in the table.
Make sure that you have closed the application and are back in the Form Editor on MainForm (move the mouse to MainForm in the Project Manager window, right-click the mouse on it and select Open from the pop-up menu).
You are now going to add three additional command buttons to the form. When you are finished, it will appear as follows:
Figure 8.24 The form with three new command buttons added
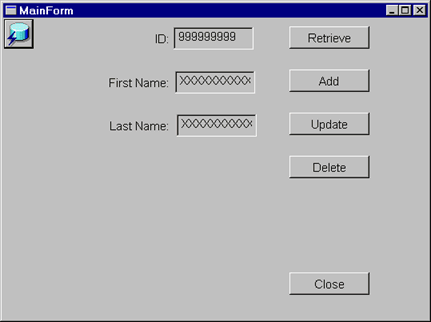
Add the three command buttons (Add, Update, and Delete) as shown, by selecting the CommandButton Control icon in the Toolbox palette and dropping each button on the form in the appropriate location.
Open the Properties dialog box for each command button and change the caption to the appropriate button name shown in Figure 8.24. Additionally, change the command button object names to PUSH-ADD, PUSH-UPDATE, and PUSH-DELETE, respectively, by selecting the Common tab and typing the appropriate name in the name field.
Once these three new command buttons have been added, you are ready to write the event procedures to implement their intended function.
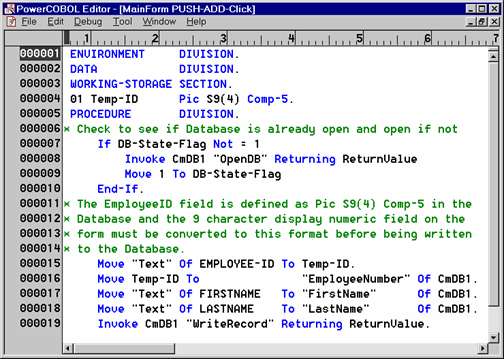
It is worth noting that the event procedure for all three new command buttons will be identical except for the second to last line in each event procedure, which calls the appropriate database function.
Bring up the Click Event Procedure for the Add command button in the Editor by right clicking the mouse on the Add button and selecting Edit the event procedure from the pop-up menu. Select the Click event from the secondary pop-up menu.
Type in the code as shown in the following example:
Figure 8.25 The event procedure for the Add command button

Since the event procedure code for the next two command buttons is almost identical, you will copy this code and then modify it in the new event procedures.
Save the edit session for the Add button, but do not close the Editor.
Move the mouse back to the MainForm form and right-click on the Update command button. Move the mouse to Edit the event procedure and select the Click event from the secondary pop-up menu.
This brings up an Editor window for the Click event on the Update command button. In this new edit session, delete all of the code, by selecting Select All and then Delete from the Edit menu.
You should now have a completely blank Editor window. Now move the mouse back to the previously opened Click event procedure for the Add button.
Make a copy of this window's entire contents by selecting Select All and then Copy from the Edit menu. This places a copy of the entire event procedure onto the clipboard.
Now move the mouse back to the empty Editor window for the Click event for the Update button and click within the top left of the empty window edit area to place the cursor there.
Select Paste from the Edit menu, and the entire event procedure is now copied into this window. You need now only change a single line of code in this new event procedure. You need to invoke the RewriteRecord procedure instead of the WriteRecord procedure of CmDB1 on Line 17. Make this change as follows:
Figure 8.26 The event procedure for the Update command button
Save and close the edit session for the Update command button, but leave the edit session for the Add command button open, as you will copy the code one more time for the Delete command button's Click event.
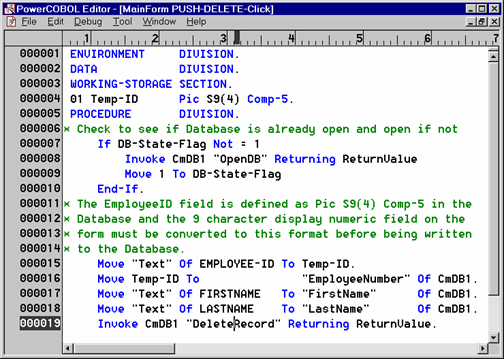
Repeat this same process for the Delete command button. Bring up an Editor window for the Delete command button's Click event, delete all of the code, and copy the code from the Add command button's Click event procedure.
Now change Line 17 from:
Invoke CmDB1 "WriteRecord" RETURNING ReturnValue
to:
Invoke CmDB1 "DeleteRecord" RETURNING ReturnValue
The code for the Delete command button should appear as follows:
Figure 8.27 The event procedure for the Delete command button
Save and close the open edit sessions for the Add and Delete command buttons.
You have completed the enhancement process. Notice how relatively straightforward and simple it was to add a significant amount of new functionality to your application using PowerCOBOL!
Save your work (close the Form Editor and select Save from the File menu).
Right-click the mouse on the project name in the Project Manager window and select All Rebuild to rebuild the application.
If you receive any compile errors, go to the appropriate place(s) to fix them, save the project and click on All Rebuild option again.
When you have a clean build, click on the Run button (or select Run from the Project menu) and re-execute the application.
Experiment around a bit. You will find that you can now retrieve, update, add, and delete records in the table. You may even find PowerCOBOL performing some error checking for your application that you did not have to program in.
For example, try to add a duplicate record, and you should receive the following error dialog:
Figure 8.28 A PowerCOBOL error message on add duplicate key attempt
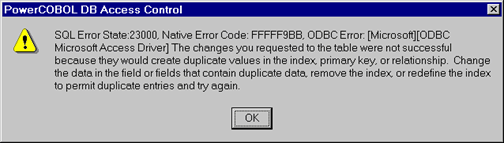
Note that the application you have just built does not have any error checking logic in it. You can easily implement this by examining the ReturnValue data item after each call (Invoke) to a database function.
You should now have a good understanding as to how to write an ODBC application in PowerCOBOL.
For more sophisticated applications, embedded SQL may be used with systems such as Microsoft's SQLServer to create client/server ODBC applications.