You will now add a second push button to the form. This push button will be programmed to print the current contents of the form (window) when selected.
You will also see the powerful drag and drop editing integration between the PowerCOBOL tools. This feature allows you to drag controls over to COBOL scriptlet editing sessions to help you construct your code.
Make sure you have opened the Hello application for form editing.
Select the PowerCOBOL Command Button Control Icon ![]() from the Toolbox palette by clicking on it.
from the Toolbox palette by clicking on it.
Move the mouse back over to the form and place the new push button to the right of the current Hello push button.
Edit the new push button's properties and change its caption to "Print".
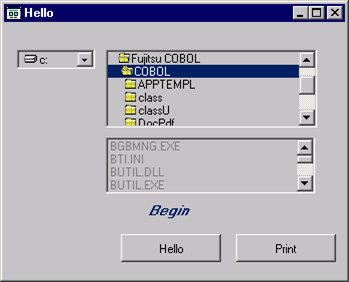
The Hello form should now look something like the following:
Figure 3.25 The Hello form with the Print push button added

Select the PowerCOBOL Print control icon ![]() from the Toolbox palette to install support for printing.
from the Toolbox palette to install support for printing.
Move the mouse back to the form and paste the Print control icon near the bottom left corner of the form.
This icon will not display at run-time. It is only present in the development window to remind you that you have elected to add printer support to the application. Therefore it does not actually matter where you paste it on the form.
You will now write the code to implement the printer support. The behavior you want is that any time the user clicks on the Print push button; the contents of the current form are printed.
It is a good idea to set a couple of the printer properties to ensure you have the correct paper type and printer orientation selected.
Move the mouse to the Print push button (not the Printer icon) and click once on it with the right mouse button to display a pop-up menu. Move the mouse to Edit Event Procedure and select the Click event from the secondary pop-up menu.
This will display the Editor on the Click event procedure code. You are going to drag and drop an icon from the Hello form into the Editor window.
In the Editor window, move the blinking cursor to column 12 of the blank line under the PROCEDURE DIVISION statement.
Make sure that you have repositioned the Editor window on your desktop so that you can see both the portion of the form being edited with the print control icon you just added and also the event procedure code in the Editor window.
Without closing the Editor window, move the mouse back over to the Hello form and over the print control icon you previously pasted there. Left-click once on this icon and hold the button down. Now attempt to drag this icon to the Editor window and drop it anywhere in the event procedure code.
This should cause the text "CmPrint1" to be inserted at the cursor position in the Editor, and to highlight it automatically. "CmPrint1" is the object name of the print process in this application.
Now right-click once on the highlighted string "CmPrint1" in the Editor window to display a pop-up menu.
Click on Insert Property near the bottom of the pop-up menu. This will display a secondary pop-up menu listing all of the available properties for this object.
Select the PaperType property. This will insert some additional code into the Editor at the appropriate location. The line you have begun to create should now look like:
"PaperType" OF CmPrint1
Now modify this line as follows so that it reads:
Move POW-PAPERLETTER TO "PaperType" OF CmPrint1.
This technique illustrates how to use drag and drop from the form being painted to the Editor to assist in creating supporting COBOL scriptlets. Note that "POW-PAPERLETTER" is a PowerCOBOL supplied constant that you can use instead of being forced to find the actual binary value required in Windows for this property. PowerCOBOL supplies a number of these constants to make programming easier. See the help system for further information on PowerCOBOL supplied constants.
You should also note from this example that you can highlight any PowerCOBOL application object name in the Editor and right-click once on it to display its associated methods and properties. You will find this useful in the future if you do not know specific properties or methods available for given objects.
Now go ahead and finish coding the event procedure code and comments as noted below. You may type these in manually or use the drag and drop feature and/or the pop-up menu options noted previously.
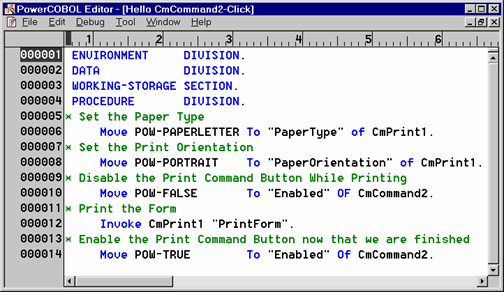
When you are finished, your event procedure code (scriptlet) should look something like the following:
Figure 3.26 The event procedure for the Print push button event (printing the form)

Save the event procedure code and close the window by clicking on the close (X) button in the upper right corner. You may now save, rebuild and execute the application.