You are going to move the static text control (CmStatic1) toward the bottom of the form just above the Hello push button to make room for the new items you are going to add. You can resize the form if needed as well.
Use the mouse to select and drag the CmStatic1 text control towards the bottom of the form so that it is just above the Hello push button.
Your form should now look something like the following:
Figure 3.20 The rearranged Hello form
You are going to use the existing text control (CmStatic1) to display file names complete with drive and path. This means you need to change the font size back to a smaller point size. The reason for the smaller font size is to accommodate fully qualified file names that will be displayed in it.
Change the Font property for CmStatic1 to a size of 8 or 9 points. You also need to widen this text control to make room for long file names.
Click on the CmStatic1 control to select it and widen it to nearly the entire width of the form.
You are now going to add three new controls from the Toolbox palette.
Select the PowerCOBOL DriveList Control icon ![]() from the Toolbox palette by clicking on it.
from the Toolbox palette by clicking on it.
Move the mouse back to the Hello form and place the DriveList control near the top left corner of the form. Now right-click once on this new control to display a pop-up menu. Select Properties. Make sure the Auto Size option is checked and click on OK.
Select the PowerCOBOL FolderList Control icon ![]() from the Toolbox palette by clicking on it.
from the Toolbox palette by clicking on it.
Move the mouse back to the Hello form and place the FolderList control to the right of the DriveList control.
Select the PowerCOBOL FileList icon ![]() from the Toolbox palette by clicking on it.
from the Toolbox palette by clicking on it.
Move the mouse back to the Hello form and place the FileList control immediately under the FolderList control.
Now resize and move these three new controls until the Hello form looks something like the following:
Figure 3.21 The Hello form with the three new controls added

You are now ready to begin writing the event procedure code to tie the behavior of these three new controls together.
Right-click once on the DriveList control to display a pop-up menu. Move the mouse to Edit Event Procedure and a secondary pop-up menu appears.
Move the mouse to the SelChange event and left-click once on it. This displays the Editor for the event procedure for this event. This event will be triggered whenever the current drive selection is changed.
If a user selects a different drive, you need to ensure that the FolderList control display is updated with a list of folders on the newly selected drive.
To create this behavior, enter the following line of code in the PROCEDURE DIVISION:
Figure 3.22 The event procedure code for the DriveList SelChange event
Save this code and close the Editor. Note that whenever the PATH data field of the CmFolder1 control is updated with a new path name, it automatically retrieves a list of file names in the new path and displays them.
Any time a user clicks on a different drive in the DriveList control, the drive will be placed in the SELSTRING data item.
By moving SELSTRING of the DriveList to the PATH data field of the FolderList control, you ensure that the FolderList is automatically updated whenever a new drive is selected.
This single line of code placed in the appropriate location becomes a very powerful method to tie the behavior of these two separate controls together.
You now need to ensure that whenever a user clicks on a different folder in the FolderList control, the FileList control is updated with a new list of files.
Move the mouse over the FolderList control and right-click once on it to display a pop-up menu. Move the mouse over Edit Event Procedure and click on the Change event. Notice that we are going to use the Change event instead of the SelChange event so you can see the difference. By using the Change event, the list of files in the FileList control window will only change if the user double-clicks the mouse on a new folder to open it up. Simply selecting a new folder by using the up arrow keys or by left clicking only once on it will not open the folder - only double clicking on it will accomplish this and force the file list to be updated to reflect the contents of the new folder. If we used the SelChange event instead, the file list would be updated upon any new selection of a folder.
This should display the Editor with the event procedure for this event. Enter the following code:
Figure 3.23 The event procedure code for the FolderList SelChange event
Once again, a single line of code becomes very powerful synchronizing the folder list control to the file list control.
Save this code and close the Editor. The FileList control behaves in a similar fashion to the FolderList control, in that whenever its PATH property is updated, it automatically retrieves a list of files in the new path and displays them.
This means that you need to ensure that whenever a user selects a different folder in the FolderList control, you should move the new path to the FileList control.
Because the FolderList control returns only the name of the current folder (and not its current path), you need to string together the current path along with a "\" and the new folder name to create the new path name.
We need to check the path we receive to see if it already contains a "\" on the end to prevent adding another "\" and creating an error. The only case where this may occur is when the path contains a root drive only (e.g. "C:\"). So we will add some logic to look for a space in the 4th character position in the path string which will signal us that we do indeed have a root drive only in the path and need to delete the "\" in character position 3.
Finally, you want to implement some behavior to ensure so that whenever a user selects a file name from the FileList control, the new fully qualified file name appears in the CmStatic1 text control.
Move the mouse over the FileList control and right-click once on it to display a pop-up menu. Now move the mouse to Edit Event Procedure and select the SelChange event.
This will display the Editor window for the SelChange event procedure. Enter the following code:
Figure 3.24 The event procedure code for the FileList SelChange event
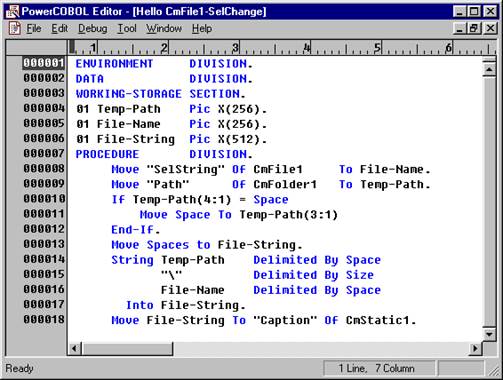
Save this code and exit the Editor. In order to create the fully qualified file name selected, you are retrieving the current PATH from the FolderList control and stringing it together with a "\" and the actual file name selected from the FileList control.
You are then moving this fully qualified file name to the text area of the CmStatic1 control.
You are now finished with this round of enhancements. Close the Hello form edit session and go back to the Hello application in the Project Manager window.
Save the project and perform a Rebuild All on it to create a new executable. Correct any errors as needed until you have a clean build.
Now execute the application. You should be able to move around the disk drives and directories on your system. If you select a specific file, its fully qualified name should appear in the text box near the bottom of the screen.
When you are finished experimenting with the application, close it.